Alright you guys, I am a gross amateur when it comes to applying nail polish, forget gorgeous nail art! (I’m in constant awe of my friend Kaitlyn who manages to pull out some insanely beautiful nail art on her gorgeous nails!) However, for whatever unknown reason, my nails have gotten long and strong recently, so I find myself wanting to do *something* with them.
And the easiest thing I know is a French tip because it’s basically fool proof since I use the nail stickers (I buy them for like 99 cents on Ebay!).
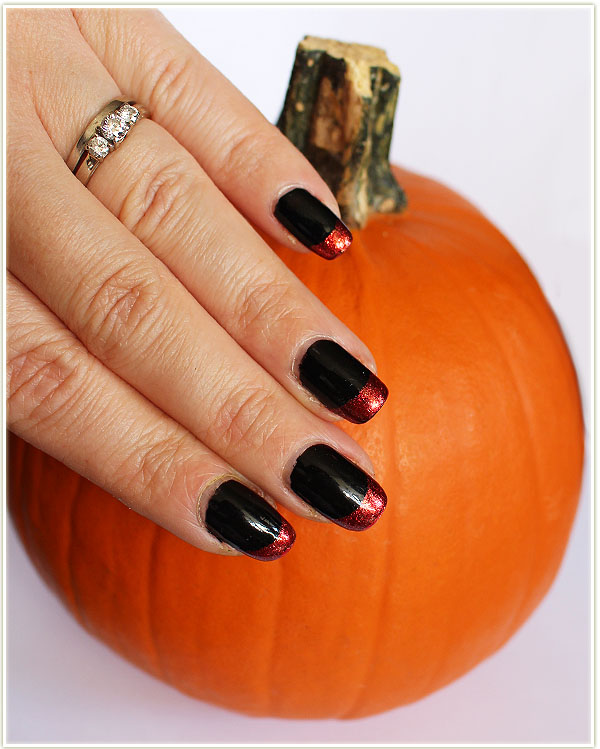
I’m personally not interested in the usual French tip colours of nude and white, so I opt to switch it up and play with colour. Since Halloween is around the corner, I wanted to stick with a seasonal orange and black nail. And since I did this just for me and wasn’t planning on doing a post about it, I really don’t have a step by step guide for you guys, but I can tell you about some of my favourite products for nails!
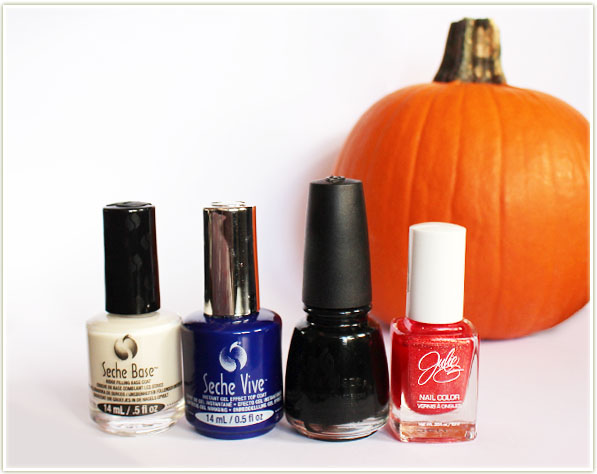
I don’t know how I did any nail polish whatsoever before I discovered Seche Vive/Seche Vite back in August. Seche Vive is the new gel-like fast drying finish, but I think a lot of people are already aware of Seche Vite (the original). This stuff dries so freaking fast and makes my manicure last at least 7 days (but really it’s usually closer to 10-12 days). I wish I’d gotten on the bandwagon a lot sooner because in the past my nails were always chipped by day 2!
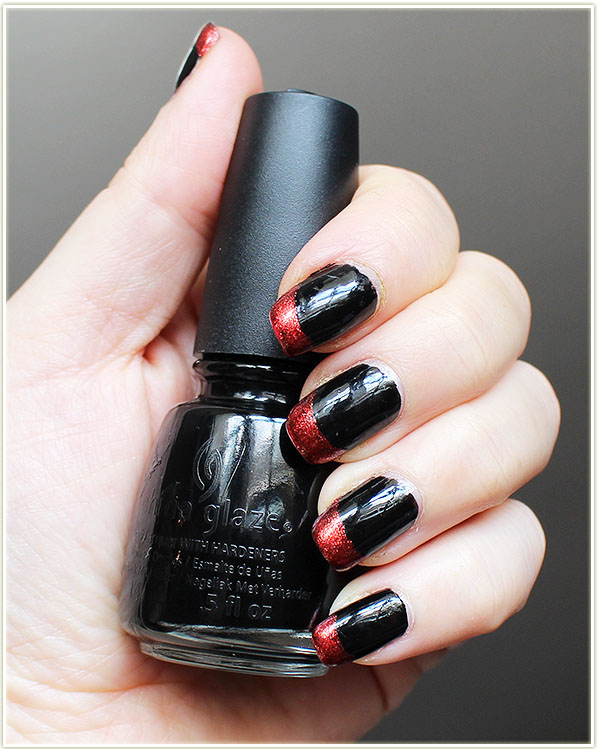
The black nail polish I’ve been using for years is China Glaze‘s Liquid Leather. It’s not a single coat black, but it’s pretty darn close. (And if you watch Simply Nailogical, you’ll know that this one was one of the better black polishes in her recent roundup. It’s also one of the easiest to get your hands on that’s for sure!) One of the reasons I like this so much is I’ve probably had it for 4-5 years and although I can’t tell how much I’ve finished in the bottle, I can say that the formula remains just as fluid as the day I got it. No gunking up in this bottle!
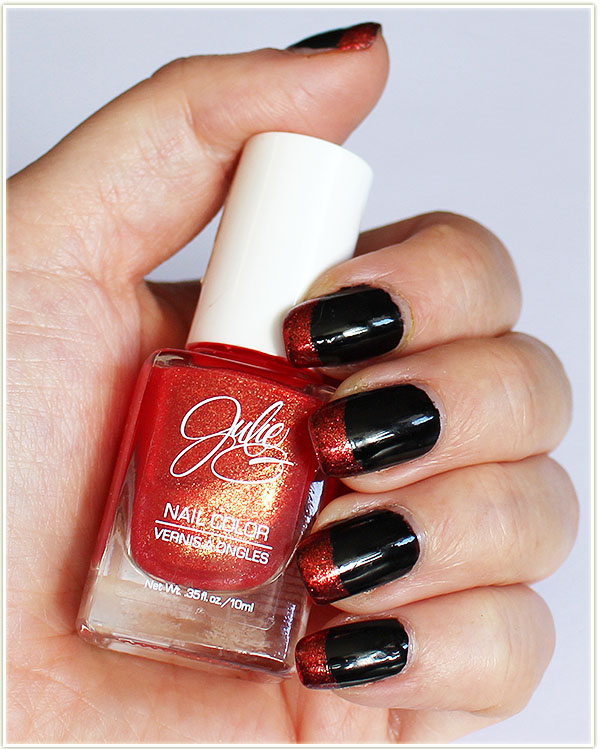
Although not available in Canada, Julie G‘s nail polish line is one I look forward to buying whenever I’m in the US and have access to a Rite Aid. Julie G is one of the original YouTubers I remember watching when I first got into the beauty world. When I first spotted her line while on vacation, I was happy to support her… and then even happier to discover that I really, REALLY liked her shimmery polishes (I’ve only tried one cream polish and I didn’t love it as much). This particular shade is Albuquerque and I’m drawn to it because it’s not only a stunning shimmery metallic orange, but it’s also the city Julie lives in as well as being the city that Breaking Bad took place in. (God I miss that show soooo much!)
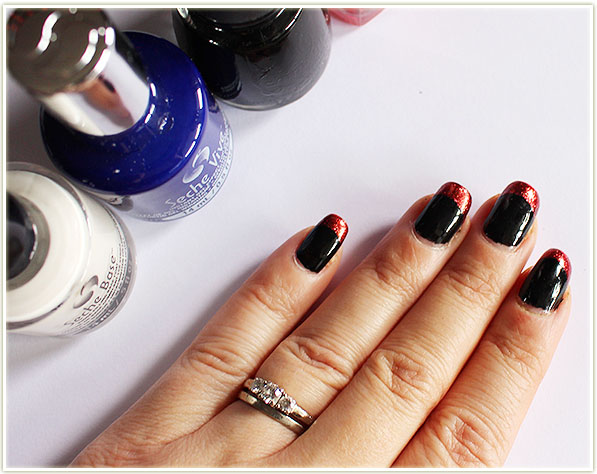
In short, how I got this nail look is first by coating my nails with the Seche Base. Waiting five minutes, coating with one layer of black polish. Waiting another two minutes and then applying a second layer of black polish. I then coated my nails with a thick layer of Seche Vive so I could use the nail stickers soon thereafter. Thirty minutes and a load of laundry later, I then applied the French tip nail stickers, did two coats on the tips of my nails with orange polish, peeled off the stickers and re-coated them with Seche Vive.
This is the easiest time I have ever had doing French tips! In the past, I always had problems with the stickers yanking off the base layer polish. This time Seche kept my base layer intact! As you can maybe see from the ridiculous sheen in the photos, Seche Vive adds one hell of a glossy topcoat to my nails. It’s really, really nice to look at in person, but it’s hell on a camera lens!
Although this post was accidental and I hadn't actually done my nails with a post in mind (seriously, I think this is my first ever nail post), please note that the Seche Base and Seche Vive products were sent to me for consideration.
Nail art, WOO! 😀 And I love what you did!
I never tried Julie G’s nail polishes, but the fact that you were able to cover over black with two coats is awesome! If I ever come across her line I’ll definitely grab a few.
Chantal recently posted…Shop and Support Breast Cancer Awareness
Oh interesting – I never thought about whether or not it would be hard to cover a black polish. (lol I’m definitely new at this aren’t I? haha)
Hah, the easiest nail art ever! 😉
Beautiful! That Julie G polish is beautiful and definitely perfect for this time of year!
Robyn recently posted…Mani Monday: Julep Sue & Jocelyn
Yeah it’s definitely seasonally appropriate!
Hi Chelle!
Love the nails! They are definitely Halloweeny. I have a very similar orange (I think) by Butter London. I never do the tips, though, because I file my nails all the way down. I also love black nail polishes. I just had Illamasqua Creator, which is black with silver sparkle. It’s looks awesome, especially under the glassy top coat.
You did 2 coats of Seche Vive?! That’s interesting. I just did my nails yesterday while watching “Bourne Supremacy” ;))) and I basically did my normal thing – base coat, 2 color coats, and a fast drying top coat (not Seche Vive, though, some generic brand). I always make sure the in-between coats are dry by tapping nail on nail lightly (it it’s doesn’t stick, I’m good to go). I let the nails dry for about an hour, but I still got dings at the tips. Grr! But I was able to smooth them back out, and they are not really noticeable.
Tanya recently posted…First Ever Attempt at French Braid
Hey Tanya!
I have a love/hate relationship with long nails. I love the way they can look, but I also get super annoyed when I break one. They were farrrr less hassle when they were shorter!
I did two coats with Seche Vive because I needed the black to dry quickly before I could put the nail sticker on. All the times I had tried it without a top coat and a nail sticker, I’d pulled the base layer off! 🙁
Yay for nail posts!
I too am impressed that one coat of that orange shows so well over black, so many you have to do the tip colour, then use the guides and paint below them for a black nail because they don’t show over black
Eithne @ Tea & Nail Polish recently posted…Quo by Orly Breathable Stronger Than Ever
Haha all the nail bloggers are like YASSSSS NAILS!!!!! And I’m just here like “oh god don’t look at my cuticles!”
It was two coats of orange! But yes, it did cover the black quite well. I had NO IDEA that some people did it the way you described. That’s so much work!
Haha, I think I could create this too! Love the orange glitter against the black- this would be pretty year-round 🙂
Jen recently posted…Better than Cleansing? Taking the FaceOff Challenge
Honestly the quick dry top coat was the real saviour with this. Without it these nails would’ve just been a dented mess. Makes doing nail art so much easier!