Category Archives: Tutorials

Weekly Makeup Looks

More looks for you to peruse! I need to find a better title for this series. Maybe numbering them as I go? Hmmm….
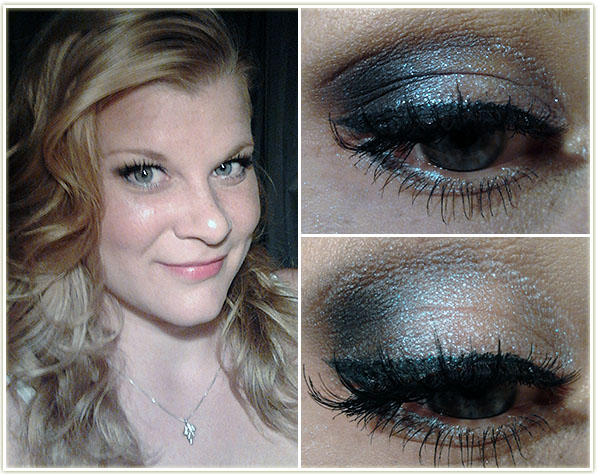
20131113wavesofwhite

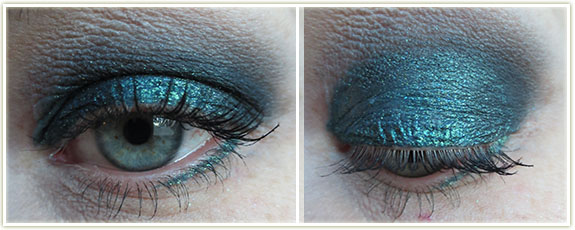
A night out look using my favourite glitter, Reflects: Transparent Teal!

Base: Urban Decay Primer Potion in Original

Eyeshadows: I applied the Maybelline Color Tattoo in Waves of White to the entire lid (do this in thin layers or the product can end up looking a bit bizarre). I then used MAC Contrast in the outer corner and blended it slightly into the crease, taking it about halfway across my lid. MAC Brule was used to highlight the brow.

And now for the fun part! I applied a thin layer of Too Faced Glitter Glue over the lid colour, waited for it to go tacky (keep your eyes shut while you do this or you’ll transfer the glue everywhere!), and then patted MAC Reflects: Transparent Teal onto the glue. A word of warning: Use this glue in thin layers otherwise the glitter is likely to crease.

I also smudged the Color Tattoo along the lower lashline with a hint of Contrast at the outer edge.

Liner: MAC Midnight Blues fluidline

Mascara: CoverGirl Clump Crusher in Very Black (water resistant) on the upper and lower lashes.

Lashes: Ardell 102 Demis

Eyebrows: MAC Omega 

Lips: Nothing!

Cheeks: Tarte Amazonian Clay Blush in Blissful

Bronzer: Hard Candy Hula Hula

Foundation: Revlon Colorstay in 220 Natural Beige
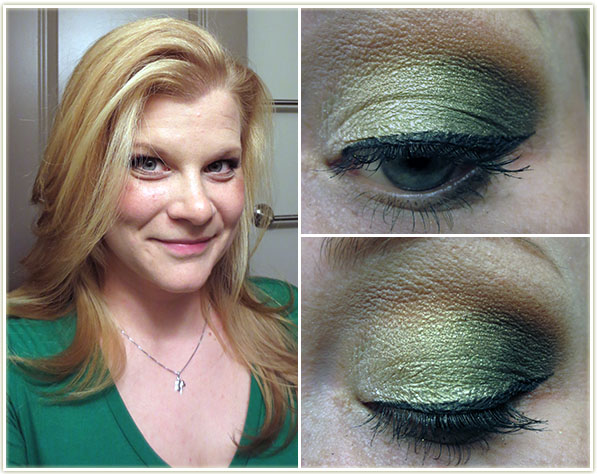

20131113maybellinecopy

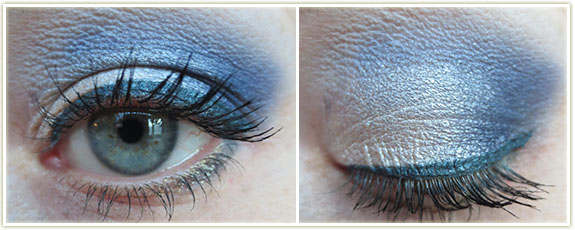
Have to give credit where credit’s due on this one and the lovely Emily Noel of Beauty Broadcast is responsible for this gorgeous combination. This look involves the limited edition Maybelline quad in “Smokey Cinnamon” from their Fall 2012 collection. I have worn this look many times since I first saw her video and will continue to do so.

Base: Urban Decay Primer Potion in Original as the bottom layer. Maybelline Color Tattoos in Barely Beige (inner half of the lid) and Mossy Green (outer half of the lid). You don’t need to worry about blending the Color Tattoos as the eyeshadows will cover them up. I smudged Mossy Green under the lower lashline.

Eyeshadows: Using Maybelline‘s Smokey Cinnamon quad, I applied the very lightest beige shade to the inner third of the lid, the pale green to the center of the lid, and then finally the dark green to the outer corner. The light green will do a good job of blending together the Color Tattoos underneath.

Finally, I applied the brown colour in the palette into the crease to blend all the shadows together and create a nice fade to the brow. I think used MAC‘s Brule as a brow highlight.

Liner: MAC Blacktrack fluidline

Mascara:  CoverGirl Clump Crusher in Very Black (water resistant) on the upper and lower lashes.

Lips: Nothing!

Cheeks: Tarte Amazonian Clay Blush in Darling (from the Off the Cuff palette)

Bronzer: Revlon Photoready in Bronzed & Chic

Eyebrows: MAC Omega 

Foundation: Bourjois Healthy Mix Serum Gel Foundation in 52 Vanilla
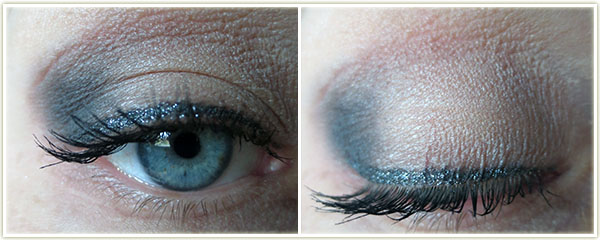

20131113kikoliner

The point of this look was to test out a new KIKO eyeliner I had and to create a dark outer corner without bringing the shadow in too close to the center of the lid.

Base: Urban Decay Primer Potion in Original

Eyeshadows: (All MACI first applied Shroom all over the lid, right up to the brow. Using a little bit of Print, I smudged the shadow into the outer corner of the lid. Unfortunately, it looked a little bit too stark, so I swept Haux into the crease to give my hooded eyes some definition.

Liner: The star of the show! I used KIKO Twinkle Eye Pencil in 06 to line my upper lashline with a very slight wing at the outer edge.

I cannot say enough good things about this eye pencil! It didn’t budge and the sparkles within the liner never fell onto my cheeks throughout the entire work day. If anyone remembers the original Hard Candy line (not the one currently in Walmart, even though it has the same name they are definitely NOT the same products) this pencil is near identical to the glitter liner they used to have in Cyber. I loved that pencil so much when I was in my teens, but with Hard Candy being completely redone as a company, that pencil is no longer in production. The other bonus is thatCyber had very definite fallout whereas the KIKO product does not!

Mascara: CoverGirl Clump Crusher in Very Black (water resistant) on the upper lashes.

20131113infallibles

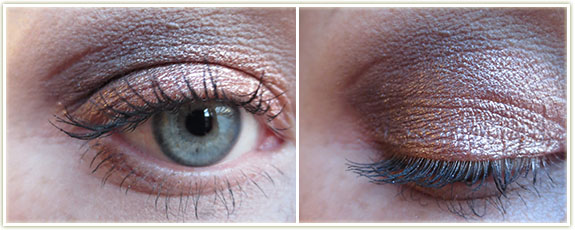
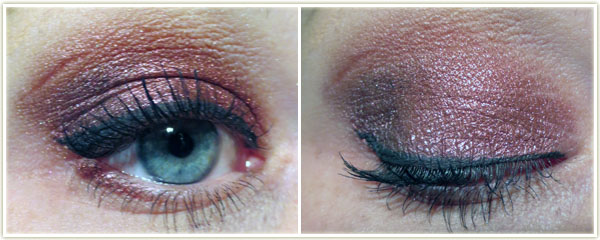
L’Oreal‘s Infallible eyeshadow in Golden Mahogany is a shade that I cannot even express how much the colour astonishes me. It’s a bit of a shame that the colour doesn’t pick up on camera quite as well as I see it with my eyes, but it’s a vibrant ruddy, rustic browned-red colour. It’s one of those shades that I actually gasped when I first swatched it. It seems that Golden Mahogany was a Canadian exclusive shade.

Base: Urban Decay Primer Potion in Original

Eyeshadows: I patted L’Oreal Infallible Eyeshadow in Golden Mahogany over the entire lid and then blended it with another brush through the crease. I then applied another L’Oreal Infallible in Burning Black (that’s Smoldering Plum for those of you in the US) into the outer corner but did not carry it into the crease. MAC Shroom was used to highlight the brow. I also used Golden Mahogany on the outer half of the lower lashline.

Liner: MAC Blacktrack fluidline

Mascara: CoverGirl Clump Crusher in Very Black (water resistant) on the upper lashes.

20131113heatelement

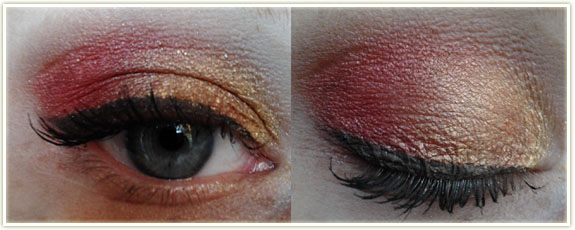
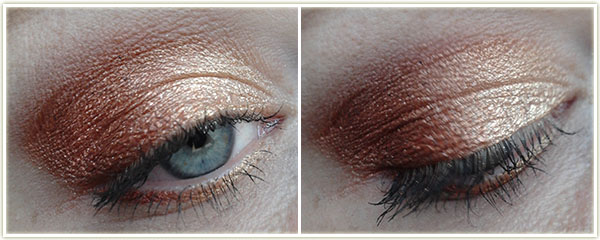
Hands down this is my favourite MAC mineralize eyeshadow (duo) ever.

Base: Urban Decay Primer Potion in Original

Eyeshadows: (All MAC) This is a super easy one. Spritz Fix+ (or water!) on a brush, then apply the lighter shade in the mineralize eyeshadow duo in Heat Element to the inner half of the lid and the copper (darker) shade to the outer half of the lid. I repeated this on the lower lashline with a smaller brush. Brule was used as a brow highlight and to blend out the upper crease.

Mascara: CoverGirl Clump Crusher in Very Black (water resistant) on the upper and lower lashes.


And that’s my latest roundup of looks I’ve been sporting!
Looks of the Past Week

20131106pink

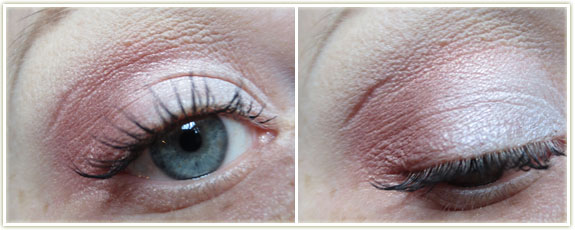
A quick, easy one before brunch on Saturday. My priorities were a) get out the door fast, and b) try out the new MUA palette I just purchased.

Base: Urban Decay Primer Potion in Original

Eyeshadows: The lid colour is from MUA‘s Pretty Pastels palette. Unfortunately the shades don’t have names, but it’s the top upper left corner one in the palette. It looks rather bland in the pan, but when you swatch it is has an amazing pinky duochrome. A duochrome, I might add, that did NOT show up on my lid very well! I then used MAC‘s Expensive Pink in the crease, with Haux in the outer corner to make it a bit more brown. Brule was used as a brow highlight.

Mascara: CoverGirl Clump Crusher in Very Black (water resistant)


20131106cateye

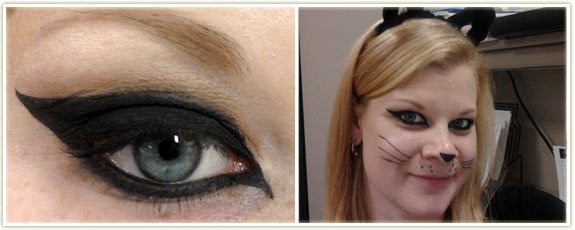
This is what I wore to work for Halloween since it was quick, easy and suitably work appropriate.

Base: Urban Decay Primer Potion in Original with NYX‘s Jumbo Eyeshadow Pencil inBlack Bean layered over top

Eyeshadow/Liner: There’s just not much to this look… I used MAC‘s Blacktrack fluidline to create the shape of the look and to ensure that I had a crisp line. Then I used Urban Decay‘s Blackout all over the lid and onto the liner to set everything. (It did, however, crease by the end of the day.) Both the gel liner and Blackout were used to line the lower lashline, with MAC‘s Feline Kohl Power pencil in the waterline.

Mascara: L’Oreal Voluminous Carbon Black in waterproof

I also used the gel liner to create the whiskers and nose… but I really wouldn’t recommend it as I kept smudging it throughout the day. A liquid liner would’ve been far better.


20131106thanksmel

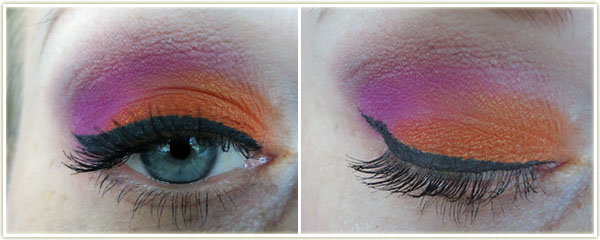
This one was a bit of a laugh – I was talking to a friend about eyeshadow combinations and how I felt like sometimes I came up with really bad colours that just don’t work well together. He responded with “what, like purple and orange?” My immediate response was that was exactly what I’d try out next!

Base: Urban Decay Primer Potion in Original with NYX‘s Jumbo Eyeshadow Pencil in Milk layered over top

Eyeshadow: I started by applying MAC‘s Sketch  into and above the crease (this is mostly used to blend out the next colour), and then use Sleek‘s Sugarlite in the crease, mostly covering up Sketch . I then applied Sleek‘s Strike to the lid with a bit of Inglot‘s AMC Shine 15 (fiery orange with gold sparkle) on top. MAC‘s Blanc Type was used to highlight the brow… annnnd then I decided I didn’t like the blending of the crease enough so I took a bit of Urban Decay‘s Naked and lightly swept that between the crease colour and the brow highlight.

Liner: MAC Blacktrack fluidline

Mascara: CoverGirl Clump Crusher in Very Black (water resistant)


20131106kiko

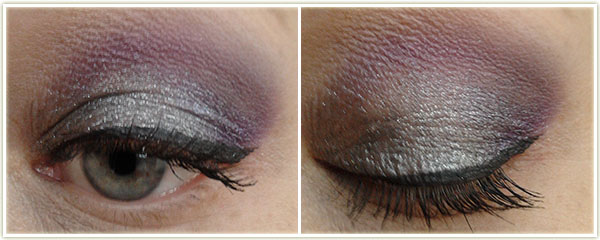
I was testing out new (to me) Kiko cosmetics that my mom had picked up while she was in Italy last month and here’s what I came up with.

Base: Urban Decay Primer Potion in Original

Eyeshadow: I applied Kiko‘s Smoky Look Eyeshadow in 09  (silver/grey) all over the lid and blended it up slightly into the crease. Using Kiko‘s Eyetech Look Eyeshadow in 206 (purple) I used the applicator that came with the product and placed that in the outer corner of the eye and then into the crease. Since the applicator on the Eyetech pencil/shadow was making it a bit difficult to blend out, I used MAC‘s Parfait Amour  at the top of the shadow in the crease and blended it towards the brow bone. Pretty sure I used Brule to highlight, but I’m not completely positive.

Liner: Maybelline Lasting Drama Gel Eliner in Blackest Black

Mascara: CoverGirl Clump Crusher in Very Black (water resistant)

Halloween 2013 – Sailor Moon

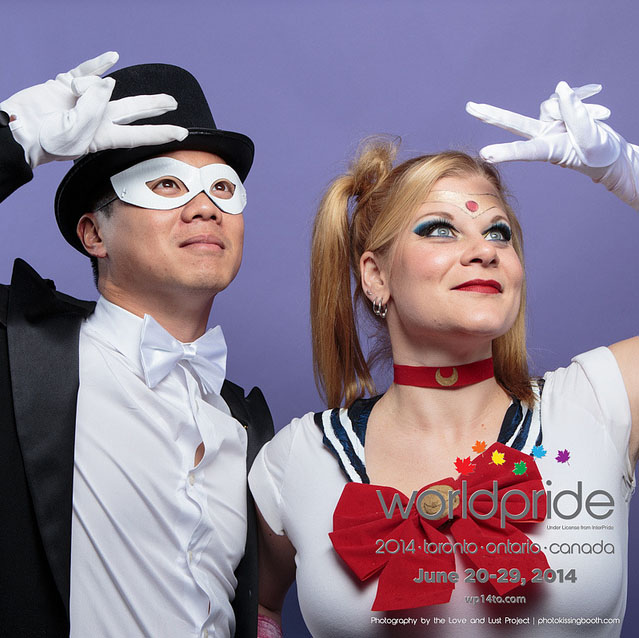
For Halloween this year, my friend suggested doing a joint costume. After a few suggestions (many of which were Final Fantasy-related on my end) we ended up choosing Sailor Moon and Tuxedo Mask.

It could not have turned out better.

Photo courtesy of www.photokissingbooth.com

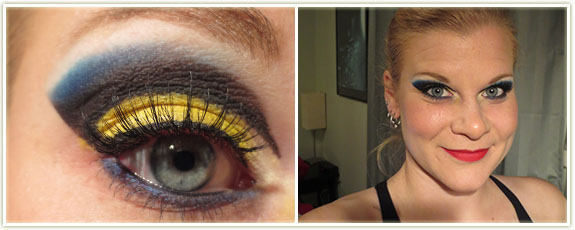
The eye makeup is primarily why I’m posting this, but I’ll go into costume details afterwards. I had originally thought to look for an anime eye tutorial, but none of them looked like they would work on my hooded eyes. After some searching I came across Cara’s (Vintage or Tacky) Sailor Moon inspired tutorial. I had watched her tutorial years ago, but had completely forgotten about it! I’m not even going to pretend that my copy of her look is bang on, as she’s quite clearly got far better skills than myself. But as soon as I saw that look I was like “oh hell yes, this is it”.

sailormooneye

I didn’t have all the same products, so here’s what I used:

Primer: Urban Decay Primer Potion with NYX’s Jumbo eyeshadow pencil in Milk on top. Primer Potion everywhere, Milk only on the lid.

Eyeshadows:  I first applied tape to the outer corner of my eyes to get a sharp edge. Urban Decay’s Blackout was used to carve out the cut crease, with Sleek’s Ink and Bolt (Matte 1 and 2 palettes) blended into the top of the edge to fade it out towards the brow. Sleek’sPow! was used to highlight the brow.

Moving on to the lid – I patted Sleek’s Bamm! all over the lid and topped it with a bright yellow shade from the Sephora Smokey Eyes 2 palette.  MAC’s Blacktrack fluidline was used to line the upper lash line and carve out the crease as well as extend it a bit further past my inner corner. Sleek’s Pillow Talk was used to highlight the inner corner of the eye.

I then took MAC’s Deep Truth and used it as a liner on the lower lash line, with Feline Kohl Power pencil on the inner rim.

Lashes: I didn’t curl my lashes as I knew I would be wearing false lashes and I find it harder to apply them if my lashes are already curled. L’Oreal Voluminous Carbon Black in waterproof went on first and Ardell demis were then applied.

Face: Revlon’s Colorstay liquid foundation (combination/oily) in 220 Natural Beige all over with very light bronzing from Revlon’s Photoready Bronzer in Bronzed & Chic.

Cheeks: Physicians Formula Happy Booster bronzer in Natural

Lips: (All MAC) Prep + prime for lips (I cannot recommend this enough! Without it my lip colour bleeds out of my lip lines even if I’m wearing a liner.) with Brick lip liner applied to outline and fill in the lips. Russian Red lipstick over top of all that finished the look. To make sure this lasted all night, I applied the lipstick once, blotted with a tissue and then reapplied the lipstick with a lip brush.

Other: The full face shot above is before I did my hair and before I suddenly remembered I had to paint on my crown! The crown was done rather quickly with L’Oreal’s Infallible eyeshadow in Goldmine (applied damp with water)  with slight shading from Urban Decay’s Half Baked. I used Inglot’s 382 (matte red) to create the crystal in the middle and then outlined the entire thing with Physicians Formula Ultra Black liquid liner.

As for my costume… let me first say I’d never even watched an episode of Sailor Moon before, although I had been very aware of the character while growing up. I had to do a decent amount of research into her costume to figure out how to put this all together and I watched my first Sailor Moon movie while putting this all together. Watching the movie definitely helped me get a feel for the character. In general, I got pretty lucky as I had most of the materials on hand. With no sewing machine or skills to speak of, this entire outfit was hand sewn haphazardly. It was time consuming, but it was a LOT of fun to make.

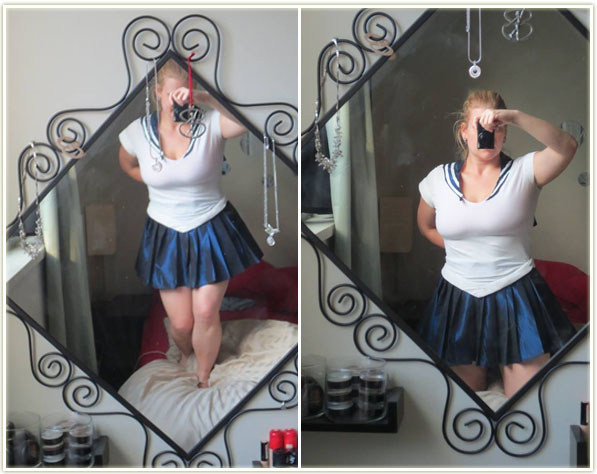
The skirt came from a full length formal skirt I had worn to some high school event over 14 years ago that I just happened to find at the bottom of a crate somewhere in the apartment. I couldn’t believe my luck! Since the skirt was rather large around the bottom, I cut the whole bottom off and proceeded to pleat it so that I not only would have a short skirt, but a decently pleated one to boot! The skirt was a disaster to create. I ended up sewing on the zipper backwards (and it’s still on there backwards!), the pleats wouldn’t stay put, (I ended using my flatiron to flatten the pleats as my proper iron just wasn’t cutting it.) and I was really iffy on the length. With no full length mirror in the apartment, I resorted to standing on the bed trying to get a proper look at the length in the makeup mirror! In the end, I think the skirt could definitely have been shorter.

Costume progress
Costume progress

The top was created from a long sleeve white shirt I had. I chopped off the sleeves and cut the bottom into a “V” shape. I then sewed in padding to make the edges stand out a bit by using some sticky medical badges that I layered over top of each other multiple times. The sailor cape was created by using the top half of the big skirt and the white stripes were hastily painted on with white acrylic paint. I then sewed it to the shirt so that it would stay put.

I lucked in with Christmas coming early to stores and picked up red Christmas bows at the dollar store to use for the front and back of the dress. White gloves with a painted red trim were probably the most expensive piece I bought (~$15). The boots were also salvaged from my teen years – I used to call them my “Buffy” boots and they were black suede. I painted them twice with red fabric paint, a white stripe at the top and used a gold marker to mark in the moon shapes. The choker was an extra strip of red Christmas bow that I snipped off and drew a moon on.

In all honesty, I didn’t have time for the hair bobbles, so I did my hair as best I could to resemble the meatball hairstyle of Serena/Usagi.

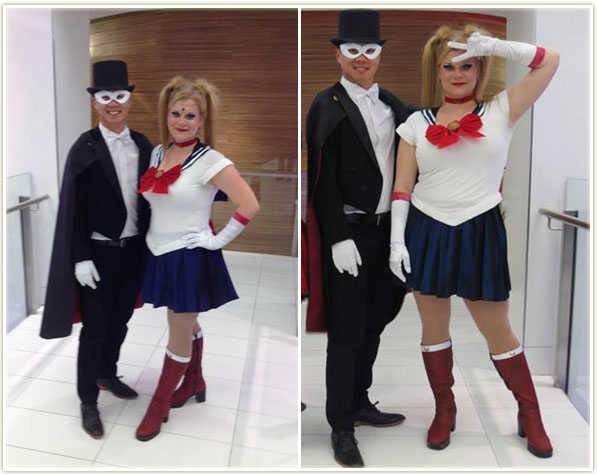
Full costumes! Tuxedo Mask with Sailor Moon

All dressed and ready to go, we hit up Church Street (they shut down the block for a street party every Halloween) and were stopped by easily 100+ people for photos. Never in my life have I felt like such a celebrity! There were times we couldn’t even move two feet forward through the crowd as people kept asking to take photos with us. The photo at the top of this post was done for free by a professional company and I was pretty happy to have a well-lit shot that shows off our costumes.

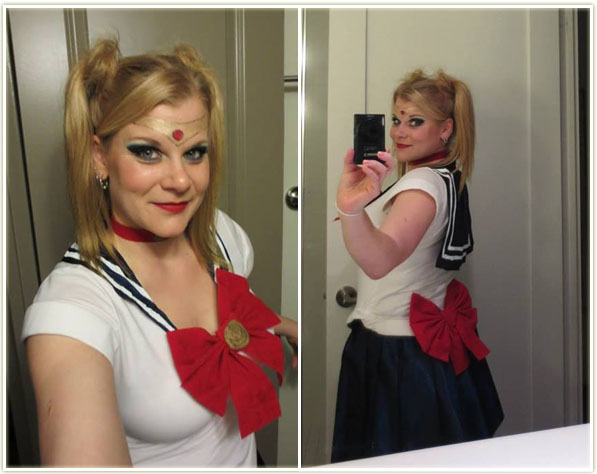
And of course, the obligatory bathroom selfies.

Everything stayed put the entire evening – I was so happy! I was pleased with how well the costume turned out, as I was expecting it to look quite shoddy. The only costume failure happened at the end of the night when the rubber soles of my suede boots completely cracked and disintegrated, probably due to their age. In the end I was happy I had painted them and was able to use my Buffy boots one last time!

Having never dressed up in a recognizable costume for the street party before, I have to say I love doing it and am definitely looking forward to it next year!

Eyeshadow Combinations

Another random assortment of looks I wore to work over the past week or so.


20131023

This one is a long time favourite of mine, but I can’t take credit for “inventing” it. I got the eyeshadow combination from Jangsara‘s Teal Tartan tutorial.

Base: Urban Decay Primer Potion (Original)

Eyeshadows: (All MAC products) Undercurrent pearlglide eyeliner was used as a replacement for eyeshadow  to cover the entire lid. Moonlight Night pigment was then used in the outer corner and swept into the crease. Brule was used to highlight the browbone.

Liner: Undercurrent was use to line the lower lashline from the outer corner to the middle of the lid.

Mascara: L’Oreal Voluminous Carbon Black (waterproof)


20131016

Base: Urban Decay Primer Potion (Original)

Eyeshadows: MAC’s Nylon was swept over the inner two-thirds of the lid with Sleek’s Ink (Matte darks palette) blended into the outer third of the lid and into the crease. I also angled it slightly so it came to a bit of a point instead of a rounded edge in the outer corner towards the brow.  MAC’s Brule was used to highlight the browbone.

Liner: MAC’s Midnight Blues was used on the upper lashline and flicked out slightly. Maybelline’s Color Tattoo in Bold Gold was used as a liner on the lower lashline with Sleek’s Ink very lightly applied to the outer edge.

Mascara:  CoverGirl Clump Crusher in Very Black (water resistant)


20131020

One of those “oh man, I have five minutes, throw something on quick” looks.

Base: Urban Decay Primer Potion (Original)

Eyeshadows: L’Oreal Infallible in Amber Rush applied all over the lid with MAC’s Midnight Madness (mineralize shadow from their Christmas collection several years ago) applied onto the outer third and into the crease. MAC’s Brule was used to highlight the browbone.

Mascara: CoverGirl Clump Crusher in Very Black (water resistant)

Oct. 2013 – Recent Looks I’ve Loved

eyes

This turned out near identical to another look I normally do using MAC’s Mineralize eyeshadow duo in Heat: Element that I got a few years back.

Base: Urban Decay Primer Potion (Original) with Maybelline’s Color Tattoo in Bold Gold layered over the inner two-thirds of the eye.

Eyeshadows: Sleek’s Sunset palette – the gold shade was used on the inner half of the eye, with the vivid  cranberry shade on the outer half of the eye. Urban Decay’s Buck was blended at the top of the crease. MAC’s Brule was used as a brow highlight.

Liner: MAC’s fluidline in Dipdown

Mascara: CoverGirl Clump Crusher in Very Black (in the water resistant variety, but I need to point out that is very NOT water resistant despite it being a fantastic mascara)


20131005

Looking at this now, I can see some creasing on the lid and these shots were taken right after application I believe. Regardless, I love that Color Tattoo (Waves of White) so in general I was pretty pleased with the outcome.

Base:  Urban Decay Primer Potion (Original)

Eyeshadows: Maybelline’s Color Tattoo in Waves of White on the inner two-thirds of the lid. MAC’s Contrast blended into the outer half of the lid, with Parfait Amour in the upper crease (very lightly since colour payoff with this shadow is not amazing). MAC’s Brule was used as a brow highlight. I then sprayed an angled liner brush with MAC’s Fix+ and dipped it in MAC’s Iridescent Powder in Silver Dusk and used it as a liner across the outer half of the lower lid.

Liner: MAC’s Midnight Blues was used to create the upper winged liner.

Mascara: CoverGirl’s Clump Crusher in Very Black (water resistant)


20131001

Someone at work called this a full on peacock look – I’ll take that compliment!

Base: Urban Decay Primer Potion (Original)

Eyeshadows: Inglot’s AMC Shine 33 on the inner two-thirds of the lid. Sleek’s Sugarlite (Matte Brights palette) on the outer third. Urban Decay’s Buck blended into the crease, with MAC’s Brule as a brow highlight.

Liner: Maybelline’s Eyestudio Lasting Drama Gel Eyeliner in Blackest Black (not a fan of this product), I’m just trying to use it up)

Mascara: CoverGirl’s Clump Crusher in Very Black (water resistant)


201309261

I was mucking around at home trying to do a “wearable to the office” type black eye. I quite like how this turned out and will probably end up wearing it to work one day. Also slightly Tron-esque which just makes it even more awesome.

Base: Urban Decay Primer Potion (Original)

Eyeshadows: Urban Decay’s Blackout all over the lid, into the crease and the smudged along the lower lashline. Buck was blended into upper crease. MAC’s Silver Dusk was used as a brow highlight and on the inner tearduct.

Liner: MAC’s Kohl Power in Feline on the inner waterline.

Mascara: CoverGirl’s Clump Crusher in Very Black (water resistant)


201309262

This was a fun one. We had a Rock N Roll-themed event at work and I took full advantage of being able to wear false lashes and glitter to work without thinking twice about it! While the end result ended up looking less rocker on my face than I’d intended, I still loved it.

Base: Urban Decay Primer Potion (Original)

Eyeshadows: I used a piece of sticky tape to create a sharp outer edge and then removed it once my makeup was completed.  MAC’s Electra all over the lid. Urban Decay’s Blackout in the outer corner and then blended slightly into the crease. Urban Decay’s Buck was use to blend out the harsh line of the black in the upper crease and MAC’s Blanc Type was used to highlight the brow bone. Electra was also used to line the inner half of the lower eyelid and Blackout on the outer half.

After all the blending was done, I used Too Faced’s Glitter Glue and applied that all over Electra on the lid. I then stuck my finger into Tony & Tina’s Cosmic Lights Glitter in Gateway (this product is probably about ten years old and unfortunately the company has since gone under. Any silver glitter will do.) and applied that over the glitter glue.

Liner: MAC’s Kohl Power in Feline on the lower waterline and Physicians Formula Eye Booster on the upper lashline (mostly to hide the false lashes).

Lashes: Ardell 102 Demis

Mascara: CoverGirl’s Clump Crusher in Very Black (water resistant)

Face: Revlon Colorstay (Combination/Oily) in 220 Natural Beige. Physicans Formula Happy Booster Bronzer in Light was used for contouring and as a blush. MAC’s Silver Dusk was used as a cheek highlight as well. MAC Omega through the brows.


20130720

This one is a “go to” for me when I want something I know that is easy and tends to go with most things I wear. I find that Sketch is quite flattering on me and I never seem to go wrong when I use that shade.

Base: Urban Decay Primer Potion (Original)

Eyeshadows: MAC’s All That Glitters on the inner third of the lid, Star Violet on the middle third and Sketch on the outer third of the eye. Naked Lunch used to highlight the brow bone and blend out Sketch. For the lower lid, I used All That Glitters on the inner half and Star Violet on the outer half.

Liner: None (although I will often use some kind of black liner for an extra punch)

Mascara: CoverGirl’s Clump Crusher in Very Black (water resistant)