More looks for you to peruse! I need to find a better title for this series. Maybe numbering them as I go? Hmmm….
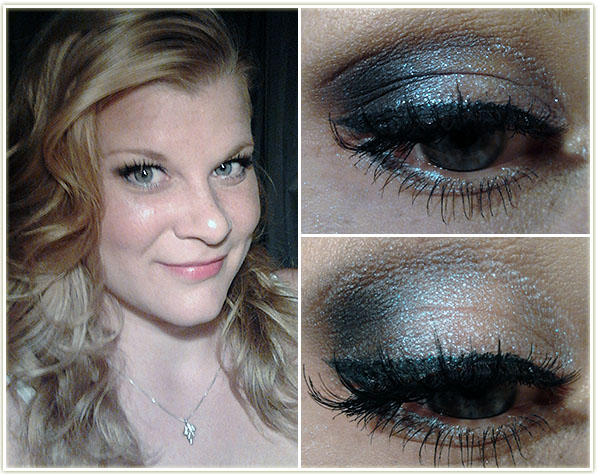
A night out look using my favourite glitter, Reflects: Transparent Teal!
Base: Urban Decay Primer Potion in Original
Eyeshadows: I applied the Maybelline Color Tattoo in Waves of White to the entire lid (do this in thin layers or the product can end up looking a bit bizarre). I then used MAC Contrast in the outer corner and blended it slightly into the crease, taking it about halfway across my lid. MAC Brule was used to highlight the brow.
And now for the fun part! I applied a thin layer of Too Faced Glitter Glue over the lid colour, waited for it to go tacky (keep your eyes shut while you do this or you’ll transfer the glue everywhere!), and then patted MAC Reflects: Transparent Teal onto the glue. A word of warning: Use this glue in thin layers otherwise the glitter is likely to crease.
I also smudged the Color Tattoo along the lower lashline with a hint of Contrast at the outer edge.
Liner: MAC Midnight Blues fluidline
Mascara: CoverGirl Clump Crusher in Very Black (water resistant) on the upper and lower lashes.
Lashes: Ardell 102 Demis
Eyebrows: MAC Omega
Lips: Nothing!
Cheeks: Tarte Amazonian Clay Blush in Blissful
Bronzer: Hard Candy Hula Hula
Foundation: Revlon Colorstay in 220 Natural Beige
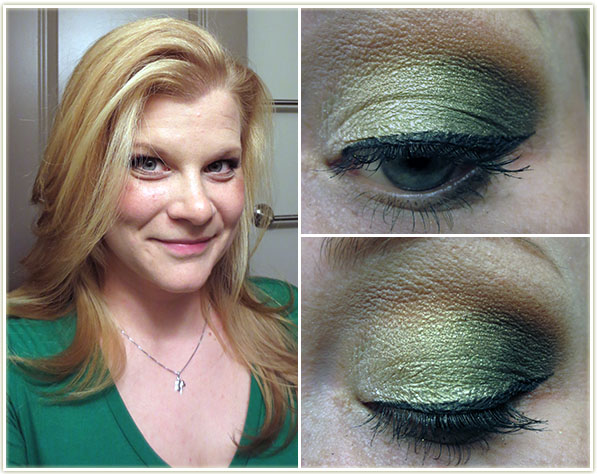
Have to give credit where credit’s due on this one and the lovely Emily Noel of Beauty Broadcast is responsible for this gorgeous combination. This look involves the limited edition Maybelline quad in “Smokey Cinnamon” from their Fall 2012 collection. I have worn this look many times since I first saw her video and will continue to do so.
Base: Urban Decay Primer Potion in Original as the bottom layer. Maybelline Color Tattoos in Barely Beige (inner half of the lid) and Mossy Green (outer half of the lid). You don’t need to worry about blending the Color Tattoos as the eyeshadows will cover them up. I smudged Mossy Green under the lower lashline.
Eyeshadows: Using Maybelline‘s Smokey Cinnamon quad, I applied the very lightest beige shade to the inner third of the lid, the pale green to the center of the lid, and then finally the dark green to the outer corner. The light green will do a good job of blending together the Color Tattoos underneath.
Finally, I applied the brown colour in the palette into the crease to blend all the shadows together and create a nice fade to the brow. I think used MAC‘s Brule as a brow highlight.
Liner: MAC Blacktrack fluidline
Mascara: CoverGirl Clump Crusher in Very Black (water resistant) on the upper and lower lashes.
Lips: Nothing!
Cheeks: Tarte Amazonian Clay Blush in Darling (from the Off the Cuff palette)
Bronzer: Revlon Photoready in Bronzed & Chic
Eyebrows: MAC Omega
Foundation: Bourjois Healthy Mix Serum Gel Foundation in 52 Vanilla
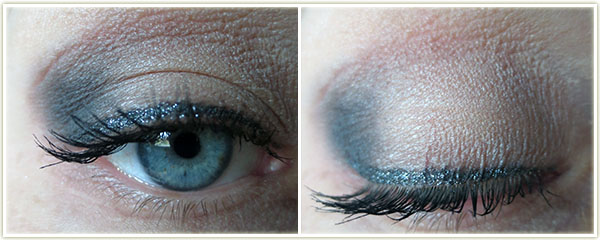
The point of this look was to test out a new KIKO eyeliner I had and to create a dark outer corner without bringing the shadow in too close to the center of the lid.
Base: Urban Decay Primer Potion in Original
Eyeshadows: (All MAC) I first applied Shroom all over the lid, right up to the brow. Using a little bit of Print, I smudged the shadow into the outer corner of the lid. Unfortunately, it looked a little bit too stark, so I swept Haux into the crease to give my hooded eyes some definition.
Liner: The star of the show! I used KIKO Twinkle Eye Pencil in 06 to line my upper lashline with a very slight wing at the outer edge.
I cannot say enough good things about this eye pencil! It didn’t budge and the sparkles within the liner never fell onto my cheeks throughout the entire work day. If anyone remembers the original Hard Candy line (not the one currently in Walmart, even though it has the same name they are definitely NOT the same products) this pencil is near identical to the glitter liner they used to have in Cyber. I loved that pencil so much when I was in my teens, but with Hard Candy being completely redone as a company, that pencil is no longer in production. The other bonus is thatCyber had very definite fallout whereas the KIKO product does not!
Mascara: CoverGirl Clump Crusher in Very Black (water resistant) on the upper lashes.
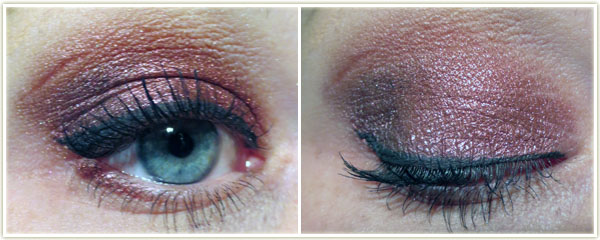
L’Oreal‘s Infallible eyeshadow in Golden Mahogany is a shade that I cannot even express how much the colour astonishes me. It’s a bit of a shame that the colour doesn’t pick up on camera quite as well as I see it with my eyes, but it’s a vibrant ruddy, rustic browned-red colour. It’s one of those shades that I actually gasped when I first swatched it. It seems that Golden Mahogany was a Canadian exclusive shade.
Base: Urban Decay Primer Potion in Original
Eyeshadows: I patted L’Oreal Infallible Eyeshadow in Golden Mahogany over the entire lid and then blended it with another brush through the crease. I then applied another L’Oreal Infallible in Burning Black (that’s Smoldering Plum for those of you in the US) into the outer corner but did not carry it into the crease. MAC Shroom was used to highlight the brow. I also used Golden Mahogany on the outer half of the lower lashline.
Liner: MAC Blacktrack fluidline
Mascara: CoverGirl Clump Crusher in Very Black (water resistant) on the upper lashes.
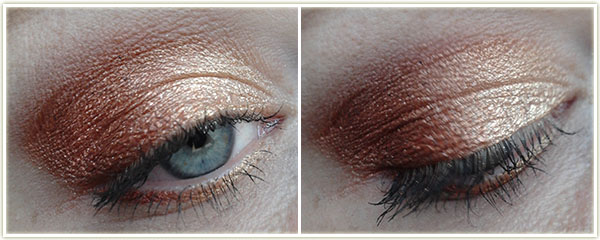
Hands down this is my favourite MAC mineralize eyeshadow (duo) ever.
Base: Urban Decay Primer Potion in Original
Eyeshadows: (All MAC) This is a super easy one. Spritz Fix+ (or water!) on a brush, then apply the lighter shade in the mineralize eyeshadow duo in Heat Element to the inner half of the lid and the copper (darker) shade to the outer half of the lid. I repeated this on the lower lashline with a smaller brush. Brule was used as a brow highlight and to blend out the upper crease.
Mascara: CoverGirl Clump Crusher in Very Black (water resistant) on the upper and lower lashes.
And that’s my latest roundup of looks I’ve been sporting!