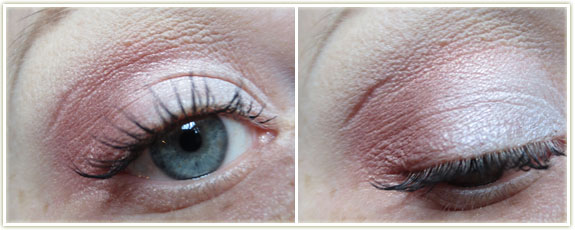
A quick, easy one before brunch on Saturday. My priorities were a) get out the door fast, and b) try out the new MUA palette I just purchased.
Base: Urban Decay Primer Potion in Original
Eyeshadows: The lid colour is from MUA‘s Pretty Pastels palette. Unfortunately the shades don’t have names, but it’s the top upper left corner one in the palette. It looks rather bland in the pan, but when you swatch it is has an amazing pinky duochrome. A duochrome, I might add, that did NOT show up on my lid very well! I then used MAC‘s Expensive Pink in the crease, with Haux in the outer corner to make it a bit more brown. Brule was used as a brow highlight.
Mascara: CoverGirl Clump Crusher in Very Black (water resistant)
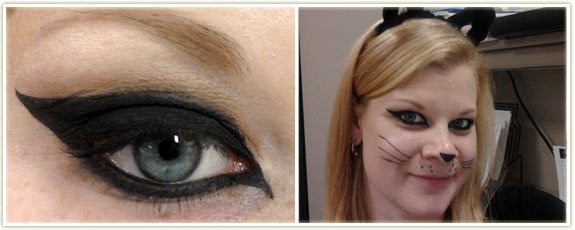
This is what I wore to work for Halloween since it was quick, easy and suitably work appropriate.
Base: Urban Decay Primer Potion in Original with NYX‘s Jumbo Eyeshadow Pencil inBlack Bean layered over top
Eyeshadow/Liner: There’s just not much to this look… I used MAC‘s Blacktrack fluidline to create the shape of the look and to ensure that I had a crisp line. Then I used Urban Decay‘s Blackout all over the lid and onto the liner to set everything. (It did, however, crease by the end of the day.) Both the gel liner and Blackout were used to line the lower lashline, with MAC‘s Feline Kohl Power pencil in the waterline.
Mascara: L’Oreal Voluminous Carbon Black in waterproof
I also used the gel liner to create the whiskers and nose… but I really wouldn’t recommend it as I kept smudging it throughout the day. A liquid liner would’ve been far better.
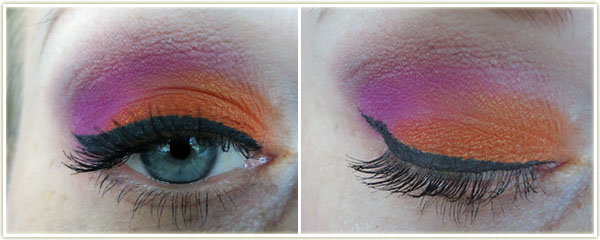
This one was a bit of a laugh – I was talking to a friend about eyeshadow combinations and how I felt like sometimes I came up with really bad colours that just don’t work well together. He responded with “what, like purple and orange?” My immediate response was that was exactly what I’d try out next!
Base: Urban Decay Primer Potion in Original with NYX‘s Jumbo Eyeshadow Pencil in Milk layered over top
Eyeshadow: I started by applying MAC‘s Sketch into and above the crease (this is mostly used to blend out the next colour), and then use Sleek‘s Sugarlite in the crease, mostly covering up Sketch . I then applied Sleek‘s Strike to the lid with a bit of Inglot‘s AMC Shine 15 (fiery orange with gold sparkle) on top. MAC‘s Blanc Type was used to highlight the brow… annnnd then I decided I didn’t like the blending of the crease enough so I took a bit of Urban Decay‘s Naked and lightly swept that between the crease colour and the brow highlight.
Liner: MAC Blacktrack fluidline
Mascara: CoverGirl Clump Crusher in Very Black (water resistant)
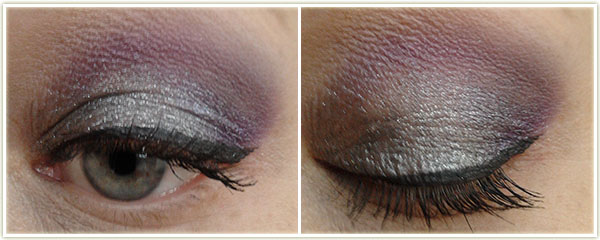
I was testing out new (to me) Kiko cosmetics that my mom had picked up while she was in Italy last month and here’s what I came up with.
Base: Urban Decay Primer Potion in Original
Eyeshadow: I applied Kiko‘s Smoky Look Eyeshadow in 09 (silver/grey) all over the lid and blended it up slightly into the crease. Using Kiko‘s Eyetech Look Eyeshadow in 206 (purple) I used the applicator that came with the product and placed that in the outer corner of the eye and then into the crease. Since the applicator on the Eyetech pencil/shadow was making it a bit difficult to blend out, I used MAC‘s Parfait Amour at the top of the shadow in the crease and blended it towards the brow bone. Pretty sure I used Brule to highlight, but I’m not completely positive.
Liner: Maybelline Lasting Drama Gel Eliner in Blackest Black
Mascara: CoverGirl Clump Crusher in Very Black (water resistant)