Category Archives: Tutorials

Ombre Lips with Maybelline’s Color Blurs

201508_maybelline_colorblur1

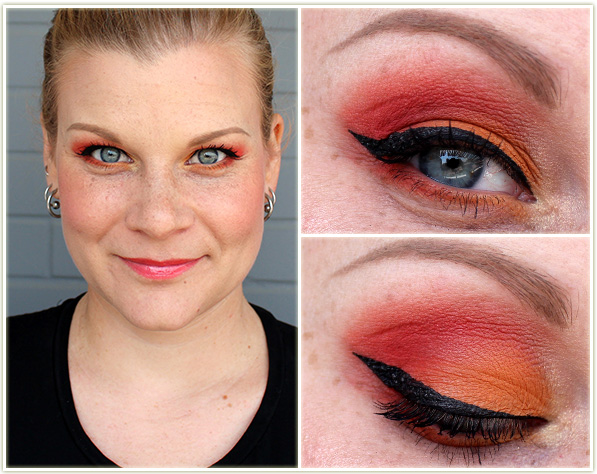
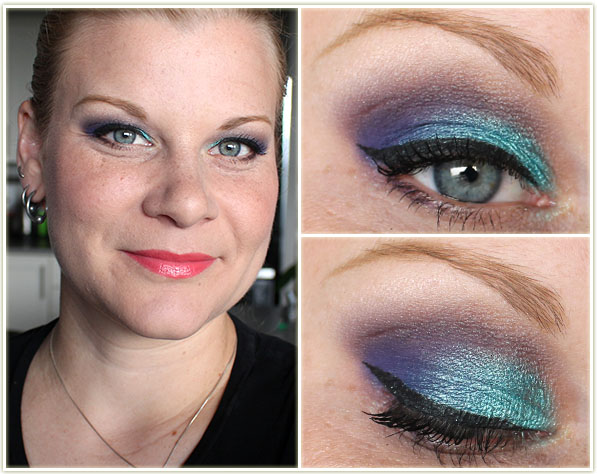
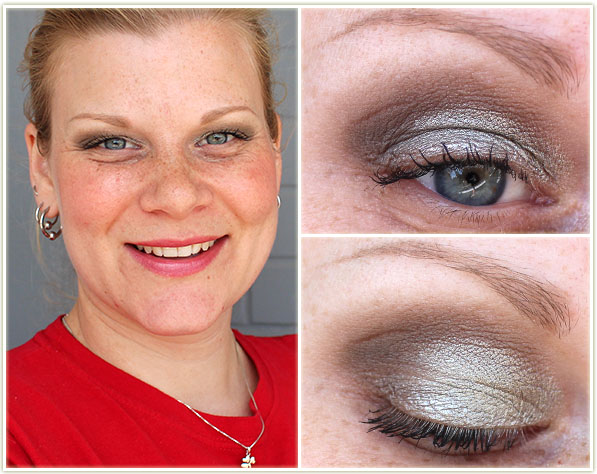
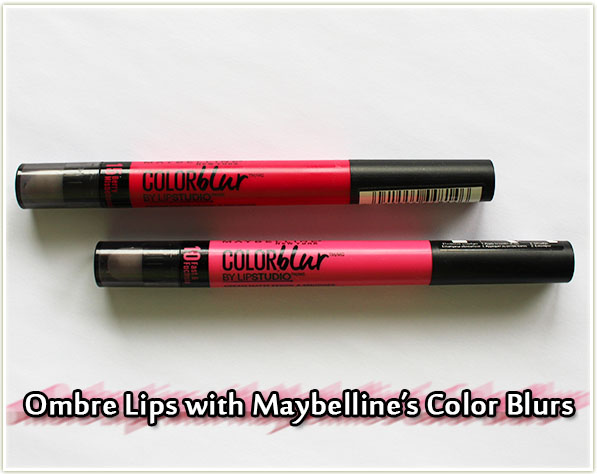
You may have noticed the Maybelline Color Blurs have started popping up at drugstores across Canada lately. It’s a lineup of fairly awesome bright matte colours.

Bright, matte colours? Take me now!

Maybelline Color Blurs

Currently available in ten shades; the Color Blurs range from several shades of pinks to some dark reds. There’s an orange and a plum thrown into the mix as well.

Maybelline Color Blurs

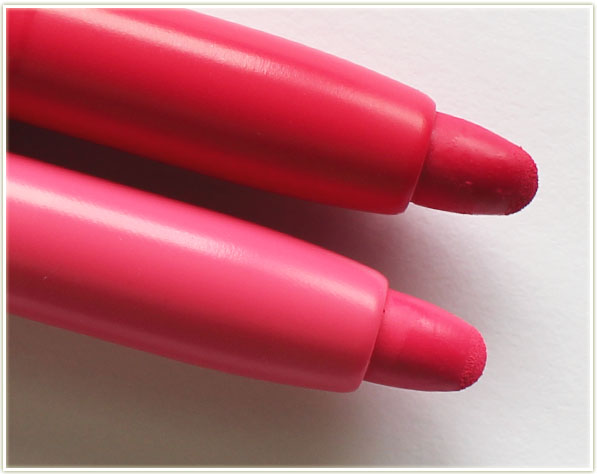
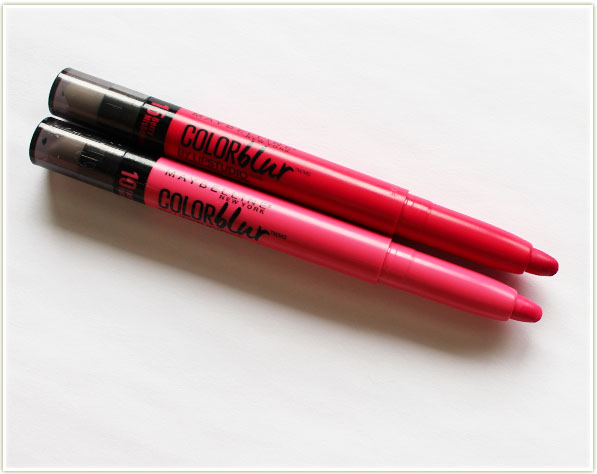
So what’s the deal with the Color Blurs? Well, it’s a twist up product (twist from the BOTTOM! It’s weird, but that’s how it works!) similar to the chubby lip crayons that have been popular for quite while now. Thankfully these are on the much thinner side which means they are a lot easier to apply to the lips (for me anyway) and you can get a much more precise line.

Maybelline Color Blurs - Smudger
Maybelline Color Blurs – Smudger

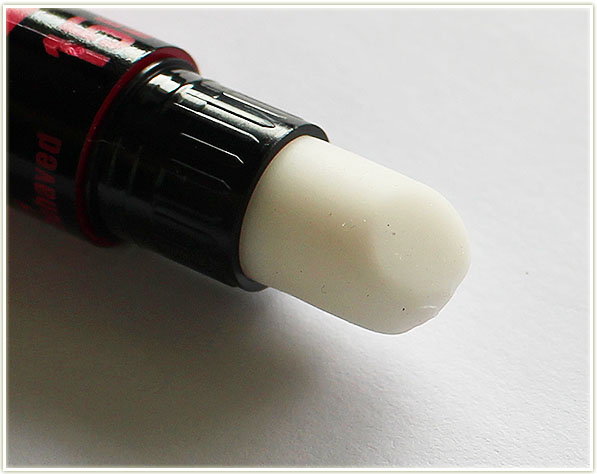
On the opposite end is a soft rubbery smudger intended to help give you a blown out/blurred look.

Maybelline Color Blur in Fast & Fuchsia and Berry Misbehaved

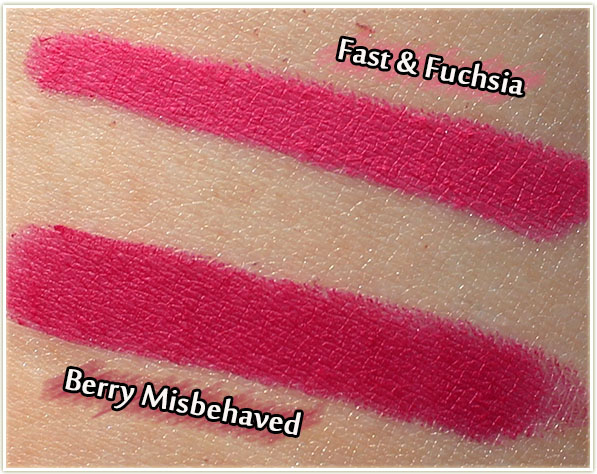
The colours are opaque on the lips in one swipe and pack one hell of a colour punch. I mean, look at the swatches – that’s a LOT of colour!

Maybelline Color Blur Berry Misbehaved - Smudged Application
Maybelline Color Blur Berry Misbehaved – Smudged Application

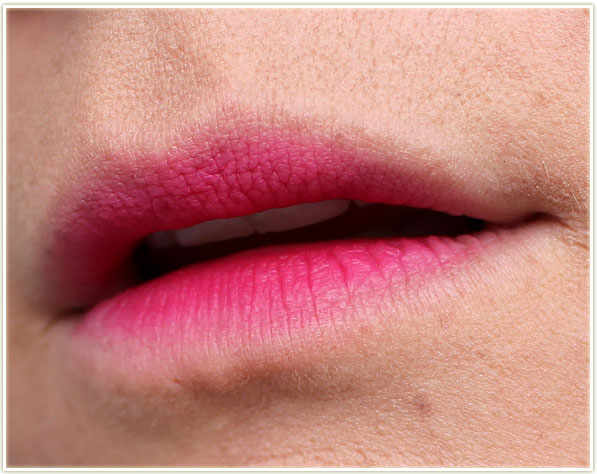
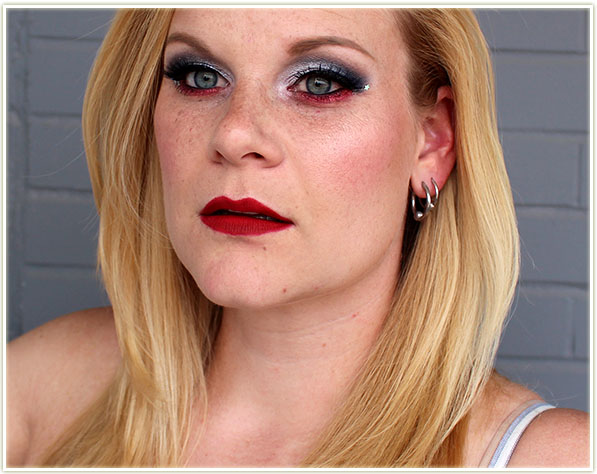
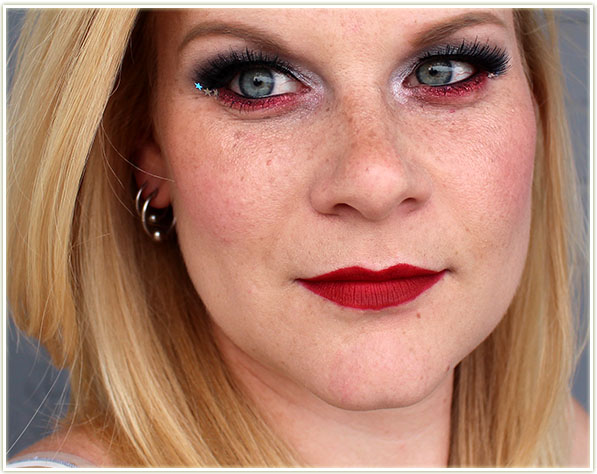
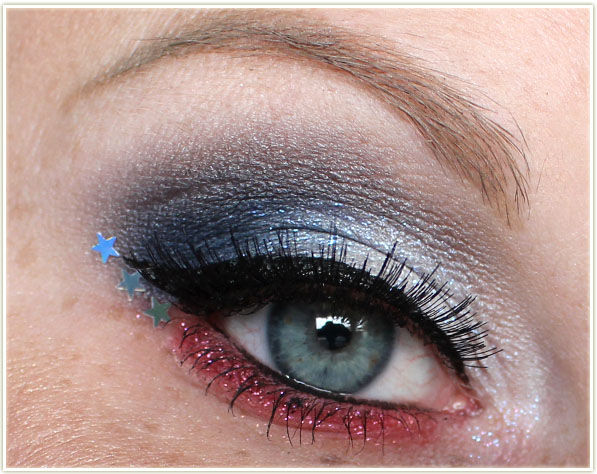
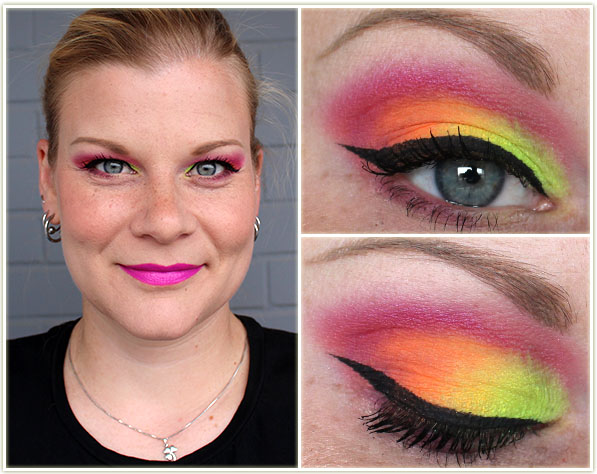
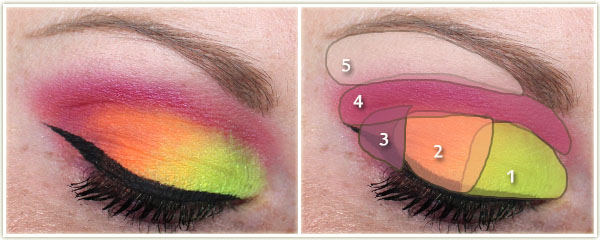
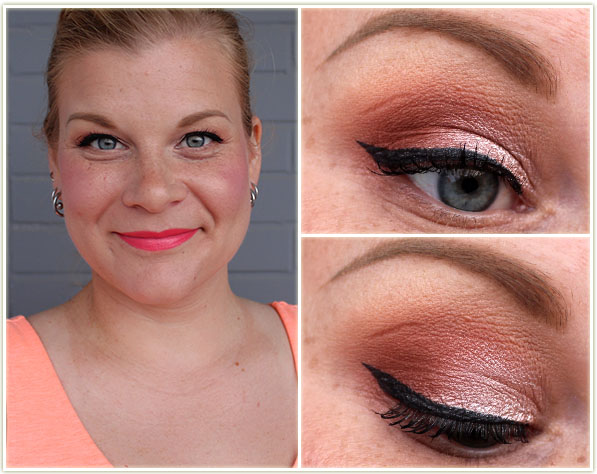
In keeping with Maybelline‘s recommendation with these products, I applied a little bit of the Color Blur in Berry Misbehaved to the inside edge of my lips. I then used the smudger to blur out the edges towards the outside of my lips. It’s a bit on the high maintenance side, but it actually produces quite a beautiful effect. I looked into it a bit more and it seems to be a lip trend that started in Korea last year (2014) and it’s started to seep into North America trends recently. It’s supposed to give you that “been eating a popsicle” look. It’s a reverse ombre in my eyes, and I think that makes this trend fairly unique.

Maybelline Color Blur Berry Misbehaved - Full On Application
Maybelline Color Blur Berry Misbehaved – Full On Application

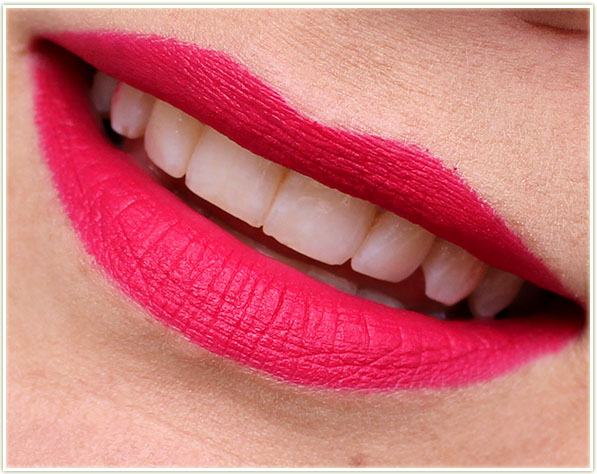
Of course, if you want full colour impact, you can absolutely achieve that with this product. And my god how it delivers.

Maybelline Color Blur Fast & Fuchsia - Smudged Application
Maybelline Color Blur Fast & Fuchsia – Smudged Application

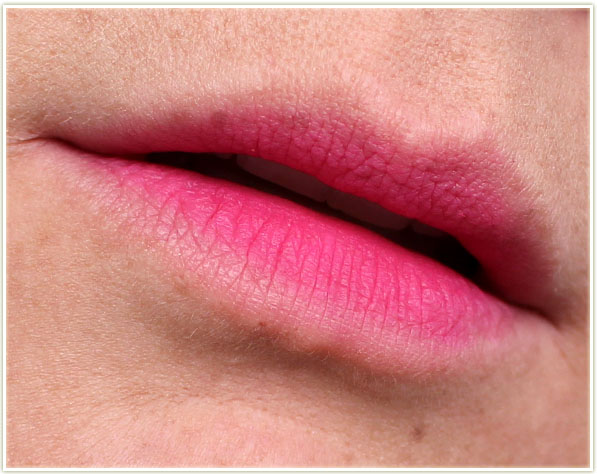
Here’s how the second shade (Fast & Fuchsia) looks blurred out. It’s a slight bit softer than Berry Misbehaved, but I personally don’t notice much of a colour difference when it’s applied this way.

Maybelline Color Blur Fast & Fuchsia - Full On Application
Maybelline Color Blur Fast & Fuchsia – Full On Application

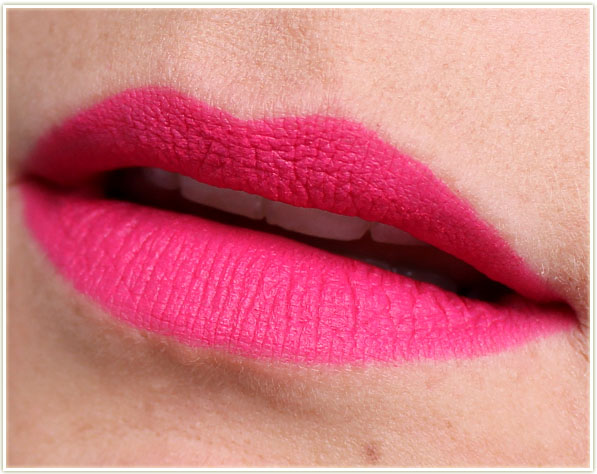
However, with a full application, you can definitely see the difference between the two shades.

Final Thoughts

Whether you’re looking for the blurred effect that Maybelline suggests, or are just seekingr a new vibrant matte colour for your lips, these Color Blurs absolutely deliver. They are smooth and feel soft on the lips. They don’t drag or feel chalky which is an absolute blessing in a matte lip products. They also provide full colour opacity in one swipe. The Color Blurs are scent-free, so if you’re not a fan of Maybelline‘s traditional sweet scent these will absolutely make you happy!

And the smudger? I totally scoffed at it when I first saw it thinking I could produce a better result with my fingertip. I was wrong – that smudger is golden for getting that soft blurred out line. Be sure to wipe it off between uses so you have a clean smudger every time you start blurring out your edges for that ombre look.

In case you hadn’t guessed, I give the Color Blurs two very enthusiastic thumbs up!

This post features press samples sent for consideration.

Wedding Anniversary – Hair & Makeup

201508_weddinganniversary

My fifth wedding anniversary was in July, and we had a lovely dinner out in Toronto. I kept it fairly simple: I curled hair (my husband’s favourite style on me) and did some makeup that semi-matched what I was wearing (because really, I have no idea how to do this contrasting business).

So I took it from this:

No makeup, freshly washed and dried hair

To this:

Tada!
Tada!

And here’s how I did it:

Urban Decay Vice 3 palette eye look

I always start out with doing my makeup first- it’s the most time consuming portion and the one I have the most fun doing. I also hate having my hair in my face when I’m trying to blend foundation (although, in hindsight, I didn’t apply any for this night out) because it’ll inevitably end up in my hair!

Urban Decay Vice 3 palette eye look

I didn’t really have anything planned out for our anniversary, so I opted to use a palette I don’t get around to using as much as I wish I did! Using the Urban Decay Vice 3 palette (the 2014 holiday release), here’s what I did:

Urban Decay Vice 3 palette eye look

Eyes

  1. Undone through the crease to make blending easier.
  2. Bobby Dazzle and Last Sin mixed together and packed all over the lid.
  3. Heroine in the outer corner and dragged through the crease.
  4. I used the Hourglass Ambient Lighting powder in Ethereal Light to highlight the brow bone.

I then created the wing with Kat Von D‘s Tattoo Liner in Trooper and applied Make Up For Ever Smoky Stretch mascara to my lashes.

Rest of the Face

  • Bronzer: Hard Candy Hula Hula
  • Blush: Hourglass Diffused Heat
  • Highlighter: Becca Champagne Pop
  • Lips: Bite Beauty Fig
Using the Kiss InstaWave hair curling tool for the first time
Using the KISS InstaWave hair curling tool for the first time

With my makeup done, now was the time to tackle my hair. I had never tried the KISS InstaWave hair curling tool before and was really curious to see how it would compare to my normal technique of using a flat iron to create my curls.

Using the Kiss InstaWave hair curling tool for the first time
Using the KISS InstaWave hair curling tool for the first time

The tool has a button that spins the barrel either clockwise or counter clockwise. The spokes you see at the base of the wand help to corkscrew your hair onto the barrel and keep it in position. To get your hair to spin into place on the barrel, all you need to do is hold a section of hair perpendicular to the barrel, hit the button to rotate the wand, and it’ll automatically suck your hair on the barrel and curl it whichever direction you chose. I let the hair sit for a little bit on the barrel before I release it.

Beautiful curls!
Beautiful curls!

Et voila! Ringlet curls! I don’t brush them out because I prefer them tighter and they’ll relax over time anyway. My first impression is that I think the  KISS InstaWave is pretty decent for people who aren’t great at curling their hair – it a foolproof product since it does the whole wrapping motion for you. It also heats up lighting fast.

It's even pretty easy to get everything at the back of your head too!
It’s even pretty easy to get everything at the back of your head too!

I think it’s awesome that it rotates both ways so you can choose what style you’re going for without having to crane your arms and neck. It also doesn’t clamp your hair like a flat iron or a true curling iron does so keep that in mind. For those of you who want a much tighter curl at the root, this won’t get you that. However, because it’s not as tight at the root, nor does it clamp your hair, you may actually save yourself a little bit of heat damage there (although that’s not something I’m personally that fussed about).

End result!
End result!

I sprayed my hair with a bunch of hairspray to make sure my hair stayed in place (it was a pretty humid night) and there we go! All done!

The KISS InstaWave hair curling tool was sent to me for consideration.

What’s On My Face – Volume 40

In my (not so humble) opinion, there’s some pretty epic makeup looks in this post. Either I love how my makeup turned out, or I love how the shots came out. I hope you like them too!


201508_womf40_look2-2

Let’s start this off with what I feel is probably my best makeup look accomplished to date. (So I’m going to post a few extra shots of it because I’m really pleased with how this turned out.)

201508_womf40_look2-1

We were going to the pub to watch the Womens’ World Cup final (USA versus Japan), and since my husband is American, I defaulted to supporting the USA. It was so close to the Fourth of July too, so this could’ve doubled as an Independence Day theme as well.

201508_womf40_look2-3

I don’t always post huge eye shots because I typically take photos of my makeup before work and don’t have the time to perfect everything. Smaller photos hide some mistakes so I have less to worry about. But when I do guest posts, or feature products specifically, I like to make sure that I get as close to a perfect makeup look as I’m physically capable of (since I don’t airbrush my photos). But this one, despite being done in a relative rush, was done soooo well that I just had to post a full-sized shot!

201508_womf40_look2-4

And here’s what I used:

201508_womf40_look2-5

Eyes

  1. MAC Cork through the top of the crease.
  2. MAC Crystal Avalanche all over the lid.
  3. Urban Decay Heroine on the outer half of the lid.
  4. MAC Blanc Type on the brow bone.

I then patted MAC‘s Transparent Blue Glitter on top of the whole lid using Too Faced‘s Glitter Glue to make sure it stayed in place. I then used MAC‘s Strike While Haute shadow all along the bottom lash line, and applied MAC Reflect Red glitter overtop (again with the Glitter Glue).

The winged liner was done with Kat Von D‘s Tattoo Liner in Trooper and I lined my lower water line with Marc JacobsBlacquer. I applied a coat of CoverGirl‘s Clump Crusher mascara and then popped on a pair of Bombshell lashes by House of Lashes.

Rest of the Face

  • Foundation: Bourjois Healthy Mix Serum in shade 52 Vanilla
  • Bronzer & Highlighter: Charlotte Tilbury Filmstar Bronze & Glow
  • Cheeks: Elizabeth MottTints & Sass
  • Lips: MAC Russian Red

201508_womf40_look5-1

Next up is a product I waited far, FAR too long to use. It had been sitting in my “to use” pile but I never got around to it. And as soon as I did, I wore it three times that week! That beautiful neon red? That’s Kryolan‘s UV-Red pressed shadow and it is INCREDIBLE. Since it is a neon, it does need a sticky white base to make it pop. But damn… seriously amazing.

201508_womf40_look5-2

Eyes
I first applied NYX‘s Jumbo Eyeshadow Pencil in Milk to the entire lid, blended it out, then:

  1. Applied Kryolan‘s UV-Red to the entire lid of my eye and the inner tearduct.
  2. Makeup Geek‘s Corrupt was used through the outer third of the lid, through the crease and on the lower lash line.

I created the wing with Kat Von D‘s Tattoo Liner in Trooper, coated my lashes with CoverGirl‘s Clump Crusher and then put on a pair of Bombshell lashes by House of Lashes. I tightlined both waterlines with Marc Jacobs‘ Blacquer.

Rest of the Face

  • Foundation: Boots No7 Instant Radiance in Cool Vanilla
  • Powder: Hourglass Ethereal Light
  • Blush: Sleek Chantilly
  • Highlighter: Becca Champagne Pop

201508_womf40_look1-1

Playing around with some Makeup Revolution foiled shadow.

201508_womf40_look1-2

Eyes

  1. Makeup Revolution‘s Emerald Goddess all over the lid.
  2. essence‘s Smokey Day Trio (dark shade) through the outer corner and crease.

On my lashes is Make Up For Ever‘s Smoky Stretch mascara.

Rest of the Face

  • Foundation: Boots No7 Instant Radiance in Cool Vanilla
  • Bronzer: MAC Refined Golden
  • Blush: Burberry Lip & Cheek Bloom in Poppy
  • Highlighter: MAC Soft & Gentle
  • Lips: SST Cosmetics Vitale

201508_womf40_look3-1

I swear this is such a vain post, but anyway… That shot on the left is my favourite shot of myself I think I’ve ever taken. It’s all thick lash line, fiery eyeshadow, chubby cheeks and intense steel blue eyes. AND I LOVE IT. I did this for a guest post on Vancouver Eyeshadow Addict back in May and somehow forgot to cross post it!

201508_womf40_look3-2

Eyes

  1. Makeup Geek Peach Smoothie through the top of the crease.
  2. Makeup Geek Chickadee all over the lid.
  3. Makeup Geek Poppy on the outer corner and through the crease.
  4. Makeup Geek Vanilla Bean on brow bone.
  5. Naked Cosmetics IV-04 pigment on the inner corner.

I used Poppy on the outer corner of the lower lash line and used Chickadee for the remainder of the lower lash line. I then created the wing with Kat Von D Tattoo Liner inTrooper and tightlined with Urban Decay‘s Black Velvet liner. On my lashes is essence‘s Lash Princess mascara.

Rest of the Face

  • Foundation: Bourjois Healthy Mix Serum in 52 Vanilla
  • Contour: Makeup Geek Barcelona Beach eyeshadow
  • Blush: Tarte Charisma
  • Highlighter: MAC Whisper of Gilt
  • Lips: Revlon Papaya gloss


201508_womf40_look4-1

And lastly, a Makeup Geek look because I hadn’t yet played around with the new foiled shadow Pegasus.

201508_womf40_look4-2

Eyes

  1. MAC Cork
  2. Makeup Geek Pegasus
  3. Makeup Geek Duchess
  4. Makeup Geek Shimma Shimma

I created the wing with MAC‘s Blacktrack fluidline and coated my lashes with essence‘s Plump, No Clump mascara.

Rest of the Face

  • Foundation: Boots No7 Instant Radiance in Cool Vanilla
  • Bronzer & Highlighter: Charlotte Tilbury Filmstar Bronze & Glow
  • Blush: Milani Coral Cove
  • Lips: Catrice Feeling Feline

Osheaga Essentials featuring essence cosmetics

2015_osheagaessential_essence1

Montreal’s Osheaga weekend is coming up! Celebrating their 10th year, Osheaga will host more than 100 bands playing on six stages during the three-day festival.

At first I was really torn about how to do this post. When I’m going to an outdoor concert or, as they’re more commonly becoming known now, a festival, the reality is that there’s a look that I *want* to wear, and then there’s the look that I’m more than likely going to wear.

So what the hell, I thought I’d throw together both. One is for the realist (or the person who’s going to actually jump into the crowd) and the other is for the person who’s more inclined to stay on the outside of the pit and enjoy the ambiance (and not get nearly as dirty).

Makeup for the person who’s going to be in the thick of it all

Simple, but pretty

The reality is that when I go to an outdoor concert, I’m going to be right in the middle of the crowd. I’ll be in that pit moshing (or dancing depending on the music) and that means I’m most definitely going to be sweaty. The last thing I want to worry about is my makeup – so I’ll generally opt for something that’s waterproof and longwearing and very, VERY minimal. (Doesn’t sound like me much does it?)

2015_osheagaessential_essence_look1-1

I’ll chuck on a band t-shirt, tie my hair back, slap on a bit of makeup and that’s it. For this look, I focused on getting bronzed up and making my eyes stand out.

2015_osheagaessential_essence_look1-3

2015_osheagaessential_essence_look1-4

Here’s how you can get the same look using the following products:

2015_osheagaessential_essence_look1_products

2015_osheagaessential_essence_look1_eyemap

Eyes
(all essence)

  1. I packed on the lighter shade in the Irresistible Vanilla Latte duo all over my lid.
  2. I took the Sun Club matt bronzing powder for blondes/lighter skin and blended it through my outer corner and crease.

I thickly lined my upper lash line with the waterproof gel eye pencil in Cocoa Bean and applied Get Big Lashes waterproof mascara to my lashes.

Rest of the Face

  • You’re outside, you had BETTER be wearing sunscreen everywhere! I applied Dermalogica Ultra Sensitive Tint in Light (contains 30 spf) all over my face and waited for it to dry.
  • Then I went to TOWN with the Sun Club matt bronzer. I used it as bronzer, blush, on my nose, etc.
  • I highlighted my cheekbones with the shimmery shade in the Irresistible Vanilla Latte duo and slapped on the XXXL shine lipgloss in Cute Pink.

Overall, I love it. It’s simple, easy to wear, and I don’t have to worry about looking trashed by the end of the festival!

Makeup for the person who doesn’t think they’re going to get sweaty

2015_osheagaessential_essence_look2-1

There’s always going to be people that enjoy the music at a festival, but just don’t want to be part of the crowd right in front of the gates of the stage. This gives you a lot more flexibility with your makeup since you’re less likely to have sweaty bodies rubbing up against your face (as a relatively short female at 5’3″, I would constantly find myself with my nose in some guy’s sweaty armpit or chest, much to my disgust).

2015_osheagaessential_essence_look2-2

This is what I’d wear to a festival if I wasn’t worried my makeup would get smeared all over my face!

2015_osheagaessential_essence_look2-3

2015_osheagaessential_essence_look2-4

Here’s what you’ll need:

2015_osheagaessential_essence_look2_products

2015_osheagaessential_essence_look2_eyemap

Eyes
(all essence)

  1. I applied some tape to the outer corner of my eye towards my brow to give myself a sharp line to work with. I ran the waterproof gel eye pencil in Cocoa Bean over that edge and feathered it in towards the middle of my eye. Remove the tape.
  2. Using the Smokey Eyes Smokey Day set, I took the darkest colour and applied it over the liner and feathered it in towards the middle of the lid. This’ll help blend out the pencil liner.
  3. Using the medium shade from the Smokey Day trio, I placed that in the center of the eye, blending out the edge.
  4. And finally, on the inner half of the lid, I applied the light shade in that Smokey Day trio.

I applied Get Big Lashes waterproof mascara to my lashes.

Rest of the Face

  • Again I stress – WEAR SUNSCREEN! I applied Dermalogica Ultra Sensitive Tint in Light (contains 30 spf) all over my face and then waited a bit so that it would sink in properly.
  • I used the same bronzer, Sun Club matt bronzer, and applied it to all the usual areas: Sides of my forehead, backs of my cheekbones, on the top of my nose and around my chin.
  • I then used the same essence lipstick on my lips and cheeks (conveniently called Blush My Lips). To get it on my cheeks, I first rubbed the lipstick onto the back of my hand, then dabbed a brush into the product and swept it onto my cheeks. For the lips, it went on straight from the bullet.

Obviously, this look has a lot more to it than my first one. It’s also a lot more fun, possibly edgy. It’s more of a rocker look (although I’m definitely getting a bit of 80s out of it too) and far more precise. But hey, if you end up dancing your heart out, you’ll just fit right in and look all grungy.

Is anyone headed to Osheaga? Who are you excited to see? My favourite on the listing is definitely Tove Lo at the moment! <3

essence cosmetics can be found at Shoppers Drug Mart and Pharmaprix in Canada.

This post features products sent by PR.


What’s On My Face – Volume 39

Another makeup roundup! I had a backlog of looks I hadn’t posted yet, some even from early May. I’m surprised I had such a backlog (and there’s still about 7 more looks on my harddrive) because it feels like I haven’t been that inspired lately (aside from Clarins’ Aquatic Treasures collection, holy smokes) but it seems my memory was just rather faulty.

201507_womf39_look5-1

And we’re starting off with a BANG! This is my absolute favourite of the whole lot. Neon? Orange? Chartreuse? YES PLEASE! I wore this out briefly to a brunch during Pride and loved every second of it.

201507_womf39_look5-2

Eyes
(using the Makeup Revolution Redemption Acid Brights palette – total knockoff for theSleek Acid palette) I first applied a white base to my lid (NYX Jumbo Pencil in Milk), then:

  1. Yellow on the inner half of the lid.
  2. Orange on the outer half of the lid.
  3. Purple shade on the outer corner and on the lower lash line.
  4. Pinky-purple through the crease.
  5. Wet n Wild Brule on the brow bone.

I used MAC‘s Blacktrack fluidline to create the wing and applied Make Up For Ever‘sSmoky Stretch mascara to my lashes.

Rest of the Face

  • Bronzer: Joe Fresh Sand
  • Blush: MAC Ripe Peach
  • Highlighter: Too Faced Candlelight
  • Lips: Too Faced Melted Rainbow


201507_womf39_look4-1

I have a bucket full of makeup that is stuff I have yet to use. Most of it is stuff from swaps, or samples from Sephora (including their 100 point perks), so every now and then I make an effort to go into it and pull out items that I REALLY should at least try before I put away into the depths of my makeup collection. The main star of this look is a L’Oreal Infallible eyeshadow I picked up at a CBB swap.

201507_womf39_look4-2

Eyes

  1. L’Oreal Infallible shadow in Endless Sea all over the lid.
  2. MAC Sketch on the outer corner and through the crease.
  3. MAC Dazzlelight on the brow bone.

On my lashes is Make Up For Ever Smoky Stretch.

Rest of the Face

  • Foundation: Boots No7 Instant Radiance in Cool Vanilla
  • Bronzer: Hard Candy Hula Hula
  • Blush: Hourglass Incandescent Electra
  • Highlighter: MAC Soft & Gentle
  • Lips: Cailyn lip tint in Basic Instinct


201507_womf39_look3-1

I had always thought this lip colour (Too Faced‘s Bon Bon) was too awkwardly bright for me. That’s not to say that I don’t love bright lip colours, but this seemed to look so weird on my skin when I didn’t have a bit of a tan. I love it so much more now that I’ve got a bit of colour on my skin! Anyway, the basis for this look was that I really wanted to wear MAC‘sPetal Power blush and tried to figure out a look that would work with it. Quite pleased with the results!

201507_womf39_look3-2

Eyes
(all Makeup Geek)

  1. Peach Smoothie through the crease.
  2. Starry Eyed on the inner half of the lid.
  3. Goddess on the outer half of the lid.
  4. Cocoa Bear in the outer corner.
  5. Rapunzel on the brow bone.

I created the wing with MAC‘s Blacktrack fluidline and applied Make Up For Ever Smoky Stretch to my lashes.

Rest of the Face

  • Foundation: Boots No7 Instant Radiance in Cool Vanilla
  • Powder: Hourglass Ethereal
  • Concealer: Benefit Fake Up in Light
  • Bronzer: Hard Candy Hula Hula
  • Blush: MAC Petal Power
  • Lips: Too Faced Bon Bon


201507_womf39_look2-1

This was another grab from my “use it before you put it away” makeup bucket. These were some Colour Pop eyeshadows I hadn’t touched yet.

201507_womf39_look2-2

Eyes

  1. MAC Cork through the crease.
  2. Colour Pop Heat on the inner half of the lid.
  3. Colour Pop Animal on the outer half of the lid.

Make Up For Ever Smoky Stretch is on my lashes.

Rest of the Face

  • Bronzer: Hard Candy Hula Hula
  • Cheeks: Burberry Lip & Cheek Bloom in Poppy
  • Highlighter: MAC Whisper of Gilt
  • Lips:  Revlon Papaya

201507_womf39_look1-1

Having a play around with some Makeup Geek shadows. I like the outer corner colour, but not so sold on the lid shade.

201507_womf39_look1-2

Eyes
(all Makeup Geek)

  1. Charmed all over the lid.
  2. High Tea on the outer corner and through the crease.
  3. Vanilla Bean on the brow bone.

On my lashes is essence Lash Princess mascara.

Rest of the Face

  • Bronzer: Hard Candy Hula Hula
  • Blush: MAC Sea Me, Hear Me
  • Highlighter: MAC Soft & Gentle
  • Lips: NARS Rikugien