I got a cute text from Bell Canada this morning informing me it is actually Canada’s 148thbirthday today! While I don’t have any exciting plans for the day, if you do, maybe take a look at my Canada Day looks post from last year! I promise lots of red eyeshadow! 😉
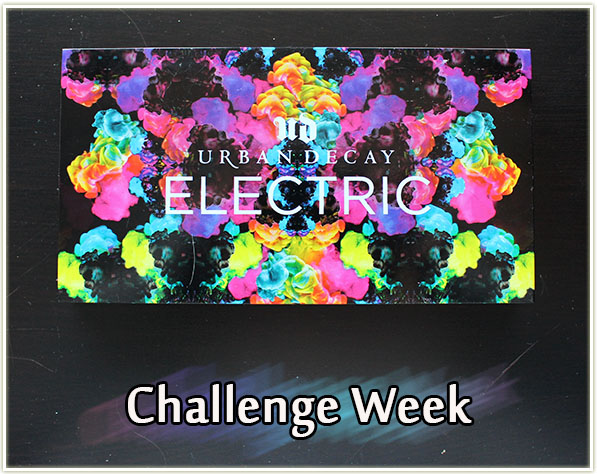
You’ve seen Swatch Sunday featuring the Urban Decay Electric palette. You know what this sucker is about. This is about pure unadulterated, pigmented, neon colour glory all packed into one palette. So, of course, I’m doing a Challenge Week on this beauty.
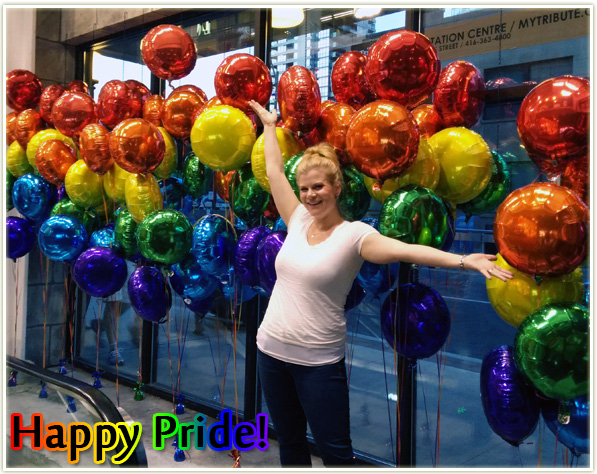
It’s also Pride Week here in Toronto! While a few cities have had their celebrations come and go already, this is my city’s week, so what better opportunity than now to share some insanely fun looks to wear out to Pride?
Note: I sometimes used NYX’s Milk as a base, but I can’t remember for which looks.
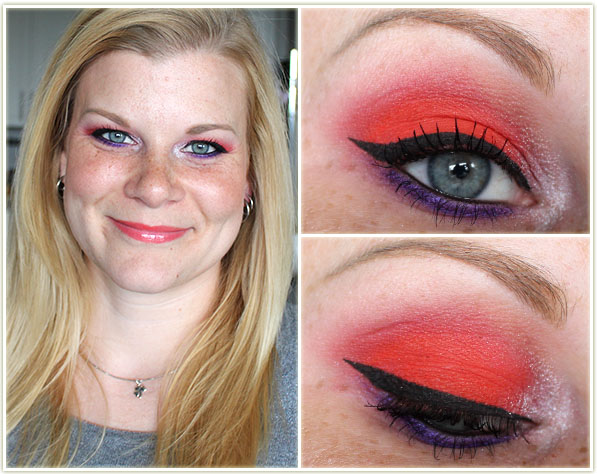
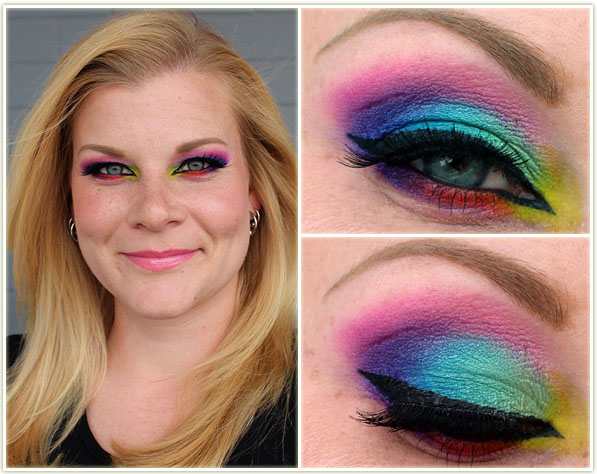
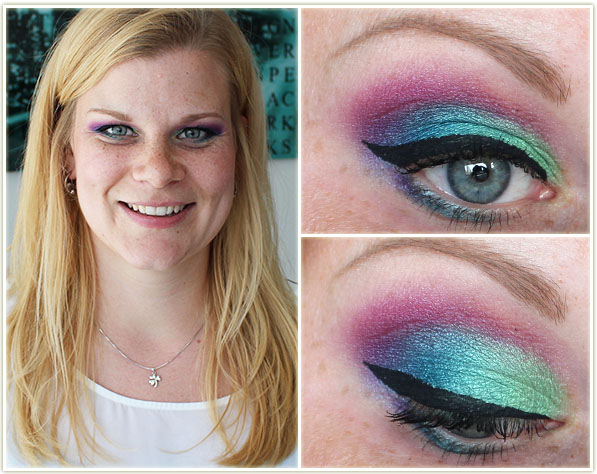
Let’s start this off with a bang! I cannot lay claim to creating this look at all, although I did do a more amped up version. I stole inspiration for this look from EmilyNoel83 and it came out even better than I had hoped. That reddish-orange? TO DIE FOR.
Eyes
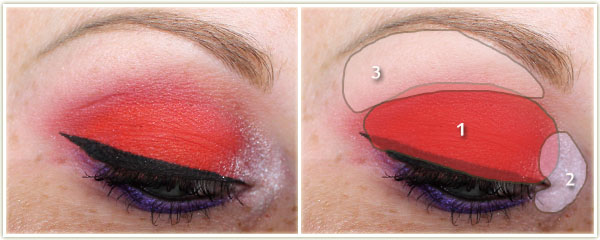
Slowburn all over the entire lid.
Revolt on the inner corner.
Wet n Wild Brulee on the brow bone.
I used Urban to line the lower lash line and tightlined both waterlines with my Marc Jacobs Highliner Gel Crayon in Blacquer. The wing was done with MAC‘s fluidline inBlacktrack and I’ve got Make Up For Ever‘s Smoky Stretch mascara on my lashes.
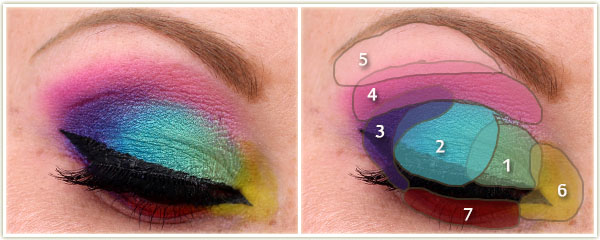
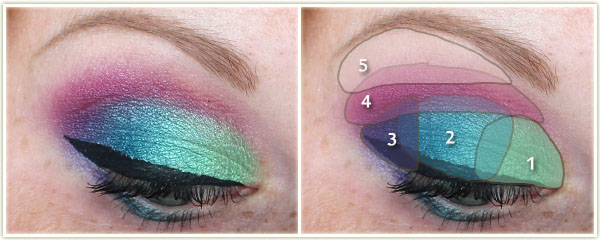
I first applied NYX‘s Jumbo Eyeshadow Pencil in Milk all over the lid, blended it in with my finger, then proceeded with the following shadows (all Urban Decay unless otherwise specified):
Freak on the inner half of the lid.
Gonzo on the outer half of the lid.
Urban on the outer corner and along the outside of the lower lash line.
Savage through the entire crease.
Wet n WildBrulee to highlight the brow bone.
Thrash on the inner tear duct.
Slowburn on the middle of the lower lash line.
I drew the inner and outer winged liner with Make Up For Ever‘s Ink Liner and then tightlined both upper and lower lash lines with Marc Jacobs Highliner in Blacque. I applied a few coats of CoverGirl‘s Clump Crusher mascara to my lashes and popped on some House of LashesBombshell falsies.
Rest of the Face
Foundation: Boots No7 Instant Radiance in Cool Vanilla
Bronzer: Hard CandyHula Hula
Blush: HourglassDiffused Heat
Highlighter: MACSoft and Gentle
Lips: I first applied Too FacedMelted Rainbow to see how it looked… but I wasn’t a huge fan. So I blotted most of it off and applied NYX‘s Butter Gloss in Creme Brulee which left me with a bit of a pink-tinged lip.
Mmmmm I got a lot of compliments on this one, but I wasn’t totally pleased with how I looked in the mirror. That being said… the shots turned out pretty decent… so I guess the mirror lies? Wouldn’t wear that lip colour with this look again though.
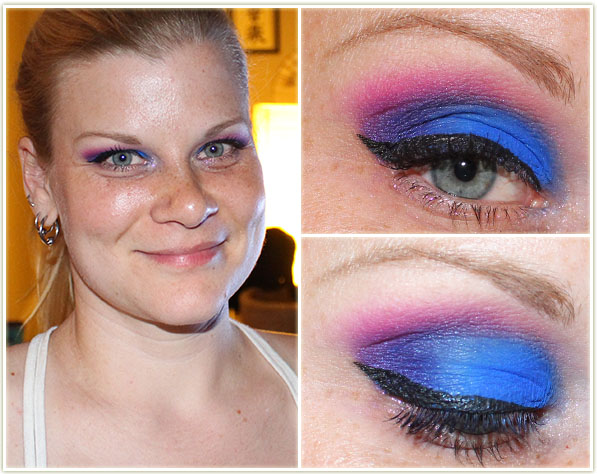
Eyes
Thrash all over the lid.
Fringe on the outer half of the lid and through the crease.
Wet n WildBrulee on the brow bone.
I created the wing with MAC‘s Blacktrack fluidline and applied Make Up For EverSmoky Stretch to my lashes.
Rest of the Face
Bronzer/Highlighter: Charlotte Tilbury Bronze & Glow
Blush: MilaniCoral Cove
Lips: Maybelline Craving Coral
So, soooo pretty. Loved this one! I’m such a sucker for this kind of gradient.
Eyes
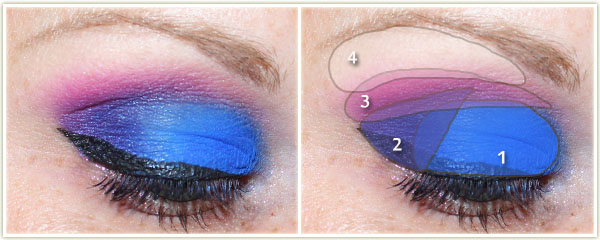
Freak on the inner third of the lid.
Gonzo on the middle of the lid.
Urban on the outer corner.
Savage through the crease.
Wet n WildBrulee on the brow bone.
I created the wing with Catrice‘s liquid liner in Dating Joe Black and tightlined my upper lash line with Marc Jacobs‘ Highliner Gel Crayon in Blacquer. On my lashes is Make Up For Ever‘s Smoky Stretch.
Rest of the Face
Bronzer: Hard CandyHula Hula
Blush: IllamasquaHussy
Highlighter: MACSoft and Gentle
This was… what I ended up with. I tried doing a solid rainbow for the CBB meetup this past Sunday and I failed SO HARD. I could not get the colours to turn into a decent rainbow gradient, and I think it’s because there’s too much of a variety of finishes. Rainbow gradients seem to only work for me when I do either all matte, or all shimmer. ANYWAY. This got a rave review from the other bloggers so I was happy about that!
Eyes
Chaos all over the lid.
Urban on the outer corner.
Savage through the crease.
Wet n WildBrulee on the brow bone.
I created the wing with Kat Von D‘s Tattoo Liner in Trooper and applied Make Up For EverSmoky Stretch to my lashes. I also applied some MAC Transparent Red glitter to my lower lash line.
Rest of the Face
Bronzer/Highlighter: Charlotte Tilbury Bronze and Glow
June 2015 saw the launch of Charlotte Tilbury products in Canada and my god was I ever excited. If you’ve been lurking around the internet for a while, you may have seenCharlotte Tilbury products popping up on blogs and YouTube since late 2013. It first started in the UK, then spread to the USA. Now, finally, Canadians can pick up her products without ordering from overseas! For the month of June, all sales on charlottetilbury.com/ca/ will have free shipping!
There’s zero disputing her products are exceptionally highend. The price tags alone were enough to curb my spending and I ended up purchasing only two products (however, my mental list of what I “need” continues to grow longer and longer…). I hope you enjoy reading about what I’ve picked up. There’s also a full look at the bottom of this post that features both products.
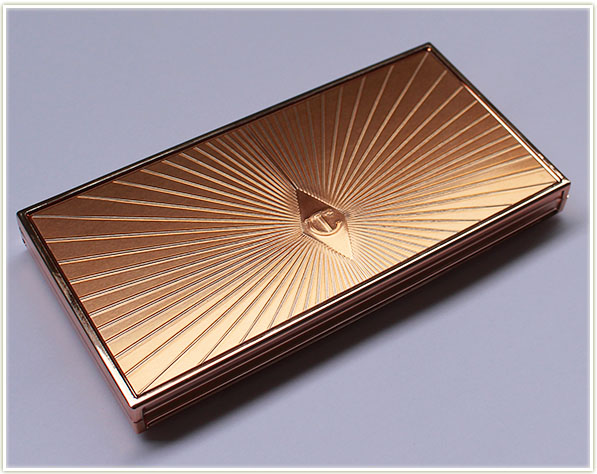
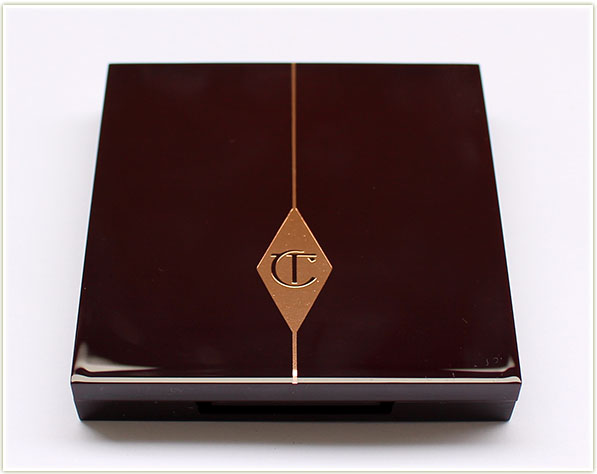
Charlotte Tilbury – Filmstar Bronze & Glow ($80 CAD)
The one thing I knew I wanted without a shadow of a doubt from Charlotte Tilbury‘s line was the Filmstar Bronze & Glow. At $80 CAD, this is by far the most expensive single item I own in my makeup collection. (Hilariously, given the current exchange rate, this is actually cheaper to buy in Canada than in the UK! So that means… it was a total steal right? ) The packaging feels and acts luxurious – it opens and snaps shut with a solid click. It’s slightly weighted, but this is a plastic compact and not a metal one. And it’s just stunning to look at. This is the kind of item you want to proudly display on your vanity.
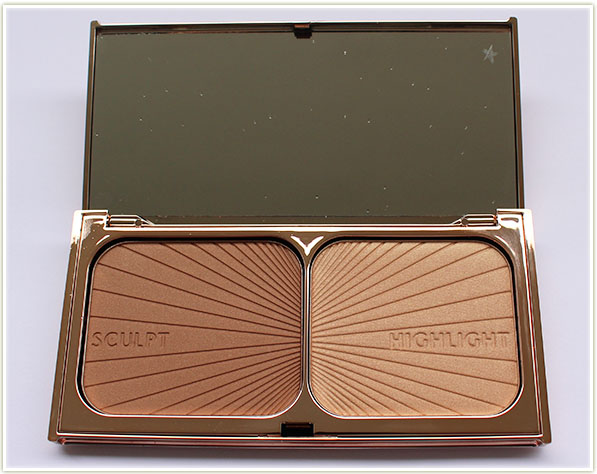
Charlotte Tilbury – Filmstar Bronze & Glow
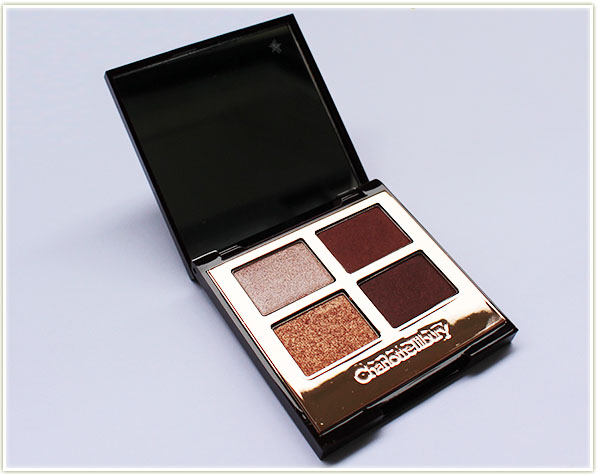
Inside the compact are two shades intended to sculpt and highlight your face. There’s also an enormous mirror on the inside which is massively appreciated.
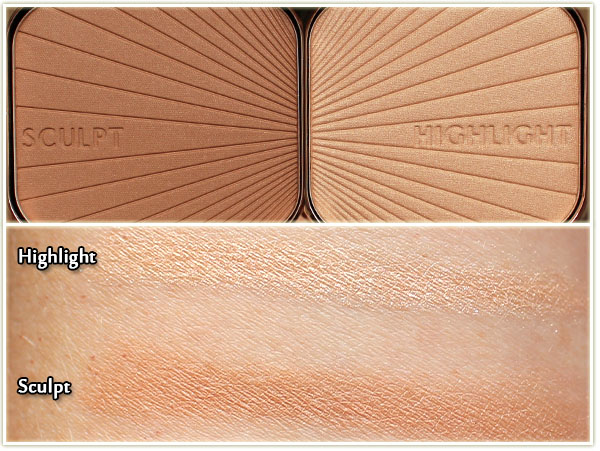
Charlotte Tilbury – Filmstar Bronze & Glow swatches
The Sculpt shade has an orange tinge to it, and there’s some shimmer. I would recommend using this as a bronzer instead of a contour because it does wonders to give you a sunkissed glow. (As a note, I’ve seen it look far cooler toned on other blogs, but when I tried it out it definitely came out more warm.)
The Highlight shade is a fairly standard gold shade that will give a beautiful sheen to the high points of your face.
Neither product has particles of glitter, they are both infused with a sheen. It’s also worth noting that these are incredibly pigmented and buttery soft. I made the mistake of jabbing my brush into the Sculpt shade the first time I used it and I picked up WAY too much product. Go gentle and sweep lightly into the product to pick some up!
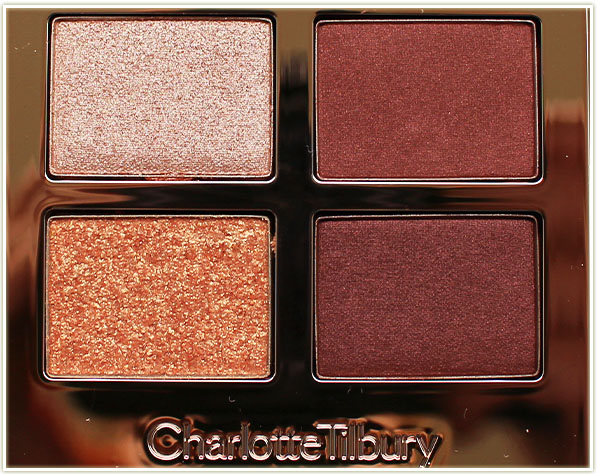
Charlotte Tilbury – The Vintage Vamp ($64 CAD)Charlotte Tilbury – The Vintage Vamp
Just look at that stunning quad. I mean come on… doesn’t that just look and feel fancy?
Charlotte Tilbury – The Vintage Vamp
Three of the shades are buttery soft ranging from satin to shimmer. The fourth shade, the gold, is basically a glitter topcoat. It’s described by Charlotte as a “Pop” shade – intended to glitter up your look and make it more nighttime appropriate. (If that matters to you that is, I’d wear it during the day regardless.) The Pop shade is definitely chunky and a bit awkward to work with. I couldn’t decide if using a brush or my finger was best.
Charlotte Tilbury – The Vintage Vamp swatches
I do feel the Enhance and Smoke shades are far too similar to each other. They look completely identical on the eye. However, they are both lovely shades and ones I’ll get an immense amount of use out of, so it’s not really a downer for me. However, if you’re looking for more definition, the two deeper shades in this quad won’t offer much difference in depth between the two of them.
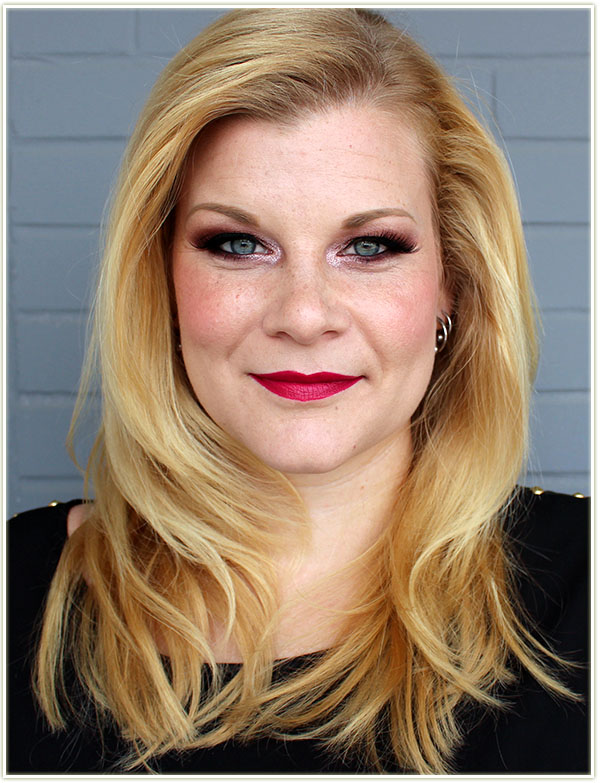
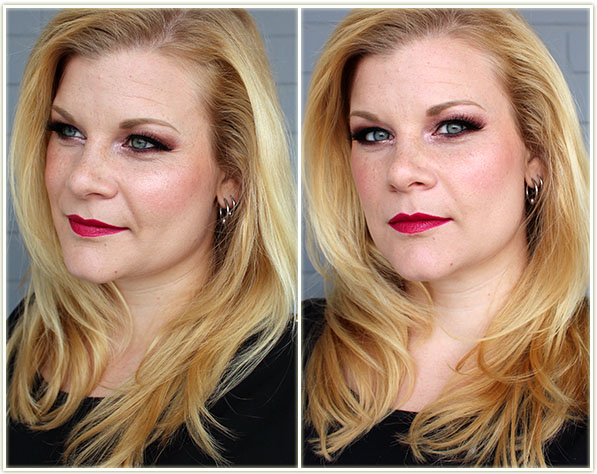
Wearing The Vintage Vamp eyeshadow quad and Filmstar Bronze & Glow
Here’s the look I came up with! There’s no denying that this is a sultry look, and I’m impressed with how easy it was to create. I wasn’t sure how well the champagne-pink shade would work with the gold topcoat, but I’m happy to report that it seemed to meld together seamlessly. These aren’t necessarily colours I would think to throw together in a look, so I’m glad they put them together for me as it forced me to try something different.
Wearing The Vintage Vamp eyeshadow quad and Filmstar Bronze & Glow
We may be on the brink of summer here in Toronto, but I love how autumnal this made me feel. The dark berry lips with the intense eyes is something I would wear regardless of the season. Heck, I think I’ve even already figured out what my Christmas makeup is going to be this year! (As ridiculous as that is to say in June!)
Wearing The Vintage Vamp eyeshadow quad and Filmstar Bronze & Glow
The shot above shows a bit more of the Sculpt and Highlight shades from the Filmstarpalette as well. The highlight is gorgeous, although not too intense. The Sculpt shade is heavily applied at the backs of my cheekbones and I like how it transitions my blush to back of my cheekbone.
The Vintage Vamp eyeshadow quadThe Vintage Vamp eyeshadow quad
Read on for full details on how to achieve this look.
The Vintage Vamp eyeshadow quad – tutorial
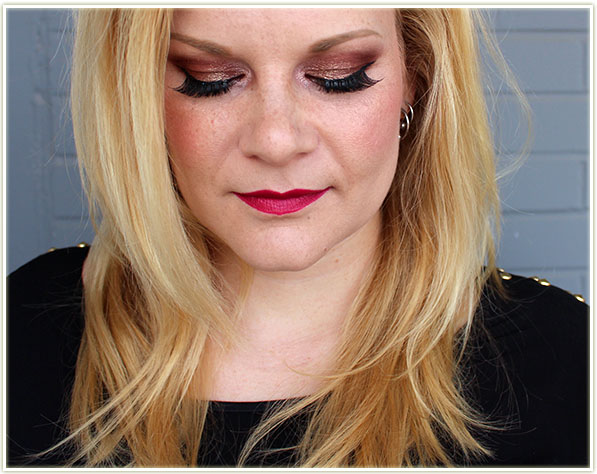
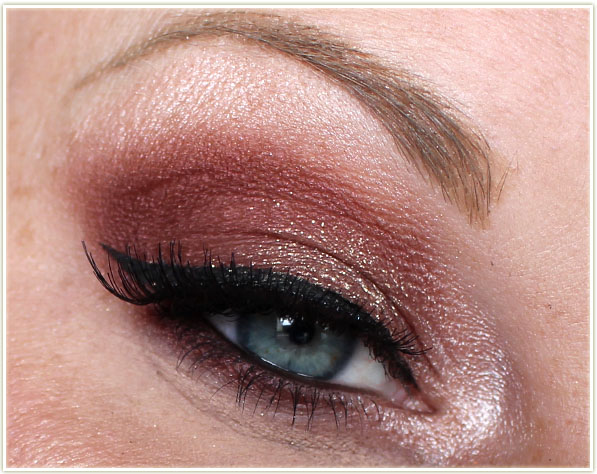
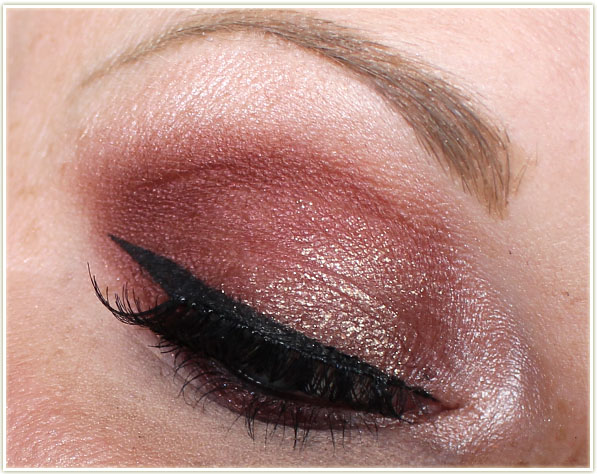
Eyes
Enhance shade all over the lid.
Smoke shade on the outer corner and pulled through the crease. This shade is also used to line the entire lower lash line.
Prime shade on the brow bone (lightly) and on the inner tearduct (heavily).
Pop shade applied to the inner half of the lid on top of the Enhance shade.
I used MAC‘s Blacktrack fluidline to create the wing and Marc Jacobs‘ Highligher Gel Crayon in Blacquer to tightline both waterlines. I applied CoverGirl‘s Clump Crushermascara to my lashes and threw on a pair of ArdellDemi Wispies false lashes as well.
Rest of the Face
Foundation: Boots No7 Instant Radiance in Cool Vanilla
Bronzer: Charlotte TilburyFilmstar Bronze & Glow (Sculpt)
Blush: CliniqueCola Pop
Highlighter: Charlotte TilburyFilmstar Bronze & Glow (Highlight)
Lips: Too FacedMelted Berry
If you’re in Toronto, Charlotte herself will be at Holt Renfrew on Bloor on June 24, 2015 between 6 and 8 pm. I’ll be there with bells on!
My makeup’s been getting more and more vibrant as we’re getting into the warmer months – there isn’t neutral look in this whole post! Enjoy. 🙂
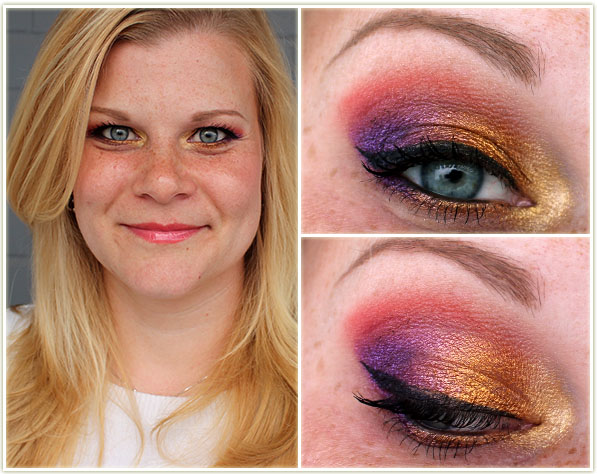
Um yes. So much yes. Not dissimilar to another look I’ve done recently (also using Makeup Geek shadows) but I love the extra pop of reddish orange shadow through the crease.
Eyes
(all Makeup Geek)
Untamed on inner half of the lid.
Masquerade on the outer half of the lid.
Poppy through the crease.
Vanilla Bean on the brow bone.
Rapunzel on the inner corner.
I tightlined my upper and lower lashlines with Urban Decay‘s Black Velvet liner, created the wing with MAC‘s Blacktrack fluidline and applied Make Up For EverSmoky Stretchmascara to my lashes.
Rest of the Face
Bronzer: Hard CandyHula Hula
Blush: I have no idea, I didn’t write it down 🙁 At a guess… maybe Tarte’s Charisma because I’m not sure what else I’d try to pair with this look.
Lips: RevlonPapaya gloss
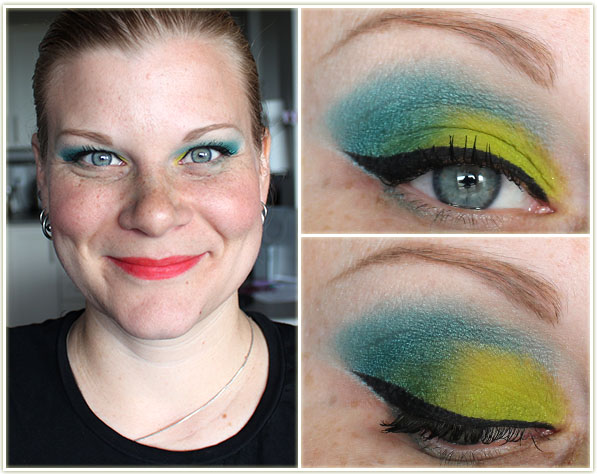
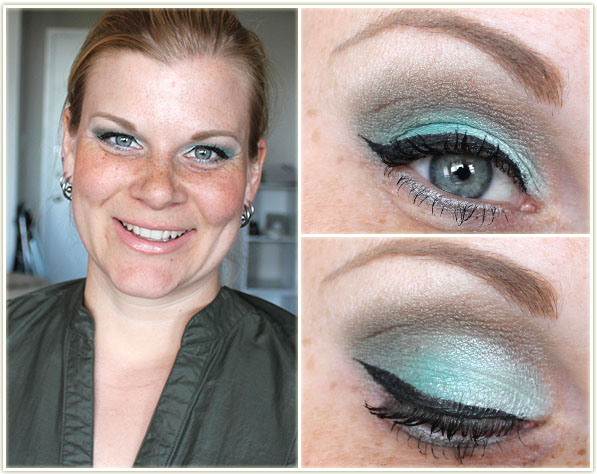
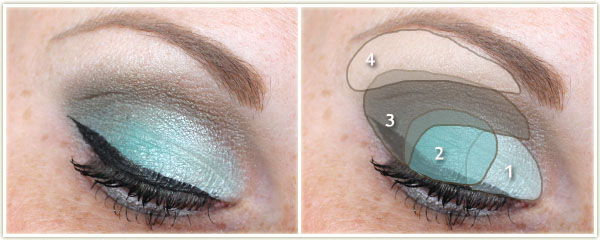
Playing around with one of Wet n Wild‘s Silverlake palettes. I’m not a massive fan of frosty blue-green shades, but this turned out decently enough.
Eyes
(all Wet n Wild shades from the Vegan Culture palette)
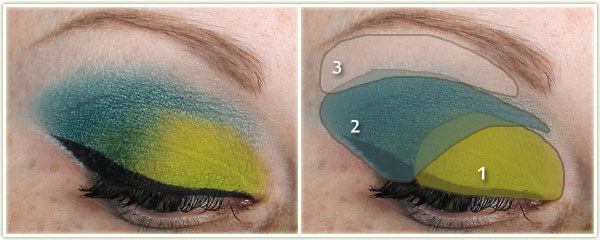
Light green on the inner half of the lid.
Bright teal shade on the center of the lid.
Dark green through the crease.
Frosty white shade (lightly!) on the brow bone.
I used the silver shade to line the lower lash line. I created the wing with MAC‘s Blacktrackfluidline and applied Make Up For EverSmoky Stretch mascara to my lashes.
Rest of the Face
Bronzer: Hard CandyHula Hula
Blush: MACRipe Peach
Highlighter: MACSoft & Gentle
Lips: Rimmel Apocalips in Nude Eclipse
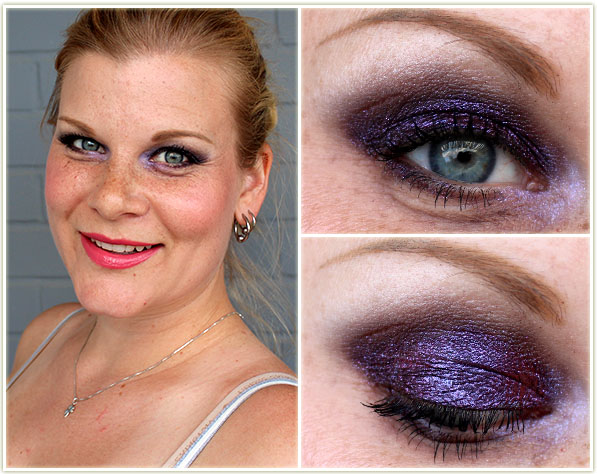
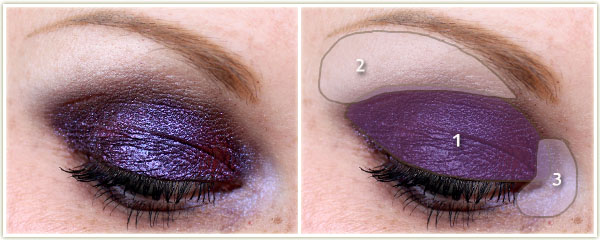
Holy CRAP. I wasn’t expecting this Lise Watier Aurora shadow in Violet to come out this intensely. I’m not sure the photographs show it, but there’s a slight reddish tinge to the shade too which adds a lovely dimension.
Eyes
I first covered my lid in NYX‘s Jumbo Eyeshadow Pencil in Black Bean, blended it out, then applied:
Lise Watier Aurora shadow in Violet over the entire lid and blended through the crease. I first applied it dry, then dunked my brush in water and applied it wet on top.
MACDazzlelight on the browbone.
Naked CosmeticsIV-03 on the inner corner.
I used Marc Jacobs‘ Highliner gel crayon in Blaquer to tightline my upper waterline. On my lashes is Make Up For EverSmoky Stretch.
Rest of the Face
Foundation: Boots No7 Instant Radiance in Cool Vanilla
Bronzer: Hard CandyHula Hula
Blush: HourglassDiffused Heat
Highlighter: Make Up For EverPro Sculpting Duo #1
Lips: Rimmel Apocalips in Celestial
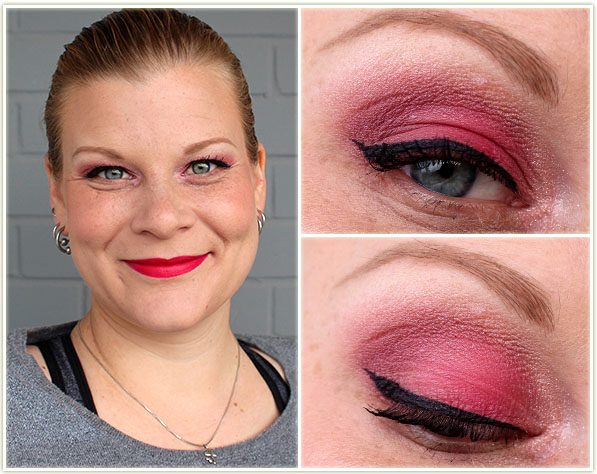
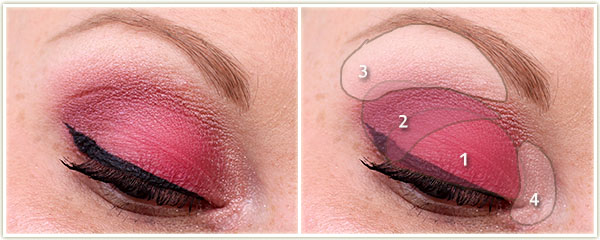
Another Wet n WildSilverlake palette! I wasn’t expecting this one to cause such a bang on my lids. It looks like such a soft, innocuous palette but I really managed to make it pop!
Eyes
(all Wet n WildThrift Store Chic palette)
Hot pink shade all over the lid.
Burgundy/pink shade in the outer corner and crease.
Pale cream shade on the browbone.
Sparkly beige-pink shade on the inner corner.
I created the wing with MAC‘s Blacktrack fluidline and applied essenceLash Princessmascara to my lashes.
Rest of the Face
Foundation: Boots No7 Instant Radiance in Cool Vanilla
Bronzer: Hard CandyHula Hula
Blush: once again… forgot to write it down… what the hell
Highlighter: MACSoft & Gentle
Lips: Wet n WildCherry Picking
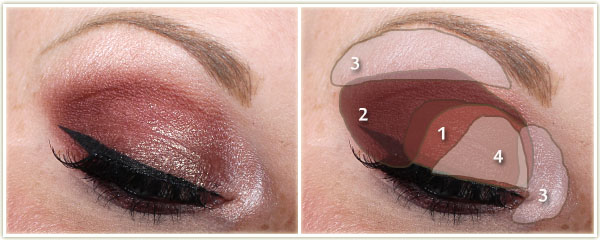
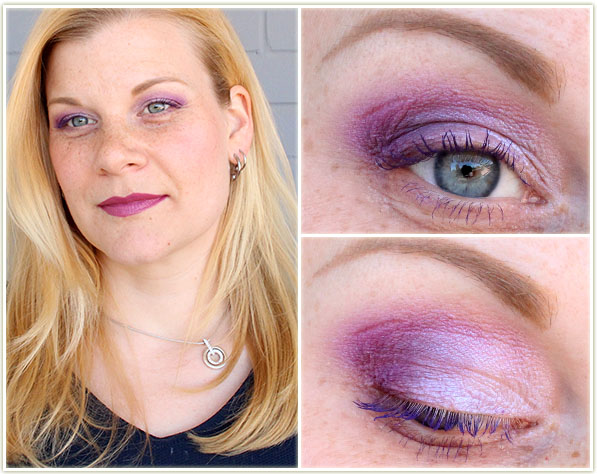
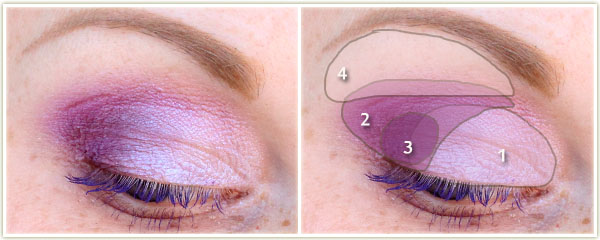
I’ve found myself drawn back to my MAC shadows lately… probably because I feel like I’ve been neglecting them (I blame Makeup Geek).
Eyes
MACVellum all over the lid.
MACDame’s Desire on the outer corner and through the crease.
MACBlackberry on the outer corner to deepen it up.
Wet n WildBrule on the browbone.
On my lashes is Sephora‘s Purple mascara.
Rest of the Face
Bronzer: Hard CandyHula Hula
Cheeks: It’s like I totally forgot about writing down my blush all week… 😐