Category Archives: Tutorials

Mary Kay Into The Garden Color Compact (Review, Swatches & Look)

Mary Kay Into The Garden Color Compact

I’m fairly new to Mary Kay makeup. My only lasting impressions of the brand was that it was always an Avon-type brand. You know the kind… where older women in your neighbourhood would have makeup parties and they’d all go through the catalogue together and pick out items they wanted to wear. They’d then place their order via their representative and wait for their products to get delivered. Since my recollections of this were from an eight year old perspective as I watched my mom take part in these things, the brand kind of became branded with a “that’s for old ladies” perspective. And while I think some of those memories still linger for me, I’m quite happy to try out a brand for the first time and see what *I* think about it, and not what my 8 year old self’s impressions are of it.

Mary Kay Into The Garden Color Compact

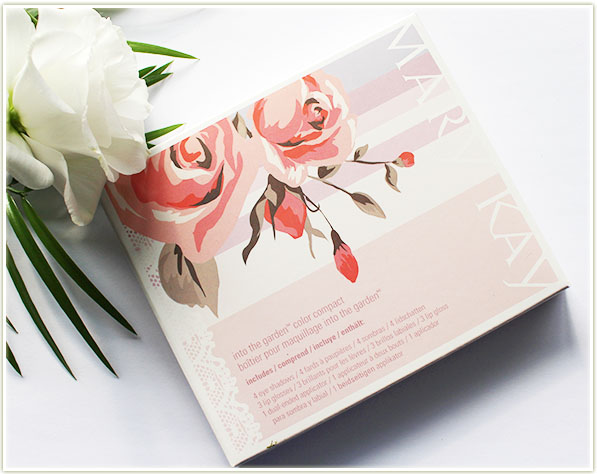
Well that was an intro and a half. Let’s get into this. As part of their spring collection, Mary Kay has released their Into The Garden collection (available now) and this Color Compact is part of that release. Florals for spring is hardly a new theme, but I know there’s a lot of women out there who appreciate the softness of pastels and gentle colours when it’s finally time for us to exit winter.

Mary Kay Into The Garden Color Compact

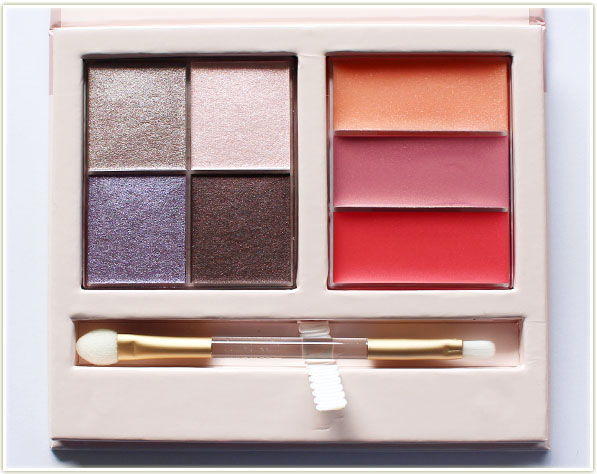
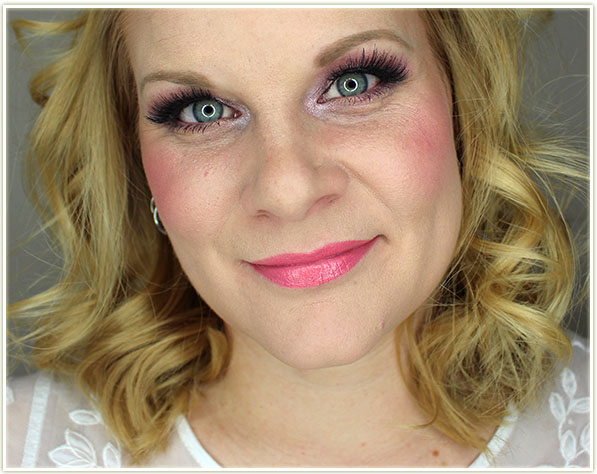
The Into The Garden Color Compact comes with four eyeshadows that all have a shimmery finish. The three lip colours are more of a gloss, but they do have some colour in them so they’ll help augment the colour of your lips.

Mary Kay Into The Garden Color Compact - Swatches
Mary Kay Into The Garden Color Compact – Swatches

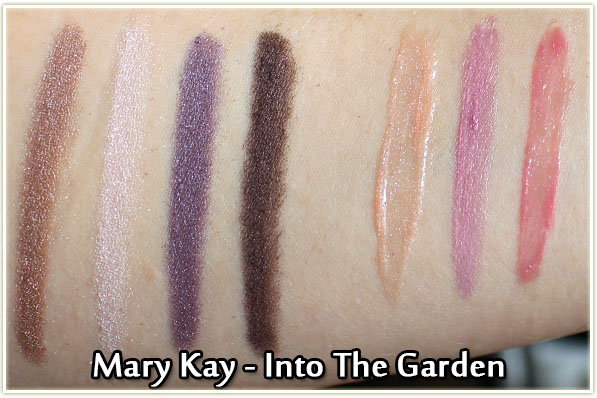
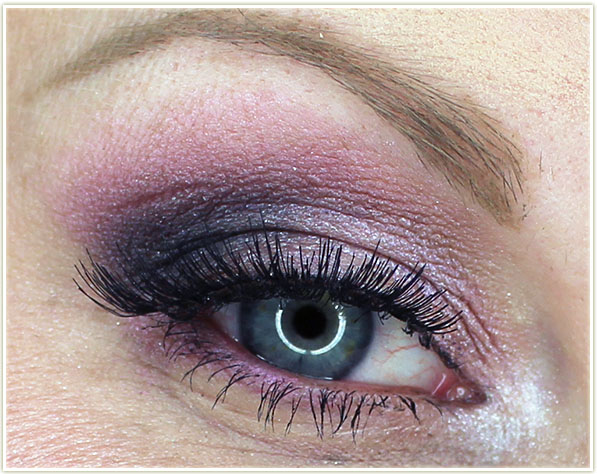
The eyeshadows impressed me: they may all have the same finish, but they’re soft, easy to blend and the pigmentation is definitely there. There’s no chalky-ness to them and all four colours are highly complementary.

The coloured glosses stood out a bit more to me in this palette as they’re not shades I would expect to see paired with these eyeshadows. They also have a bit of glitter in them.

Wearing Mary Kay Into The Garden

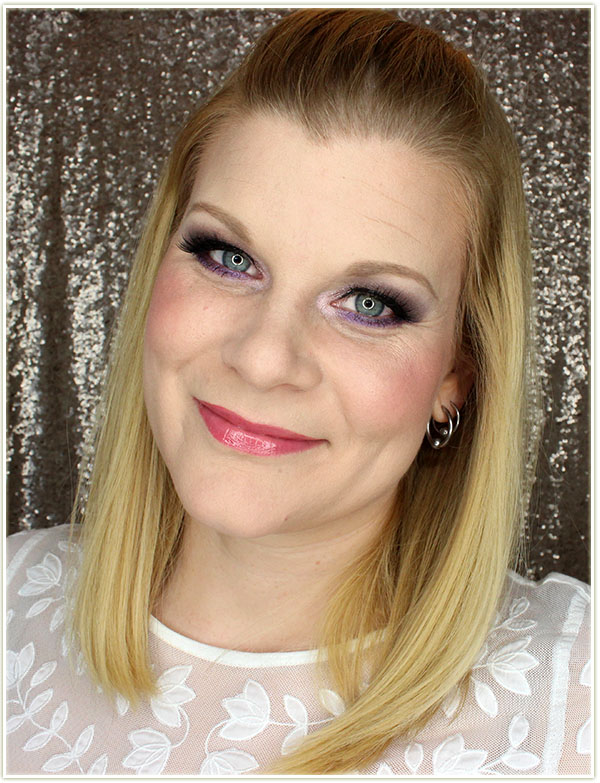
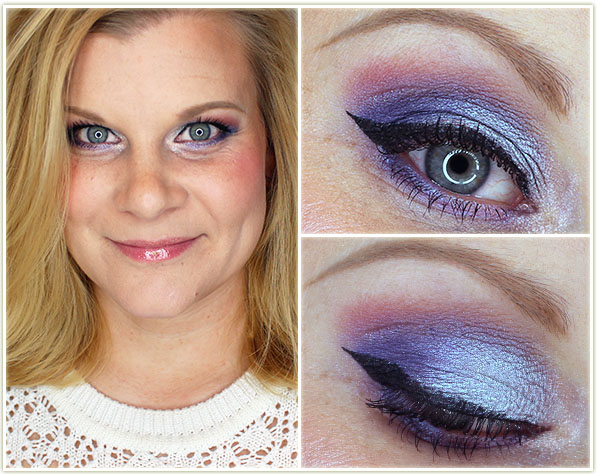
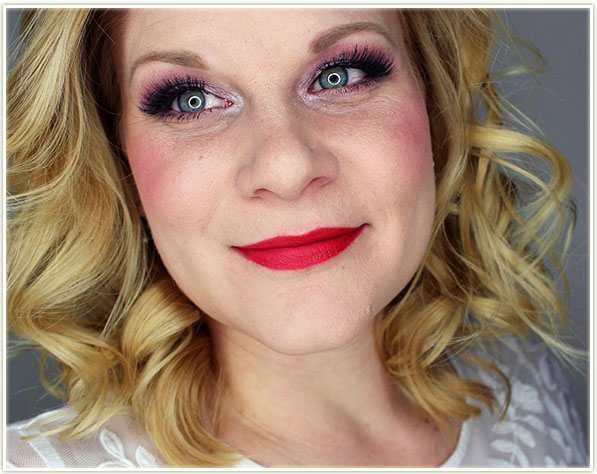
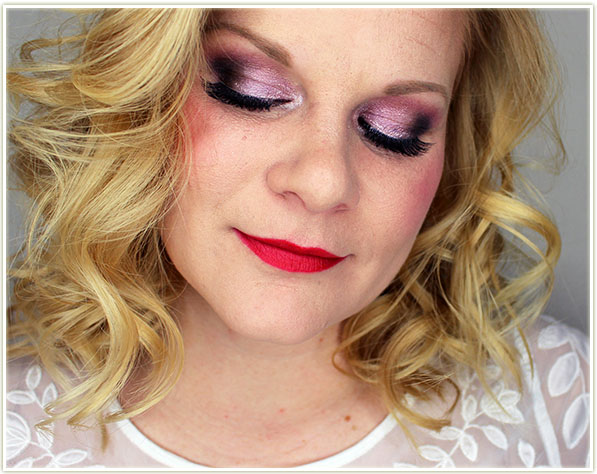
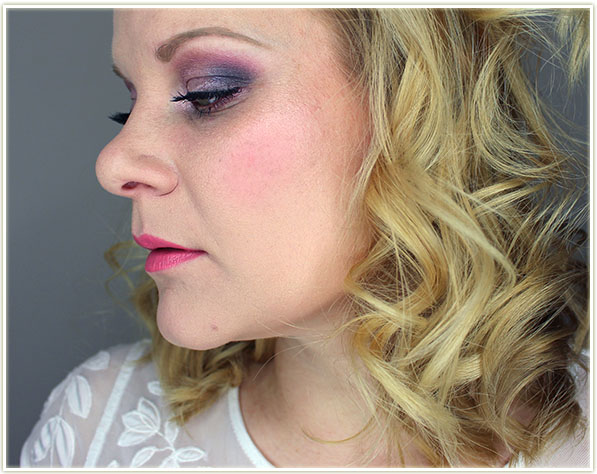
Here’s the look I put together using the Into The Garden Color Compact.

Wearing Mary Kay Into The Garden

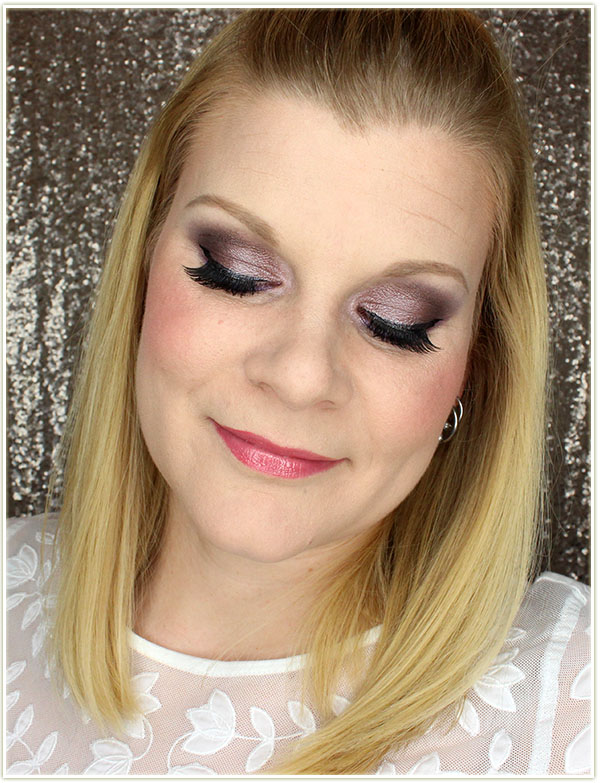
I used all four eyeshadows and the more coral-red lip shade.

Wearing Mary Kay Into The Garden - close up
Wearing Mary Kay Into The Garden – close up
Wearing Mary Kay Into The Garden - close up
Wearing Mary Kay Into The Garden – close up

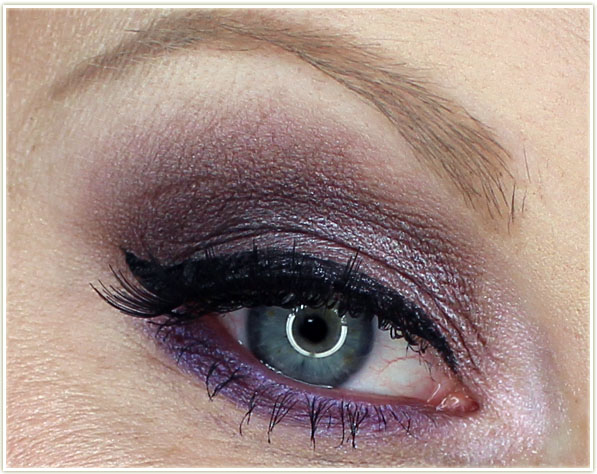
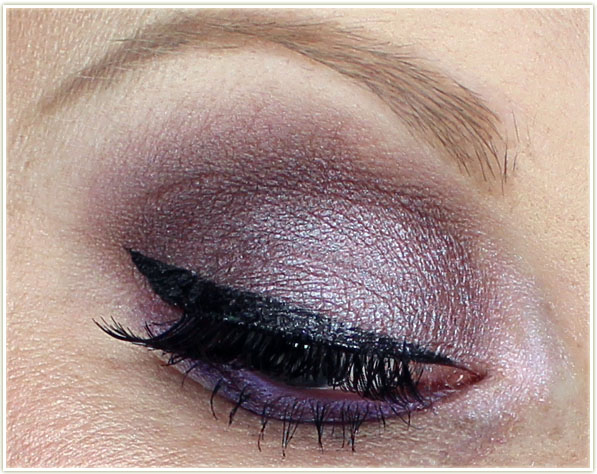
I applied the taupe shade all over the lid, the deep, dark purple on the outer corner and through the crease. I lined my lower lash line with the vibrant purple and applied the soft pink shade to the inner corner. The look came out quite pretty, and yet dramatic enough for my tastes.

Let me know what YOU think of Mary Kay products! I was pretty impressed with the eyeshadows in this palette and would love to hear more about what you recommend from the brand.

The product featured in this post was provided to me for consideration.

VIDEO: The 100’s Wanheda/Clarke

The 100 - Season 3 Episode 3 - Ye Who Enter Here Makeup Tutorial
The 100 – Season 3 Episode 3 – Ye Who Enter Here Makeup Tutorial

I love, love, LOVE the TV series “The 100” and I got a liiiiittle excited during the  Season 3 episode “Ye Who Enter Here” and Clarke’s incredible Grounder makeup during that council scene. So I sat down to recreate it. Enjoy!

A few housekeeping notes…

  1. I’m going to try doing two videos a week going forward (on Tuesdays and Thursdays) because I’m really enjoying the format.
  2. Blog posts will continue on the Monday/Wednesday/Friday schedule with Saturday posts when I have skincare to talk about, and Sundays while I continue to have makeup palettes to swatch (annnnd there’s still about twenty of them left in the queue!).

That’s it! I hope you’re enjoying my videos as much as I’m loving making them!

What’s On My Face – Volume 45

As I was putting together this roundup of looks, I started to realize just how much I’ve been using my Makeup Geek shadows lately. I mean, I use them a lot on a regular basis, but three out of the five looks are solely Makeup Geek in here!


Viseart Editorial Brights makeup look

I did this for a YouTube video tutorial but had to repost it here because I know not everyone has the time for videos (I’ll continue to repost my video tutorial looks on the blog as time goes on).

Viseart Editorial Brights makeup look

Eyes
(using the Viseart 08 Editorial Brights palette) I first covered my lid with NYX‘s Jumbo Eyeshadow Pencil in Milk and then:

  1. MAC‘s Cork in the crease.
  2. The yellow shade from the palette on the inner third of the lid.
  3. The orange on the middle of the lid.
  4. The red on the outer half of the lid.
  5. The lime green on the inner corner of the lid.
  6. (also listed as 5) MAC‘s Blanc Type to highlighter the brow bone.

I applied the light blue to the middle of my lower lash line and the purple to the outer section of the lower lash line. I created the wing with Kat Von D‘s Tattoo Liner in Trooper and tightlined my water lines with Marc Jacobs‘  Highliner Gel Crayon in Blacquer. I coated my lashes with Make Up For Ever Smoky Stretch mascara and applied House of Lashes Bombshell falsies.

Face

  • Primer: Make Up For Ever Step 1 Smoothing Primer
  • Foundation: Make Up For Ever UltraHD in Y225
  • Bronzer: Joe Fresh Sand
  • Blush: Hourglass Diffused Heat
  • Highlighter: Becca Champagne Pop
  • Lips: Too Faced Melted Chocolate Milkshake with Sephora‘s lipgloss in Good Fairy

KAt Von D Mi Vida Loca Remix look

Although I love the Kat Von D Mi Vida Loca Remix palette, I’ve not been using it because I was trying to work through a bunch of other palettes. I said enough was enough, and went back to it for it this look!

KAt Von D Mi Vida Loca Remix look

Eyes
(Using the Kat Von D Mi Vida Loca Remix palette) I first applied NYX‘s Jumbo Eyeshadow Pencil in Milk to my lid, then:

  1. Misfit on the inner third of the lid.
  2. Synth on the middle of the lid.
  3. Dark Wave on the outer corner.
  4. (numbers are screwed up, sorry) Vinyl on the inner corner (to the right of 1).
  5. Ignore this one… I haven’t a clue if I put anything on my brow bone.

Echo is lining the outer half of my lower lash line. I coated my lashes with Make Up For Ever‘s Smoky Stretch mascara.

Face

  • Bronzer: Joe Fresh Sand
  • Blush: MAC Warm Soul
  • Lips: MAC Sweet Tooth

Makeup Geek look

Playing around with my new Makeup Geek duochromes!

Makeup Geek look

Eyes
(all Makeup Geek)

  1. Cupcake through the crease.
  2. Kaleidoscope on the lid.
  3. Pop Culture on the outer third of the lid.
  4. Duchess on the outer corner.
  5. Prism on the inner corner
  6. Vanilla Bean on my brow bone.

I used Blacklight on the lower lash line and created the wing with MAC‘s Blacktrack fluidline. I covered my lashes with Make Up For Ever Smoky Stretch mascara.

Face

  • Foundation: Revlon Colorstay in 200 Nude
  • Bronzer: Joe Fresh Sand
  • Blush: MAC Life’s A Picnic
  • Lips: Sephora Good Fairy

Makeup Geek look

Before anyone says anything – I know the lips look weird. I was playing around with different shades and I *thought* this went together. It wasn’t till I saw the photos that I was like “ohhh….”. haha

Makeup Geek look

Eyes
(all Makeup Geek)

  1. Prism all over the lid.
  2. Typhoon through the crease.
  3. Dirty Martini on the outer third of the lid.
  4. Vanilla Bean on the brow bone.

I created the wing with Kat Von D‘s Tattoo Liner in Trooper and coated my lashes with Clarins’ Aquatic Green mascara.

Face

  • Foundation: Revlon Colorstay in 200 Nude
  • Bronzer: Joe Fresh Sand
  • Blush: Tarte Blissful
  • Lips: Colour Pop Donut

Makeup Geek look

More Makeup Geek goodness!

Makeup Geek look

Eyes
(all Makeup Geek)

  1. Peach Smoothie through the top of the crease.
  2. Poppy through the crease.
  3. Fortune Teller on the lid.
  4. Morocco on the outer third of the lid.
  5. Voltage on the inner corner.
  6. Vanilla Bean on the brow bone.

I created the wing with MAC’s Blacktrack fluidline and coated my lashes with Make Up For Ever‘s Smoky Stretch.

Face

  • Bronzer: Joe Fresh Sand
  • Blush: Hourglass Incandescent Electra
  • Lips: Benefit Coralista gloss

Valentine’s Day Makeup Look featuring Hard Candy

Hard Candy Valentine's Day Look

Hard Candy and I have a past that involves a lot of love and a lot of glitter. I remember becoming enamoured with their products at the ripe old age of 15. I was turned on to their nail polishes by Sarah Michelle Gellar (of Buffy the Vampire Slayer fame who wore their peach polish. Of course, I wasn’t into nail polish really (and still am not to this day), but I was *OBSESSED* with BtVS. And whatever SMG/Buffy liked, I therefore LOVED.

And so, my Hard Candy obsession started. I  have vague memories of the Hard Candy counter at Sears in the Rideau Centre in Ottawa and spending my hard earned babysitting money (keep in mine I was 14 years old) on a 20 dollar eyeliner. (I’m 33 years old and spending $20 on an eyeliner freaks me out NOW and it’s almost 20 years later!)

Hard Candy makeup
Hard Candy makeup

So anyway, this eyeliner. It was called Cyber and it was a black base shot through with silver glitter. It was my life blood at that age. It lined my eyes and the glitter splashed all over my cheeks due to fallout. I loved it so, so much. I went through that entire eyeliner and even repurchased another when Hard Candy was dying out as a high end brand during my first year of university. I have a very strong memory of going to the Hard Candy counter at Yorkdale mall (in Toronto where I was attending York University) and buying my very last Cyber eyeliner liner (still priced around $20). They dissolved within a few months of that purchase.

Hard Candy makeup
Hard Candy makeup

And here we are now. It’s 2016 and Hard Candy has morphed into a drugstore brand sold at Walmart. It’s a weird twist of fate that one of the first brands that made me fall in love with makeup has since turned into a brand that I actually have to spend less to obtain now even though it’s 20 years later.

Since I’ve always had a whole lot of love for Hard Candy, I put together a soft romantic look with two different lip choices that, while appropriate for Valentine’s Day, would also be great for any kind of date. I hope you enjoy. 🙂

Valentine's Day look with a strong lip
Valentine’s Day look with a strong lip colour
Valentine's Day look with a strong lip
Valentine’s Day look with a strong lip colour

For the face, I used the All Matte Up Hydrating Lip Stain in Mattely in Love as a blush (I rubbed it on the back of my hand first and then used a small stippling brush to apply it to my cheeks) and then applied the blush in Honeymoon as a highlighter to bring out the glow on my cheeks. I also applied the Mattely in Love lip stain to my lips as well (that colour is incredible!).

Hard Candy eye look
Hard Candy eye look

I primed my eyes with the Eye Def Metallic Eyeshadow in Golden Earth and then applied the soft lavender duochrome shade from the Pinking of You palette all over the lid, I put the deeper pink through my crease and on my lower lash line and used the shimmery white on my inner corner. On my outer corner I used the Fierce Effects eyeshadow in Heart & Soul (the black shade) and blended that in to deepen everything up. Pop on your favourite mascara and some false lashes, and your eyes are set!

Valentine's Day look with a soft lip colour
Valentine’s Day look with a soft lip colour

If you’re looking for something a bit softer on the lips, try using their Beloved lipstick instead. It’s creamy and hydrating and will add a bit of shine to your lips.

Valentine's Day look with a soft lip colour
Valentine’s Day look with a soft lip colour
Bonus cat photo!
Bonus cat photo!

Thanks for listening to my Hard Candy story and I hope you enjoyed the looks! And please, please let me know if you have any experiences with Hard Candy as a brand (both old and new). 🙂

The products featured in this post were sent to me for consideration.