This year, Toronto is the host city for World Pride. I have loved Pride ever since I moved to Toronto and into the Village. I know Pride gives everyone a different feeling, but to me it’s a time to celebrate freedom, be happy, and wear a metric ton of bright colours and glitter.
I’ve been saving these looks for a lonnnng time. Even before I had a blog I was all “I need to photgraph these because some day… I’ll use them for… something.” Since these are all taken over a year ago (during last year’s Pride Week) the quality may be a little bit different and I definitely don’t have any closed eye shots so I could map out what colours go where. But I’ll do my best to describe!
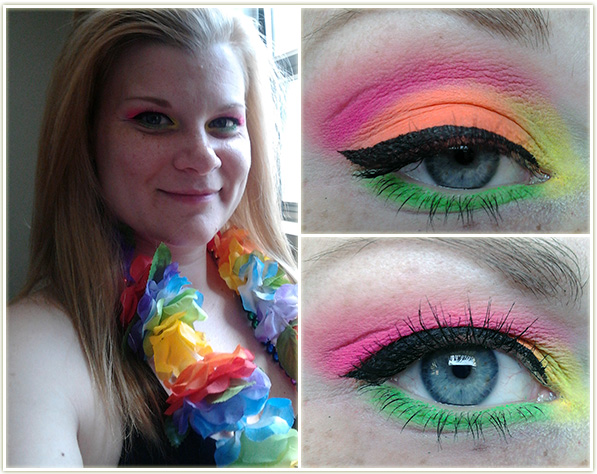
If you’re looking to shock people with a neon look, then this one is a darn good place to start. Although the up close picture shots make it look really cool, just be aware that this is not an especially flattering look.
I wore this during my soccer league’s Pride Parade float last year and it held up through the heat and the inevitable water bomb attacks that happened throughout the parade.
Eyes
- Urban Decay Primer Potion in Original all over the upper and lower lids.
- NYX Jumbo Eyeshadow Pencil in Milk all over the upper lid – smooth out with your finger.
- Then using the Sleek Acid Palette: Neon orange on the lid, neon pink through the crease, neon yellow in the inner corner and the neon green to line the lower lash line.
- A touch of Urban Decay’s Buck to blend out the crease and make the pink a touch less harsh.
- Physicians Formula Eye Booster in Ultra Black to create the wing.
- L’Oreal Voluminous Carbon Black mascara on my lashes
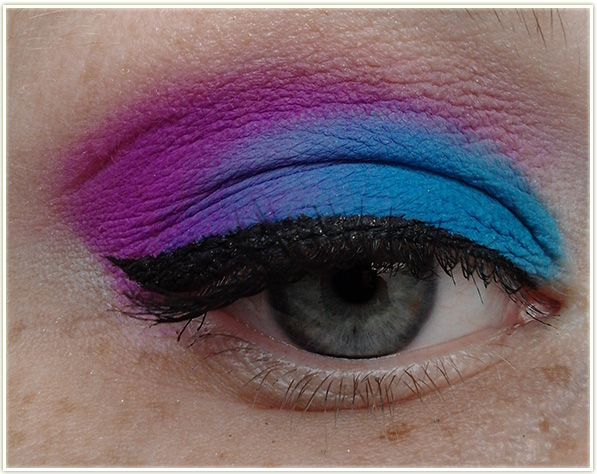
This is a quick vibrant one that can be done using any two really pigmented colours. The week of Pride, I tend to mix colours based on the rainbow’s gradient and go from there. For example, on Monday I’d wear red/orange, Tuesday yellow/green, Wednesday blue/purple, etc. If you stick to the rainbow gradient, it’s very hard to mismatch colours.
For the above look, I used:
- Urban Decay Primer Potion in Original to prime my lid
- NYX Jumbo Eyeshadow pencil in Milk as a solid base – be sure to blend it out
- Then using Sleek’s Ultra Mattes V1 palette: Sugarlite all over the lid, with Bolt in the outer corner and through the crease. A little bit of Pow! to highlight the brow with a touch of Urban Decay‘s Naked eyeshadow in the crease to blend out the shades through the crease.
- Maybelline Gel Liner in Blackest Black to create the winged liner
- And finally, CoverGirl Clump Crusher mascara on my lashes
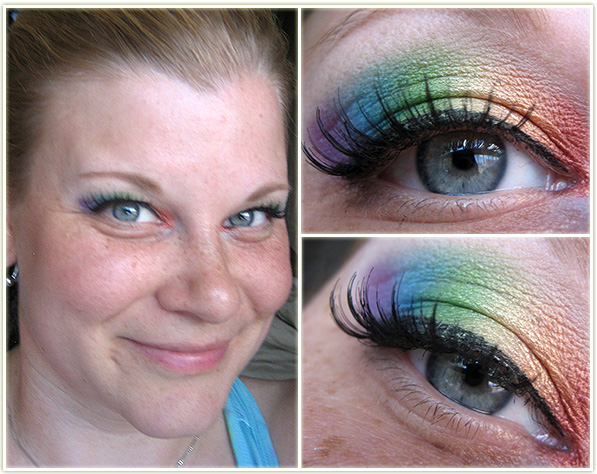
And my favourite one! This came out so much better than I ever thought it would. Every Pride I end up wearing this to work at least one of the days of the week. I think it’s really vibrant and beautiful. And it’ll definitely get you noticed!
- Urban Decay Primer Potion in Original to prime my lid
- NYX Jumbo Eyeshadow Pencil in Milk to create the base
- Starting from the inner corner, using all MAC shadows, apply small stripes of shadow, then blend them into the next colour. I used (from inner corner to outer): Coppering, Amber Lights, Goldmine, Bio Green, Freshwater and Parfait Amour.
- MAC Blacktrack Fluidline for my liner
- L’Oreal Voluminous Carbon Black mascara on my lashes with Ardell 102 false lashes on top.
I hope this gives you some ideas for Pride. Keep in mind that pretty much anything goes throughout Pride so you can feel free to wear whatever you like.