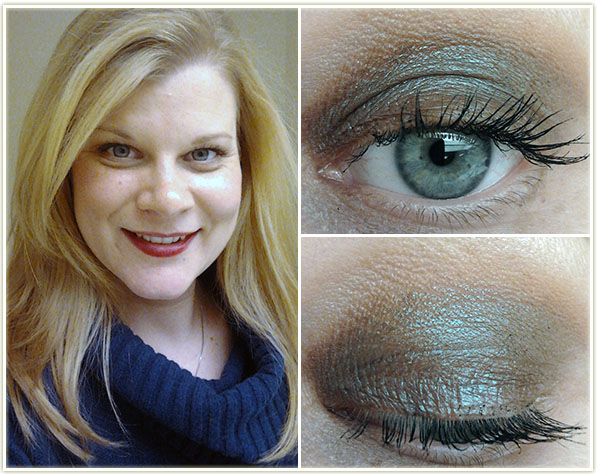
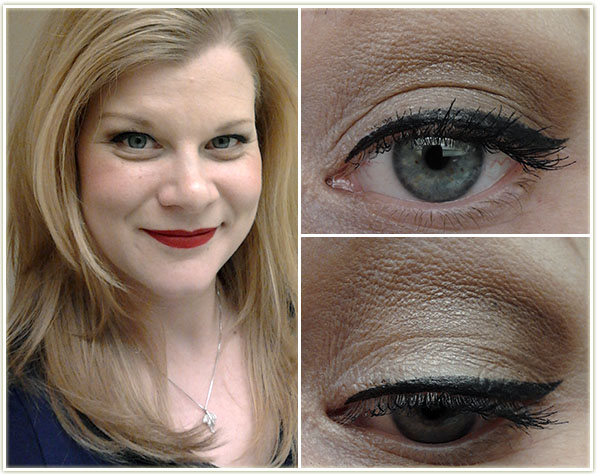
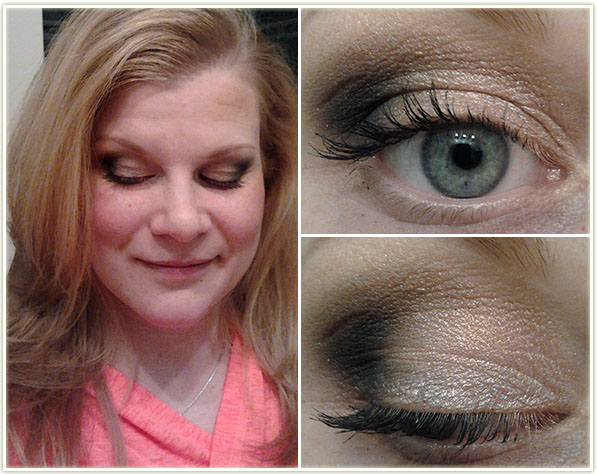
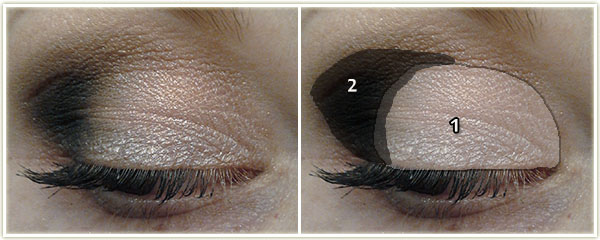
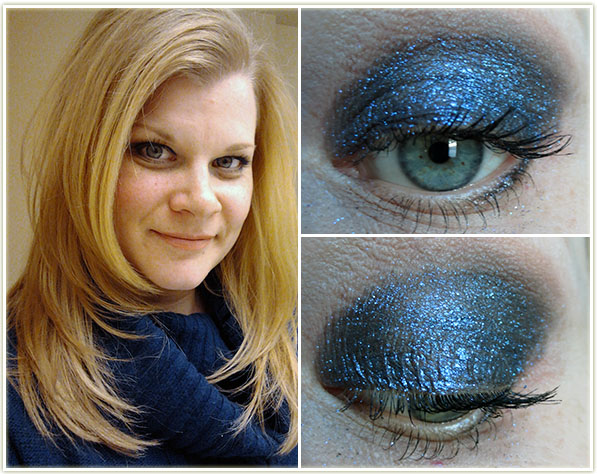
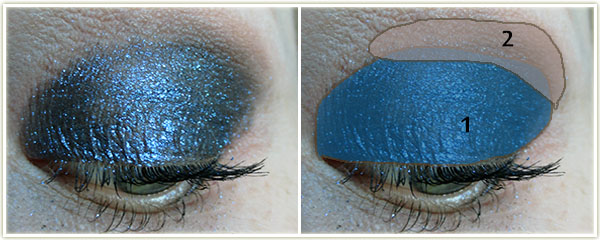
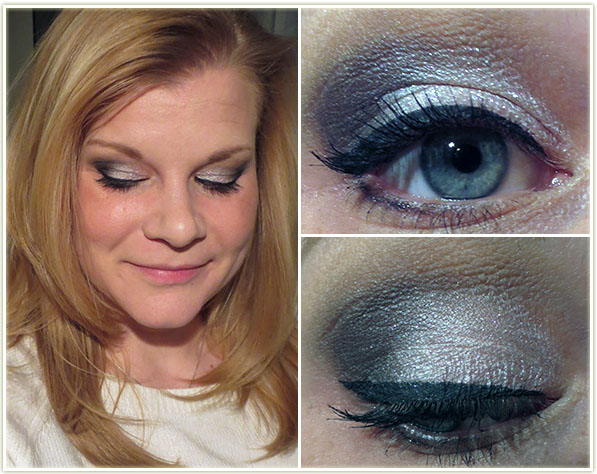
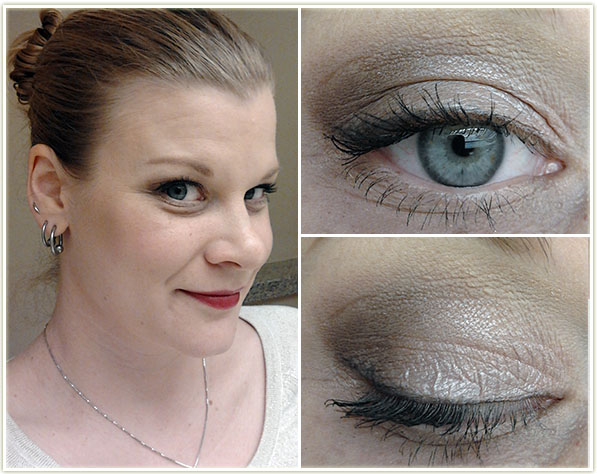
I hadn’t used MAC‘s Club in a really long time, and when I do, I tend to use it just in the crease which honestly doesn’t really show off just how awesome the shade is. So I decided to try something different and use it all over the lid.
Eyes: Primed with Urban Decay Primer Potion in Original (this is the day when this primer suddenly stopped working on me and this entire eye look ended up a creased mess by the end of the day!), then:
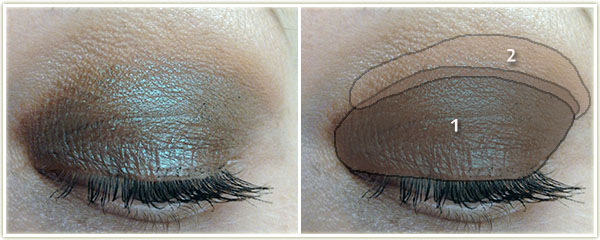
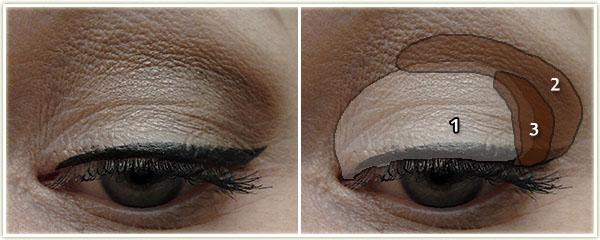
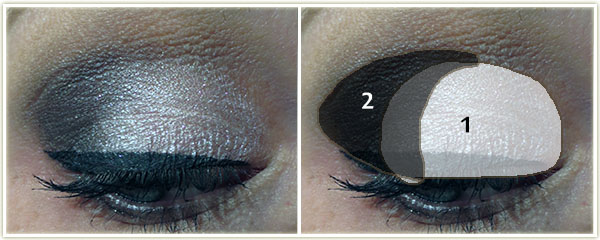
MACClub all over the entire lid right up and over the crease.
Makeup GeekCreme Brulee at the top of the crease to blend out the edges of Club.
MACBrule was used to highlight the brow with L’OrealVoluminous Carbon Black on my lashes.
Rest of the Face
Foundation: MUA Matte in Shade 1 Soft Sand
Concealer: MAC Select Cover-up in NW20
Bronzer: Physicians Formula Bronze Booster in Light/Medium
Blush: Cargo Medocino
Lips: Revlon Just Bitten Balm + Stain in Twilight
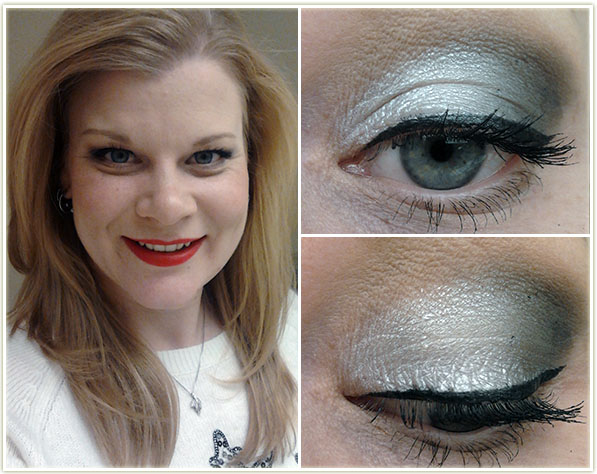
My eye makeup matched my shirt. That’s pretty much the only logic I applied here!
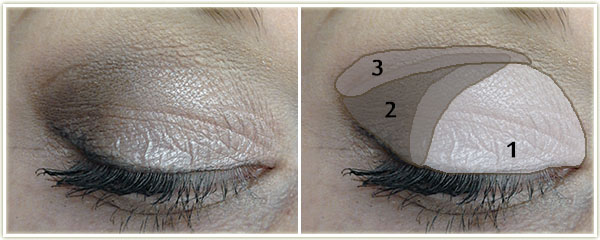
Eyes: NARS Pro Primer eye primer, then:
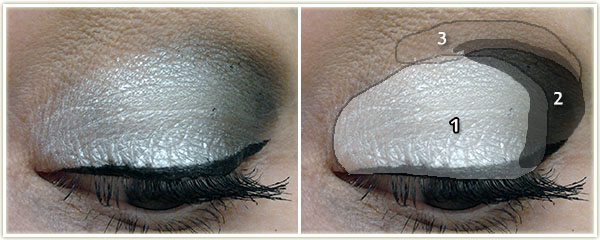
MACCrystal Avalanche all over the lid.
MACPrint in the outer corner.
Makeup GeekCreme Brulee to blend out the upper crease.
MACBrule to highlight the brow and L’OrealVoluminous Carbon Black on my upper and lower lashes. Make Up For Ever Aqualiner in 13 Black to create the wing.
Rest of the Face
Foundation: Revlon Colorstay (Combination/Oily) in Buff
Bronzer: Revlon Photoready in Bronzed & Chic
Concealer: MAC Select Cover-up in NW20
Blush: MACWarm Soul
Lips: RevlonFire and Ice
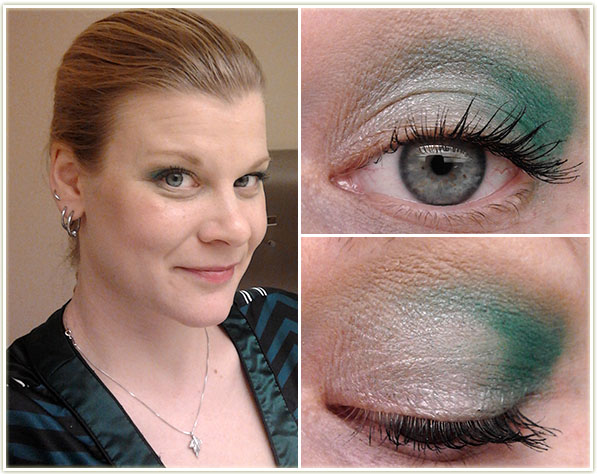
Although I tend to think of the Laura MercierArtist 2 palette as predominantly purple, there are a lot of neutral shades in there that need recognition too!
Eyes: Urban Decay Primer Potion in Eden all over the lid, then:
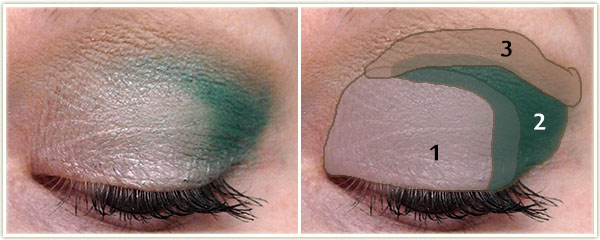
(all Laura Mercier) Sparkling Dew all over the lid.
Bamboo through the crease.
Truffle to darker up the outer corner.
MAC Brule on the browbone, Make Up For Ever Aqualiner in 13 Black for the winged linger and L’OrealVoluminous Carbon Black mascara on my upper lashes.
Rest of the Face
Foundation: Bourjois Healthy Mix Serum in Shade 51 Light Vanilla
Bronzer: Physicians Formula Bronze Booster in Light/Medium
Blush: IllamasquaHussy
Lips: MACRussian Red lipstick with Brick lip pencil
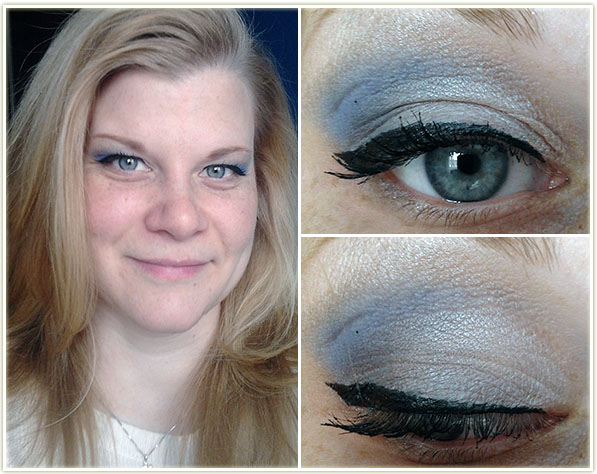
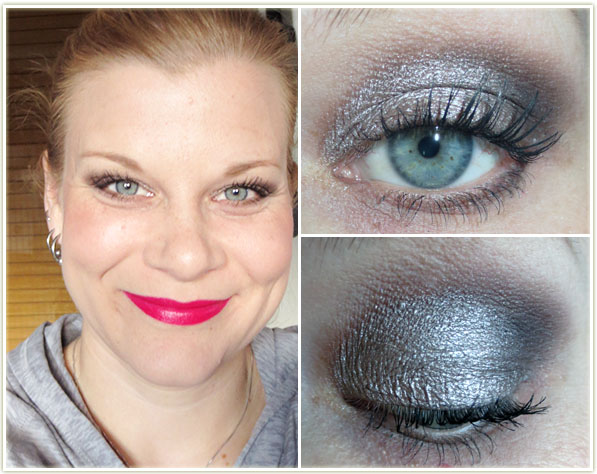
This one showed up decently in pictures, but I can’t say I really liked the end result. The blue shade (Illamasqua‘s Imagine) was sheer, powdery, patchy and just flat out miserable to apply. It needed a insane amount of layers AND it faded throughout the day.
Eyes: NARSPro Prime all over the lids, then:
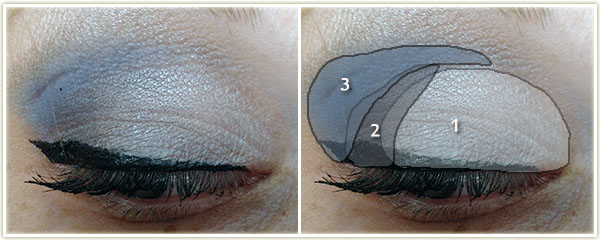
Urban DecayVirgin on the inner two-thirds of the lid.
Urban DecayGunmetal in sort of an angular stripe at the outer corner.
IllamasquaImagine at the outer corner and blended into the crease.
Urban DecayVirgin to highlight the brow, Make Up Forever Aqua Liner in 13 Black for the wing and Too FacedBetter Than Sex mascara on my upper lashes.
Rest of the Face
Foundation: none
Bronzer: TartePark Ave. Princess
Blush: TarteCrave
Lips: nothing
Super quick one while I was on vacation.
Eyes: NARSPro Prime all over the lid, then:
(all Urban Decay) Sin all over the lid.
Creep in the outer corner.
Virgin to highlight the brow and Too FacedBetter Than Sex mascara on my lashes.
More makeup looks I’ve done over the past few weeks ranging from stuff I wore to work, out to a bar or was just headed over to a friend’s place! I was really happy with this set of looks and I hope you enjoy them.
As a note, I’ve switched to NARS‘ Pro Prime eyeshadow primer, so that’s what I use in all of my looks now unless otherwise stated.
I loooove this one! It took me a lot more time to put this one together because I don’t normally get this creative and use so many shadows. (Seriously, if you haven’t noticed, I tend to stick to about two lid colours!) I don’t typically wear this much shadow/liner under my eyes on a regular basis because holy hell is that area ever sensitive on me and I usually end up with very watery eyes. This frustrates me because I realize just how much a makeup look comes together when you shade under your eyes!
Anyway, moving on.
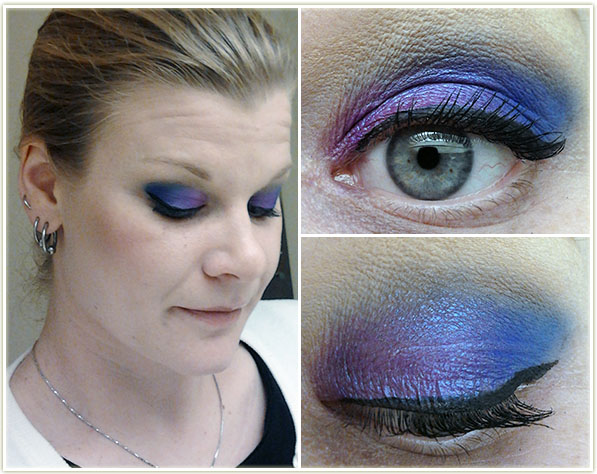
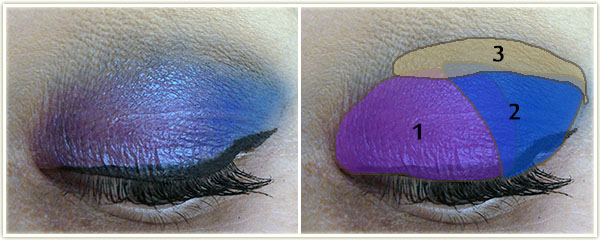
With this, I had one goal: I wanted to use the MUFE rainbow glitter that I had picked up last month. I also hadn’t done purple look in quite a while so I figured this was as good a time as any.
Eyes: I first applied NYX‘s Jumbo Eye Shadow Pencil in Milk all over the lid as a base.
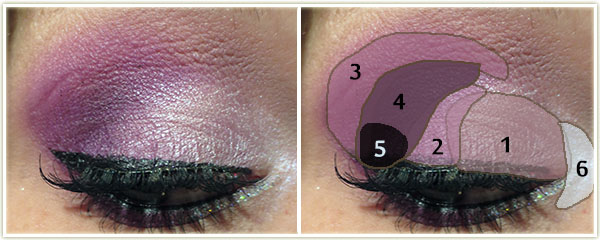
The first colour from a ginormous Sephora eyeshadow palette I have that unfortunately does not have shade names, however, the colour is very similar to MAC‘s Crystal. Essentially, the colour is a very pale lilac shade with a bit of a sheen to it. This shade was placed on the inner half of the lid.
I then used MACDame’s Desire right beside the previous shadow, but not all the way out to the corner.
SleekSugarlite was blended heavily into the upper crease.
SleekHighness filled in the outer corner, with;
SleekNoir at the very edge of the outer lashline to darken up that area.
I then used MACVellum to highlight the inner corner of the eye and blended it into the pale purple.
MACBlanc Type to highlight the browbone with MACOmega on my brows. On the lower lashline, I used Sugarlite to line the outer half of the lid, then applied some Too FacedGlitter Glue to the inner half of the lid and tapped on Make Up For Ever‘s Glitters 13 (silver rainbow glitter) on top of the glue. I lined the upper lashline with MUFE‘s Aqua Liner in 13 Blackand used MAC‘s Feline Kohl Power pencil on the lower waterline. And finally, I finished up the eyes with some Ardell‘s 102 Demis and applied L’OrealVoluminous Carbon Black on my lashes.
Rest of the Face
Foundation: Bourjois Healthy Mix Serum in 51 Light Vanilla
Bronzer: Revlon Photoready Bronzer in Bronzed & Chic
Blush: TarteExposed with IllamasquaHussy layered on top
Highlighter: MACSilver Dusk
Lips: I’m not wearing it in the picture, but I wore Rimmel Apocalips in Celestial out that night.
Extra: I used MAC‘s Select Coverup in NW20 under my eyes and set it with Laura Mercier
It was just one of those mornings when I had no idea what to wear and just happened to look into the tub that contains all of my mineralize eyeshadows. Although it’s beautiful, I rarely use this shadow. A word to the wise though, this can apply really patchy and can flake off at a moment’s notice. Beautiful end result, however.
Eyes:
With a dampened, flat, stiff makeup brush, I packed (and I do mean packed) on MACBlue Flame all over my entire lid. You may will likely need to layer this.
I then blended Makeup GeekCreme Brulee into the crease.
I also lined the outer third of my bottom lashline with the Blue Flame as well. Too Faced‘s Cream Colored Ponies on my browbone and L’OrealVoluminous Carbon Black on my lashes.
Rest of the Face
No foundation, bronzer or highlighter.
Blush: Illamasqua –Hussy
Lips: MAC – Shy Girl
Obligatory neutral eye look, using the Too Faced A Few of my Favorite Things palette.
Eyes: (Urban DecayPrimer Potion as a primer for this one!)
Too FacedSnowflakes all over the lid.
Too FacedBuche de Noel slightly into the outer corner.
Too FacedWoolen Mittens on the outer corner and blended into the crease.
I did the winged liner with MAC‘s Dipdown fluidline. Too FacedCream Colored Ponies to highlight the brow with L’OrealVoluminous Carbon Black on the lashes.
Rest of the Face
Foundation: MUA Matte foundation in Shade 1 Soft Sand
Bronzer: Physicians Formula Bronze Booster in Light/Medium
Blush: Errr no idea. Maybe nothing?
Lips: MACBoldly Bare lipliner with MACViva Glam Cyndi on top
This look features Jealousy Wakes, the eyeshadow created by Christine (Temptalia) for MAC. Unfortunately it was limited edition (boy, was it EVER) and it sold out almost instantly back when it was released. It’s a beautiful shade and this is my default look when I want to wear that shadow.
Eyes: (Again with UDPP)
MACVex, inner two thirds.
MACJealousy Wakes, outer corner and into the crease.
Makeup GeekCreme Brulee throughout the crease.
MACBrule to highlight the brow and L’OrealVoluminous Carbon Black on my lashes.
Rest of the Face
Foundation: MUA Matte foundation in Shade 1 Soft Sand
Bronzer: Physicians Formula Bronze Booster in Light/Medium
Blush: Physicians Formula – Natural
Highlighter: DiorAmber Diamond
Lips: MACPetting Pink Lip Conditioner
A shame the sparkles don’t show up more – I was going for a wintry snowfall at night look.
Eyes:
MACCrystal Avalanche on the inner two-thirds of the lid.
MACPrint on the outer third.
Although it is incredibly difficult to see in the photograph (which is very frustrating to me), I did layer Illamasqua‘s Beguilepigment on top of Crystal Avalanche. Rest assured that it showed up much better in person.
I used KIKO‘s Twinkle Eye Pencil in 06 (I really need to use this more, it’s fantastic) on the lower lashline. The upper winged lined was created with MACBlacktrack fluidline. I appliedToo FacedBetter Than Sex mascara to both sets of lashes and ran some MACOmega through my brows. (The brows really never change, I’ll probably stop repeating this…)
Rest of the Face
Foundation: MUA BB Cream in Light mixed with some moisturizer
Bronzer: Physicians Formula Bronze Booster in Light/Medium
Blush: MACWarm Soul
Highlighter: MACSilver Dusk
Lips: Nothing – was heading out to eat so I didn’t see the point!
I’m pretty pleased in the makeup department lately… most of my looks have been suitable enough to post on here and I had about 15 or so looks to choose from for this post! Pretty happy with that because sometimes I can get a nasty streak where I don’t like anything I applied at all for several days. (That’ll make for an interesting post some day.
New year, new looks! And I’ve got plenty of new goodies to play with that I’ve accumulated over the holiday season!
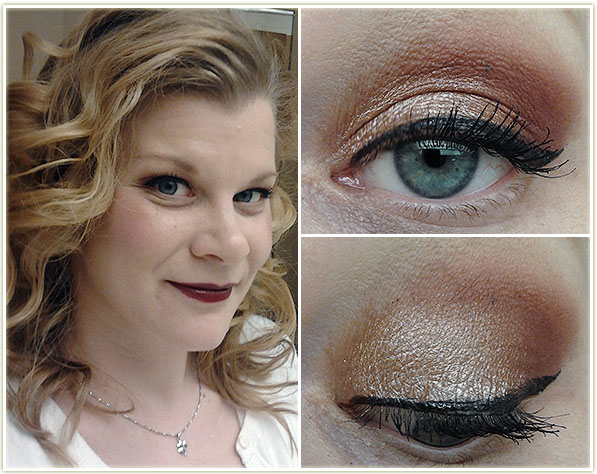
I love this one so much. Everyone has gone insane over rose-gold everything and I think I’m starting to see why. This was a makeup combination that just made me feel like I looked especially pretty. I’m also having a love affair with Makeup Geek’s Bitten and I’m more than happy to use it constantly on my eyes!
Eyes:
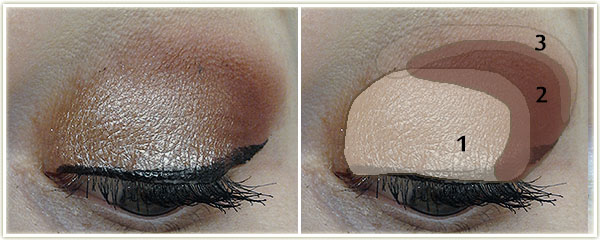
L’Oreal Amber Rush all over the lid.
Makeup Geek Bitten in the outer corner and crease.
Makeup GeekCreme Brulee at the top of the crease to blend the two lid shades together.
MACBrule was used to highlight my brow. I used Make Up For Ever Aqua Liner in 13 Black to create the wing and applied L’Oreal VoluminousCarbon Black mascara to my top lashes. For brows, I used MACOmega.
Rest of the Face
Foundation: Bourjois Healthy Mix Serum foundation in 51 Light Vanilla
Bronzer:Physicians Formula Bronzer Booster in Light/Medium
Blush: Cargo Mendocino
Highlighter: DiorAmber Diamond
Lips: MACDark Side
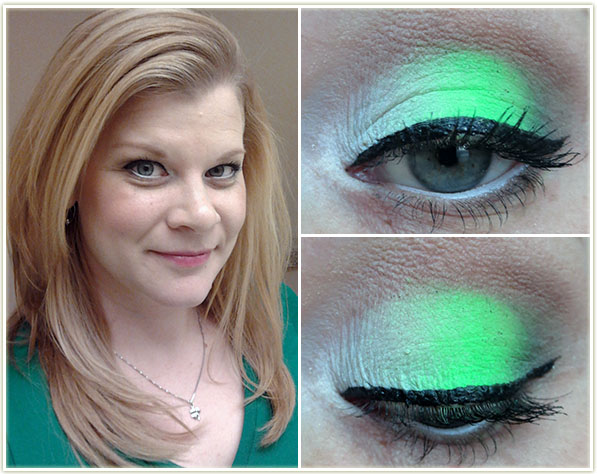
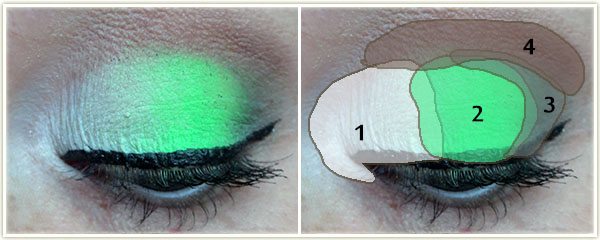
Good grief do I ever love this one too! I can’t claim ownership though, I relied on Shaanxo’s video for inspiration. Anything with neon (not to mention neon AND green) and I’m a total sucker for it.
Eyes: I first applied NYX‘s Jumbo Eyeshadow Pencil in Milk all over the lid and blended it out with my finger. I also brought it down below the inner tearduct as well.
Using the white from Sleek‘s Acid palette, I applied that all over the inner third of the eyelid, bringing it down around my inner tearduct.
With the same Sleek palette, I used the neon green shade and patted that on the center of my lid. (This took a lot of layers in order to get it to be so vibrant!)
Using MAC‘s Greensmoke, I placed it in the outer corner of my lid and tried to blend it as best as I could with the neon shade (wasn’t that easy and I don’t think I was overly successful).
I then used MAC‘s Cork through the crease.
Brule was used to highlight the brow and MACOmega was used on my brows. I used Make Up For Ever‘s Aqua Liner in 13 Black to do my winged liner and applied L’OrealVoluminous Carbon Black mascara to my upper and lower lashes. For the lower lash line, I used a bit of Greensmoke on the outer corner, then lined my inner waterline with NYX‘s Milk(which actually had decent longevity!).
Rest of the Face
Foundation:Bourjois Healthy Mix Serum in shade 51 Light Vanilla
Bronzer:Physicians Formula Bronze Booster in Light/Medium
Blush:Joe Fresh cream blush in Apricot
Highlighter:Hard CandyTiki
Lips:NYX‘s Butter Gloss in Vanilla Cream Pie
This look came about as I was trying to use products that I had bought, but hadn’t used yet. The primary inspiration came from MUA‘s Shade 9 which is one of the most beautiful duochromes I’ve ever owned. Unfortunately, I’m not keen on how the blue turned out, as it applied rather chalkily.
Eyes: I used Urban Decay‘s Eden primer this time as opposed to my usual Original one. In retrospect, that was a stupid idea considering I was using a very shimmery shadow and Eden is a very flat, very matte primer.
MUAShade 9 Pearl on the inner half of the lid.
Makeup GeekNeptune on the outer half of the lid.
Makeup GeekCreme Brulee in the crease.
MACBrule was used to highlight my brow with MACOmega through my brows. L’Oreal Voluminous Carbon Black on my upper lashes with MAC‘s Blacktrackfluidline to create the winged liner.
Rest of the Face
Foundation: MUA BB Cream in Light
Bronzer: Physicians Formula Bronze Booster in Light/Medium
Blush: TarteExposed
Highlighter/Powder: HourglassAmbient Lightning Powder in Ethereal
Lips: Revlon Lip Butter in Creme Brulee
Heh, I’m not even sure what to say about this one. *I* think it’s rather bland, but looks like this tend to be when I get the most compliments. I wanted to use the Naked 3 palette and dip into a few products on to my “To Use Up” list. I don’t find the end result very inspirational, so when I use the Naked 3 again, I’ll definitely try out different combinations.
Eyes: Urban Decay Primer Potion in Eden all over the lid. All shadows are from the Urban DecayNaked 3 palette:
Burnout on the inner two-thirds of the lid.
Factory on the outer third of the lid.
Limit through the crease
I used Strange as a brow highlight and applied Blackheart as a very thin line along my upper lash line with a faint flick at the outer edge. L’Oreal Voluminous Carbon Black mascara on my upper and lower lashes.
Rest of the Face
Foundation: Yaby Foundation in Buff
Bronzer: Physicians Formula Bronze Booster in Light/Medium
Blush: Tarte – Dollface and Dazzledmixed together
Highlighter: Hard CandyTiki
Lips: Revlon Lip Butter in Red Velvet with Creamsicle layered on top.
I had to laugh at this one… I didn’t intend for this to come out nearly as dark as it did, or nearly as ridiculously bright on the lips… for a weekend brunch. While I was also wearing workout clothes. Hah. Ah well.
Eyes:Maybelline‘s Color Tattoo in Bad to the Bronze was applied all over the lid, keeping it below the crease. On top of that I layered:
Inglot152 Shine over the entire eyelid.
Laura MercierBamboo on the outer corner of the lid.
Laura MercierEspresso was used to blend out the crease and pull the shadows out at the corner of my eye into a slight V shape.
MACBrule to highlight the brow with MAC Omega through the brows. Bamboo and Espressowere mixed together to line the lower lashline. L’Oreal VoluminousCarbon Black mascara were applied to upper and lower lashes.
Rest of the Face
Foundation: CoverGirl CC Cream in 110 Classic Ivory
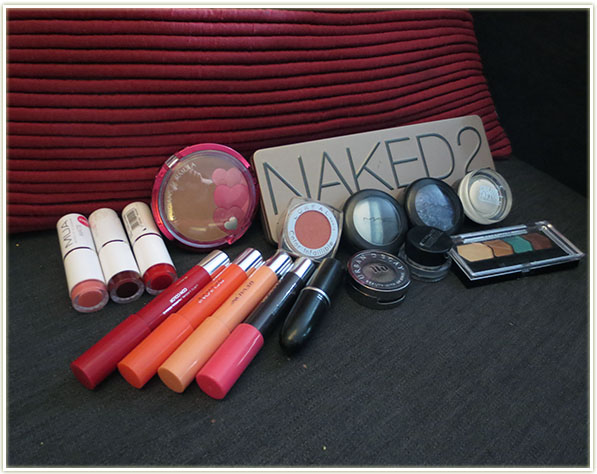
Today I’m sharing the items in my collection that I really regret buying. These, in general, are the items I reach for the least in my collection. Looking over the items I’ve pulled out, most of them are cheaper products which is a bit of a relief. I think this is because I tend to research more expensive products before purchasing them. Anyway, let’s see which items I’ve had a buyer’s remorse over!
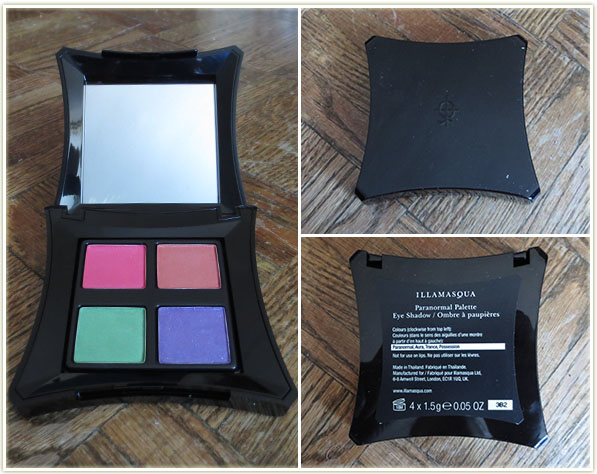
One of my most recent purchases was such an immediate regret that I ended up taking it right back! It’s Illamasqua‘s Paranormalpalette.
Illamasqua – Paranormal Palette
I’m reposting the exact same image from my haul just a few weeks ago because I used it twice, noticed the EXCESSIVE creasing, then hightailed my butt back to the Illamasqua counter and returned it. I had called them day before I returned it and had gotten some spiel about how my Urban Decay eyeshadow primer wasn’t good enough because these were cream to powder eyeshadows and I need to be using a creamy primer. I wasn’t buying it. Urban Decay‘s primer has NEVER lead me astray and I can’t remember the last time I had anything crease on my eyelids because of that primer! When I returned it, the woman was very lovely about it and didn’t give me any hassle. It takes a lot for me to return a product but this one was so expensive ($45 CAD) that there was no way I was going to keep it. I mean, just LOOK at the creasing:
Ridiculous!
At the end of the day, I do love the Illamasqua products I’ve tried, primarily their blushes and pigments, but I’m going to be avoiding these “cream to powder” products in the future.
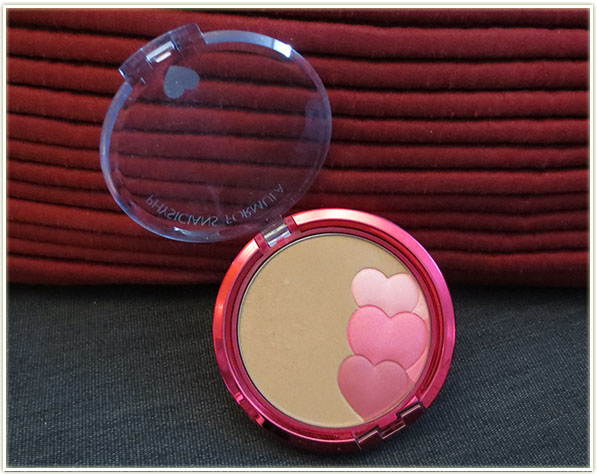
Sigh. I bought this Physicians Formula product thinking since it was a bronzer and a blush in one, it’d be perfect for travelling. The truth is I’ve not travelled even once with this item in the year or so I’ve owned it. I love the shade of the bronzer, but I’ve not even touched the blush. And let’s be realistic… without a proper division between the two products, it’s pretty hard to get JUST the blush when you dip into the product.
Urban Decay – Mushroom, L’Oreal Infallible – Pepsy Coral, Maybelline Color Tattoo – Too Cool
These were just poor choices all around.
Buying an Urban Decay single eyeshadow (Mushroom) is just a bad idea when so many of their shades come in palettes at a much better value. Not to mention that I don’t need yet another taupey, silver-grey shade – I think there’s even an exact dupe in my Naked 2 palette. Plus, this just isn’t the kind of colour I reach for much anyway.
L’Oreal‘s Pepsy Coral was an impulse buy at a warehouse sale I was at in October last year. It’s now three months later and I’ve still not used this shade. Plus it looks identical to MAC’s Paradisco which I already own.
Maybelline‘s Color Tattoo in Too Cool is a shimmery white cream shadow. It goes on patchy and the shade is very similar (if not identical) to MAC‘s Crystal Avalanche. Boo.
I am so over these chubby lipstick crayons. SO OVER IT. First of all, the CoverGirl one (Watermelon Twist) broke apart the first time I used it (the bullet fell right out of the tube). It also tastes awful. How does a drugstore product still taste terrible like this? Most of the other brands have grown out of the artificial, chemical smell of makeup from decades long past. The colour is okay, but I can’t get over the smell/taste. Although I do have to say… hot pink is not the colour I think of when the word “watermelon” is in the shade name.
As for the Revlon ones… also over it. They don’t actually stain that much. The lighter, peachier one (Charm) ends up staining my lips slightly pink (?!?). The red one tends to bleed outside my lip line quite a bit and reapplication only makes it look worse. On the bright side, they do have a nice minty smell, quite akin to dental floss actually, but I do like it! However, I’ve been avoiding any other crayon type lipstick once I realized how disappointed I was in these.
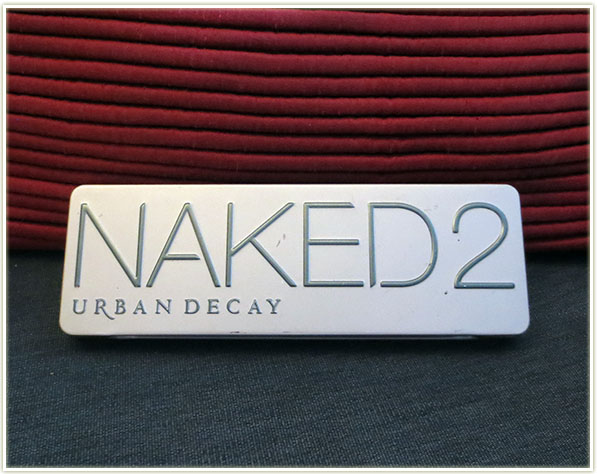
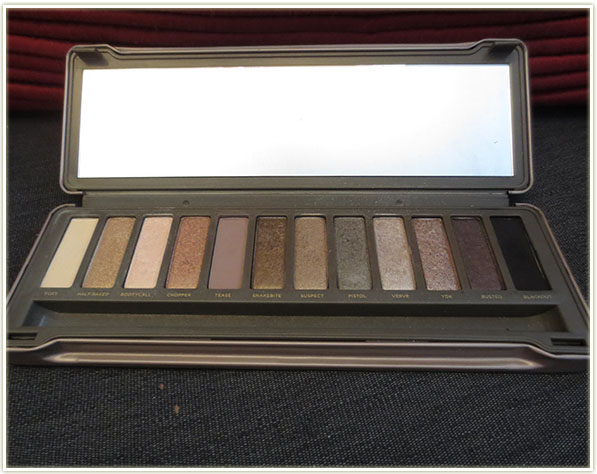
Urban Decay – Naked 2
Oh man, I’ve seen people so divided over Urban Decay‘s Naked 2 palette.
Urban Decay – Naked 2Urban Decay – Naked 2
There are some colours in here that I love – specifically Tease, Verve and Blackout (but really, that’s just a black). But there are a lot of shades in here that just seem to blend together into nothingness when I try to put a look together. Maybe I’m using the wrong colour combinations or something, but my looks with this palette have been pretty dismal.
It’s hard to regret something when you only paid £1 for it, but these matte lipsticks from MUA do frustrate me. These have decent pigmentation when swatched and they *are* lovely colours, but they feel terrible on the lips. They ball up, go tacky and they seem to fade awkwardly, which is especially weird for a matte lipstick. Plus, check out the bottom right-hand picture above: You have to apply the lipsticks so hard on your lips to get the colour you need that it causes huge indentation marks in the side of the bullet. When that happens, the bullet starts to ooze a clear substance which is just icky. As soon as I finish this post, they’re going straight into the garbage bin.
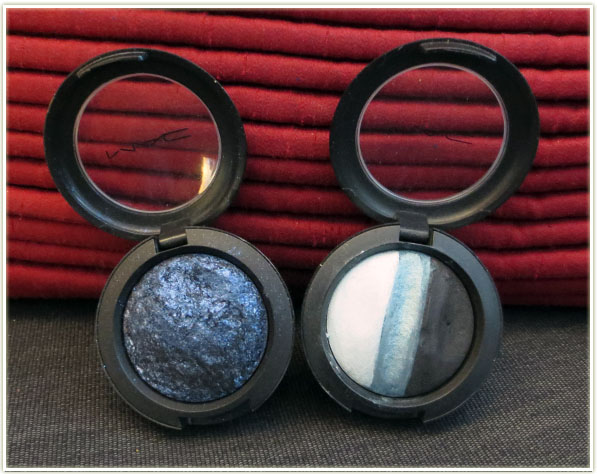
MAC Mineralize Eyeshadows – Blue Flame & Blue My Mind
I didn’t notice till I sat down to write this post that both of my MAC mineralize eyeshadow regrets are both blue. Blue Flame is beautiful, but I rarely use it. Blue My Mind is… meh. The light side is a pale, powdery blue that can be kind of awkward to wear. The middle section is nice, but it needs to be applied damp to get a good colour payoff. Plus the middle strip is so small that you need a rather small brush in there. The last section is black and it’s okay… but it’s a bit underpigmented.
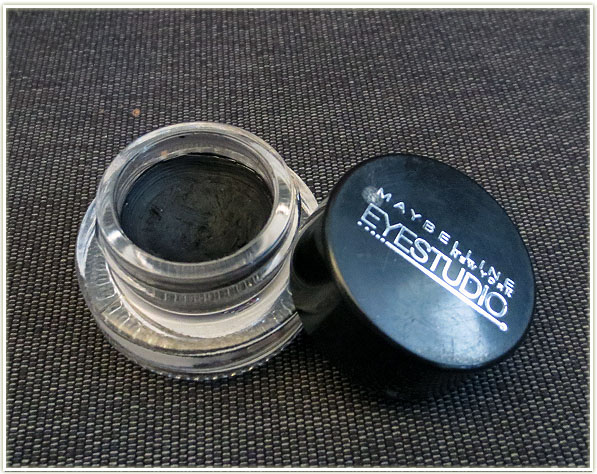
Maybelline Gel Liner in Blackest Black
I bought Maybelline‘s gel liner in Blackest Black after hearing many raves reviews from people saying that this was better than MAC‘s Blacktrack. Unfortunately, for me, this wasn’t the case. This just didn’t feel as fluid or creamy as MAC’s gel liner does and I sometimes end up with skipping problems along my lash line despite using the same brush for both gels. Because it’s just not as nice to use as MAC’s product, I’ve since gone back to MAC‘s fluidline and emptied out the jar so I could put something else in it.
Maybelline Irresistibly Ivy Eyeshadow Quad
While I like the colours and they’re quite well pigmented, I just don’t reach for this palette that much. I was sucked in by the pretty green shade and the fact that this was on clearance since they were discontinuing this particular quad.
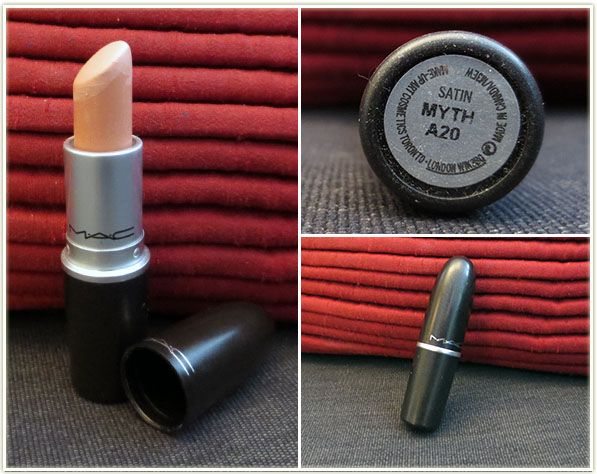
MAC lipstick in Myth
I regret this for no reason other than that this shade (Myth) looks like death warmed over on me. I love nude lipsticks, but this is not a shade I can pull off despite trying to make it work several times.
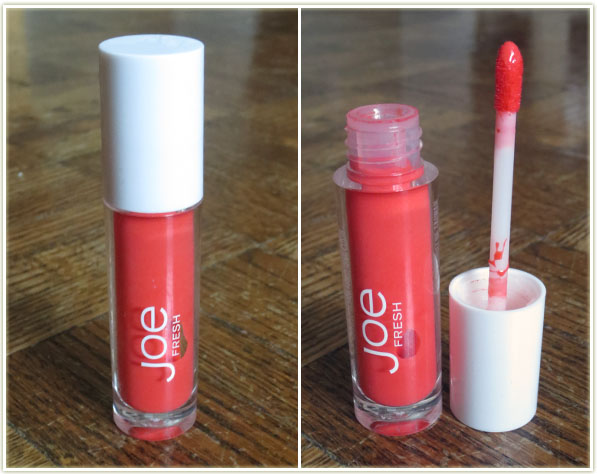
Joe Fresh Lip Tint in Mango
I forgot to photograph this with the rest of the group, but this is one downright awful product. It doesn’t ever dry down on the lips. If you talk, the product will magically disappear from your lips. If you lick your lips, the product completely disappears. But you definitely DON’T want to lick it off because the product tastes absolutely awful. This is another one going straight into the garbage bin as I can’t make this work even if I wanted to!
That’s it for me! Any products you’ve picked up that you regret buying?
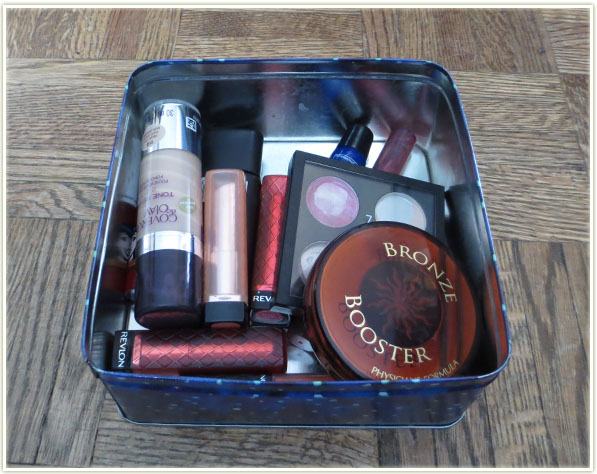
Last year, before I had this blog, I made a list of products I wanted to finish in 2013. I managed to finish about half of them which isn’t too bad! This year I thought I’d put fourteen products in a bin and do my best to use them up. The intent behind these products is that I won’t actually be repurchasing them after I’ve finished them up. It’s not so much that I dislike them (if they were really that bad, I’d just pitch them in the bin) but they’re just “okay” products. I like them enough, and use them, but I have other products I love more. Also, by forcing myself to use some of these products up, I end up discovering new ways to wear them. In essence, it makes me get creative! So let’s see what I’ve dumped in that “to finish up” bin!
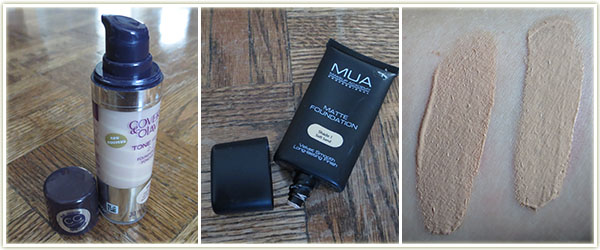
CoverGirl CC Cream in 110 Classic Ivory and MUA Matte Foundation in Shade 1 Soft Sand
There’s nothing especially wrong with these products – they’re just not my top picks. On my winter skin, the CC Cream is actually too dark right now but the MUA one is just right. The packaging on the MUA one makes it very easy for travel… or so I thought. The cap on the product doesn’t actually latch on very well so it ends up overtwisting and not aligning properly. Very annoying. The CoverGirlCC Cream on the other hand is actually quite nice – it has a pleasing scent (I’m not sure everyone agrees about this) and I love that it has a pump…. but it’s just not my favourite. If I wear these regularly, I should be able to get through each in about a month or two.
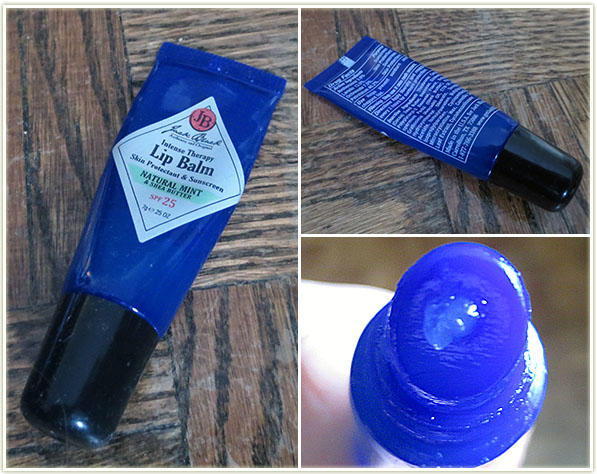
Jack Black Lip Balm in Natural Mint
I bought this because Christina @ Temptalia raves about this balm. To me, Jack Black’s lip balm feels no different than vaseline and I don’t actually feel like it has a lot of healing properties on rough, dry lips. I used to apply this product predominantly when I would go for a run. The reason behind this is I find my mouth/lip area gets very dry while running and wanted something soothing on my lips while I did my exercise. Unfortunately, this product seems to ball up/go tacky when my body warms up/starts sweating a bit so this actually became incredibly uncomfortable to wear while exercising. Instead, I’ve been wearing it as a protective layer throughout December while we’ve been experiencing freezing temperatures of -33C. I don’t feel it heals chapped lips, but the vaseline content of the product will certainly protect again snowy wind burn.
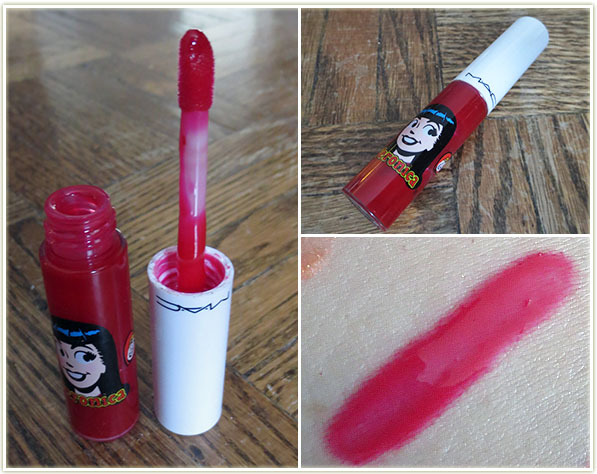
MAC lipglass in Strawberry MaltMAC lipglass in Strawberry Malt
I bought this Strawberry Malt lipglass early last year when the Archie’s Girls collection launched at MAC. The colour itself is gorgeous, but I find it fades really awkwardly on my lips and bleeds outside my lipline. Not attractive and it makes it far too fiddlesome for a gloss.
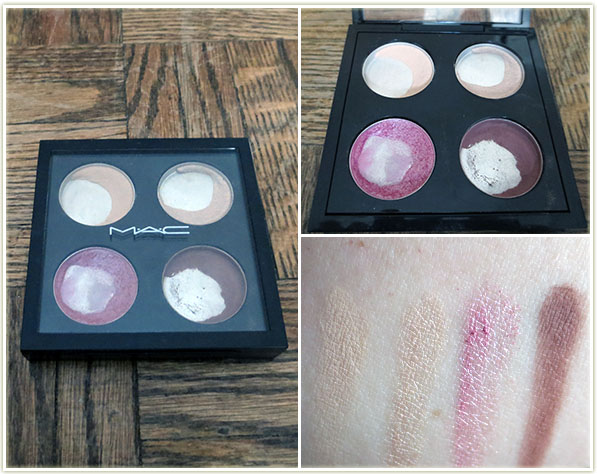
MAC eyeshadows in Brule, Shroom, Swish and Haux
If you’ve been reading any of my eyeshadow tutorials, you know that I use Brule almost every single time to highlight my brow bone. I use this product almost daily and I feel like I’m never going to finish this pan of it! The colour is nice, the blendability is fine, but I have other shades that are similar that I’d like to get through as well. The same applies to Shroom, which is essentially just a shimmery Brule.
Swish on the other hand… oh man, this colour needs to DIE. I bought this in my teens and it’s horrible – I don’t even know how I managed to hit so much pan on it! It’s a frosty pink shade that just looks, in my opinion as my older, wise self, just ridiculous. I’ve only come up with one combination this looks okay on, but I need more ideas if I’m going to make it through the rest of this pan!
The last shade is Haux – it’s a wonderful slightly rose-tinted, brown shade with a satin finish. It’s also my oldest eyeshadow – this guy right here is 18 years old. I’m not kidding. It needs to get finished up so I can move on with my life!
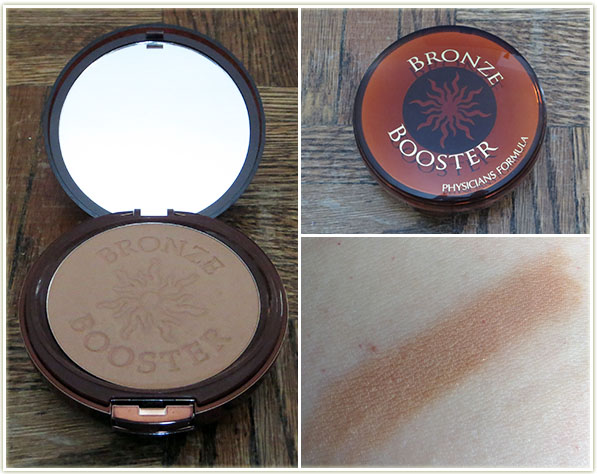
Physicians Formula Bronze Booster in Light/Medium
I think this is going to be the most challenging product to get through, but I wanted to include something that I had made almost no dent in. This bronzer is perfectly adequate – it blends nicely and the colouring is nice. I had bought it on a whim in late 2012 while I was in the US because I love Physicians Formula products, but they’re incredibly expensive in Canada (like $22 for a bronzer!). However, I have too many bronzers and I really need to put some out to pasture. I am slightly concerned that from past experiences, I have to use a single bronzer for an entire year before I finish it up – so this may become my daily bronzer. We’ll see how it goes.
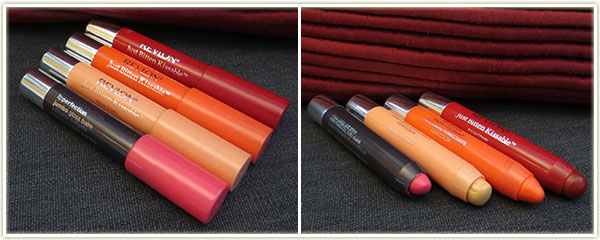
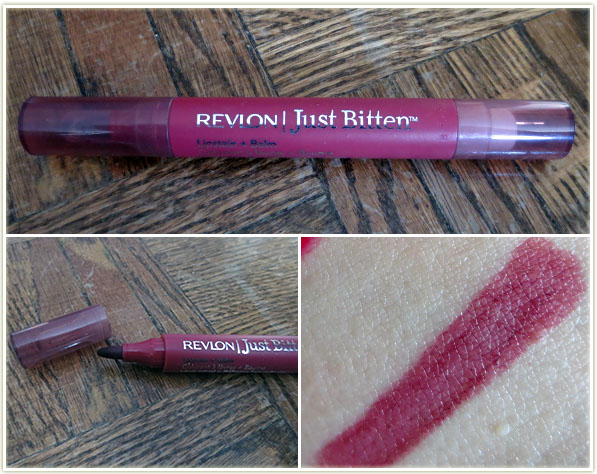
Revlon Just Bitten Lipstain + Balm in Twilight
I love this colour (Twilight), I just don’t wear it enough. I’m a big fan of Revlon‘s lipstains (NOT their balm stains), they can apply slightly patchy, but with enough layers it generally tends to even out. Plus they feel, to me, incredibly comfortable on the lips. In general, I prefer these to lipsticks, but for lipstains to work, they usually have to be pretty dark colours, which is why I don’t have more of them – since they all tend to blend together (colourwise) after a while. This one can get REALLY dark after several applications which is why I tend not to favour this one. Still very pretty though.
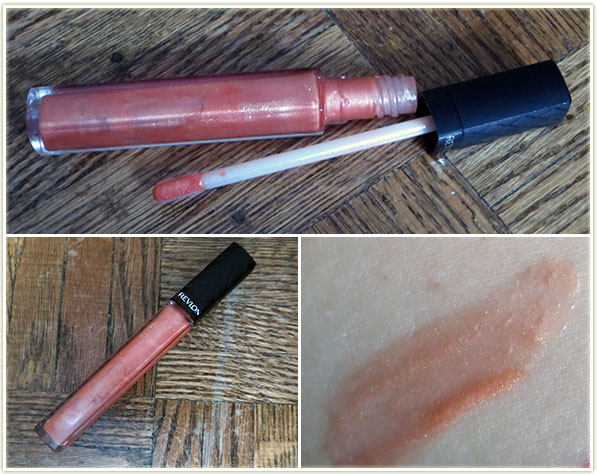
Revlon ColorBurst Lipgloss in Sunset Peach
Revlon‘s Sunset Peach is an easy shade for me to wear throughout the summer and one I reach for often. I’m fairly certain I’m close to done with this shade as it’s looking quite patchy through the tube. My main reason for wanting to finish this one up is that while I think the packaging is quite pretty, the reality is that I don’t carry a purse (SHOCK, HORROR) and this tube is just too darn big for my pocket, which makes it incredibly unfriendly for carrying anywhere.
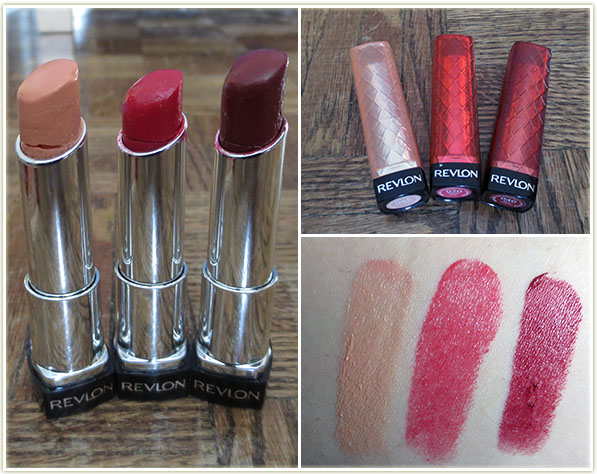
Revlon Lip Butters in Creamsicle, Cherry Tart and Red Velvet
I loved these Lip Butters by Revlon, but I’m over them. Creme Brulee is my favourite and I’ll continue to repurchase it, but I don’t feel I need all of the colours like I used to. Creamsicleactually looks rather ghastly on me and Red Velvet always just seems too dark (although I’ll often see it on other people and like it, so not sure what’s up with that!). While fiddling around with these colours and swatching them, I tried swatching Creamsicle over Red Velvet and they looked gorgeous together. Cherry Tarte, however, is beautiful on its own, but I have other shades I prefer.
So that’s it! I wonder how well I’ll manage to get through these products by the end of the year.