Tag Archives: Morphe
VIDEO: Morphe – The Jaclyn Hill Palette – Review & Thoughts
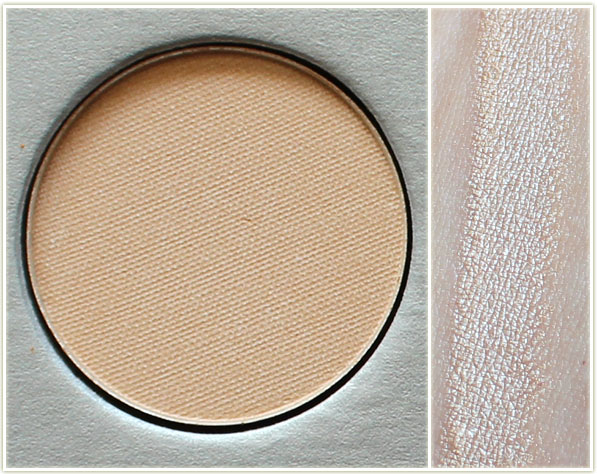
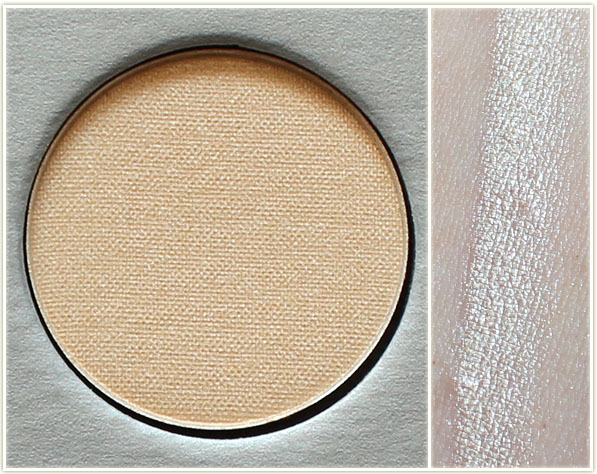
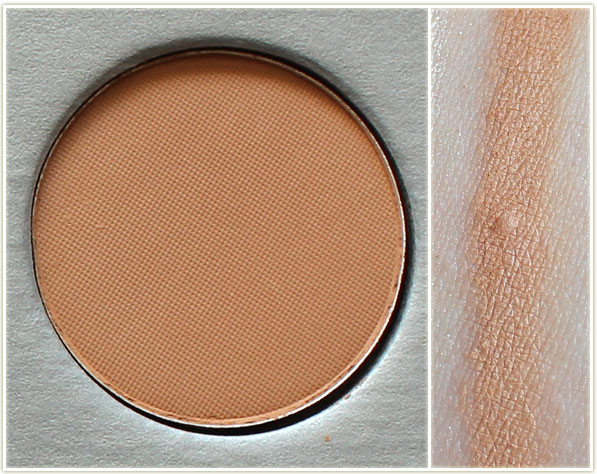
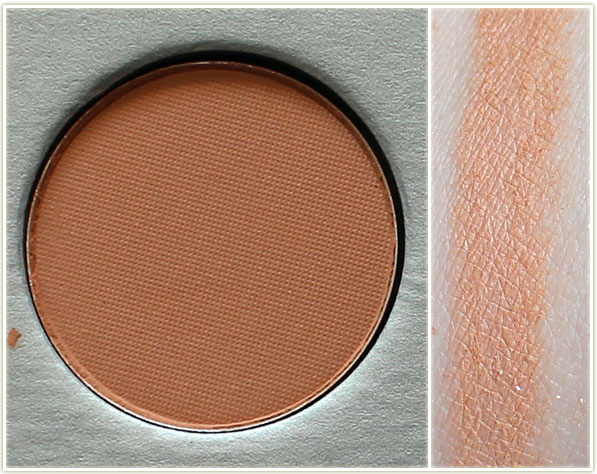
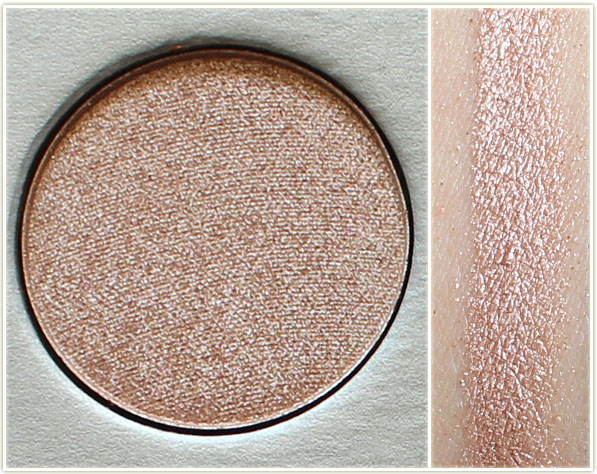
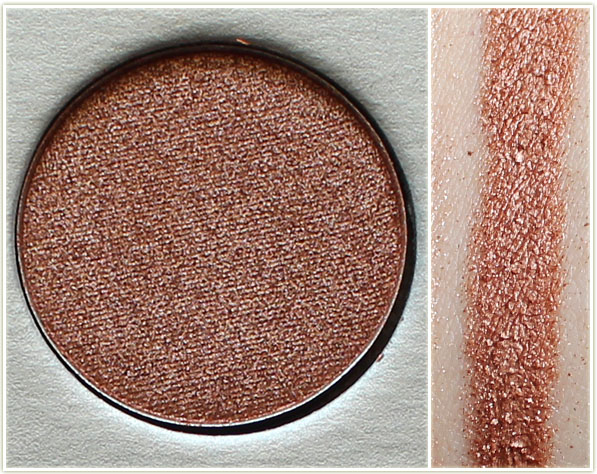
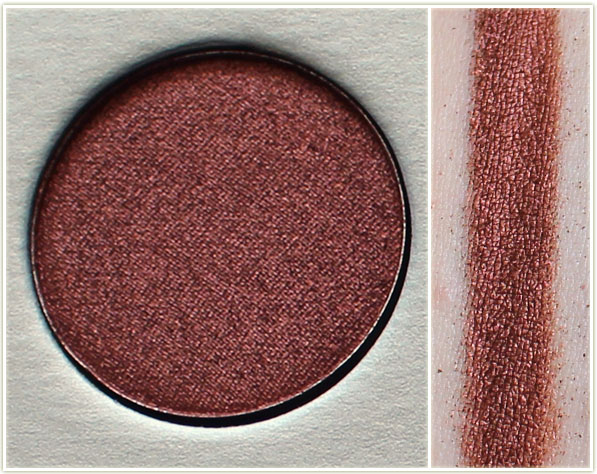
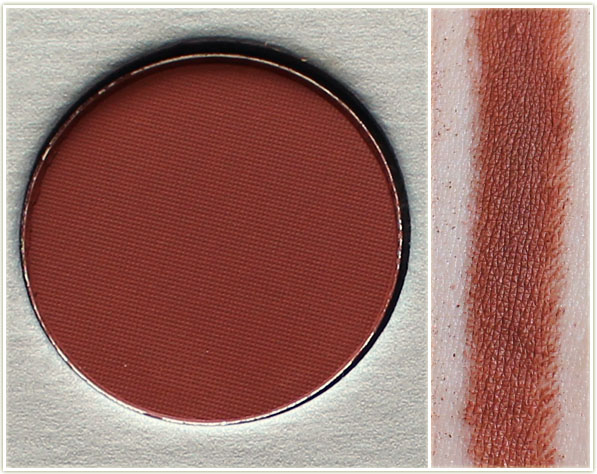
Swatch Sunday: Morphe – The Jaclyn Hill Palette
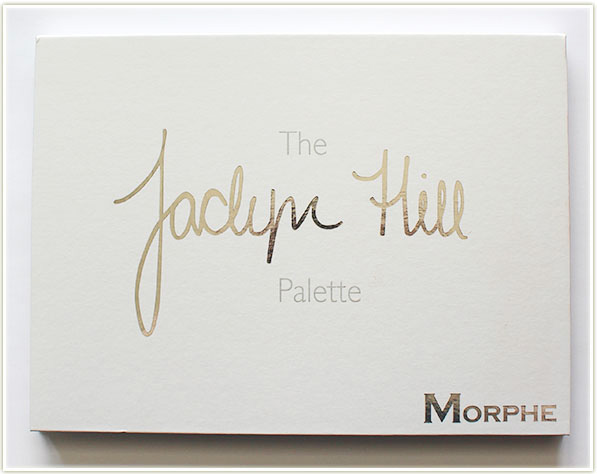
Morphe’s released their latest 35 pan palette collection: The Jaclyn Hill palette. I picked this up because although I have not been a fan of Morphe in the past (seriously, check out my scathing review of the 35B palette), I am quite the fan of Jaclyn Hill so I wanted to give this one a shot.
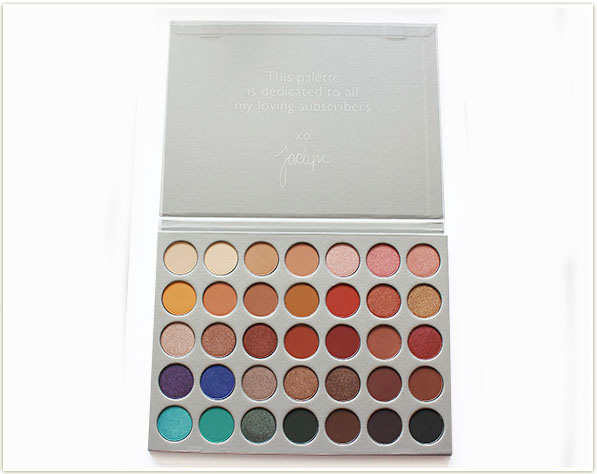
It’s an extremely warm toned palette, with a fun random shots of colour in the bottom left corner of the palette.
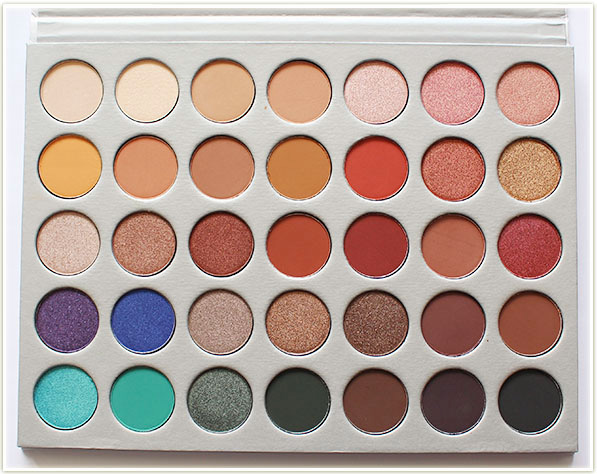
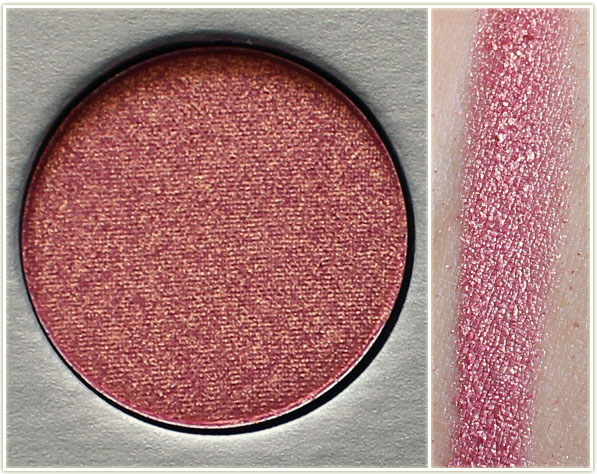
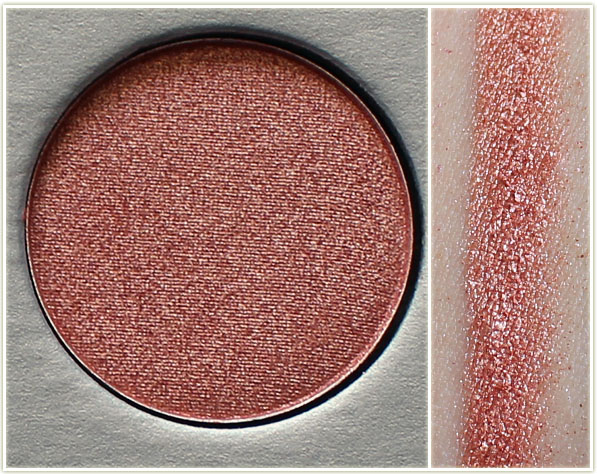
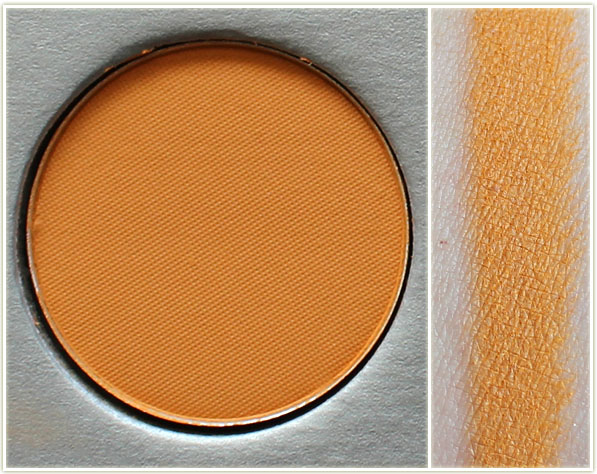
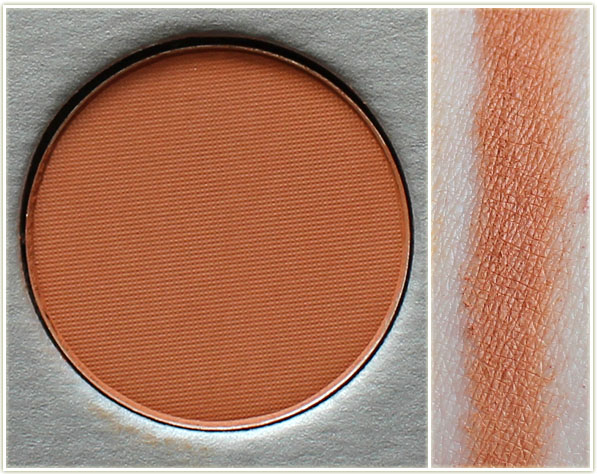
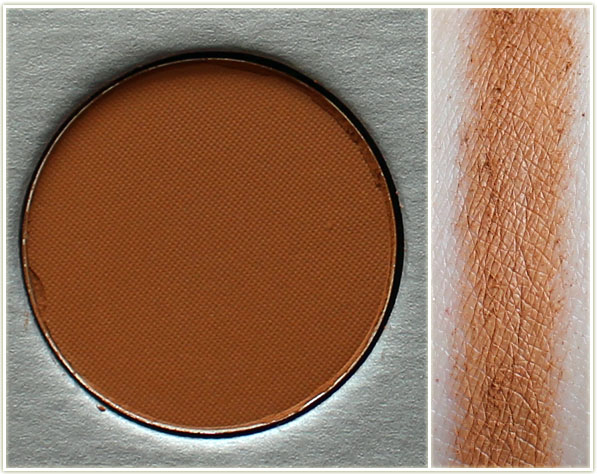
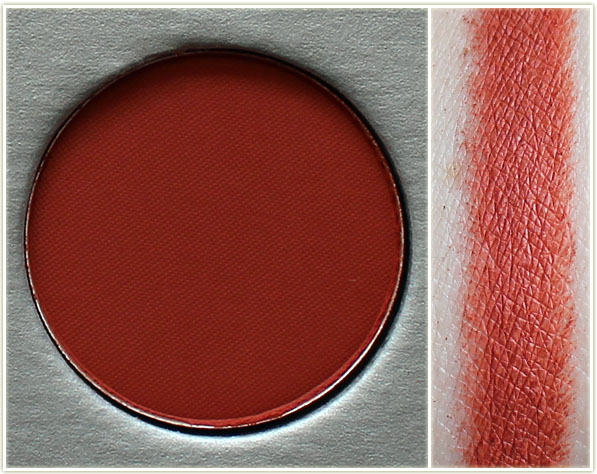
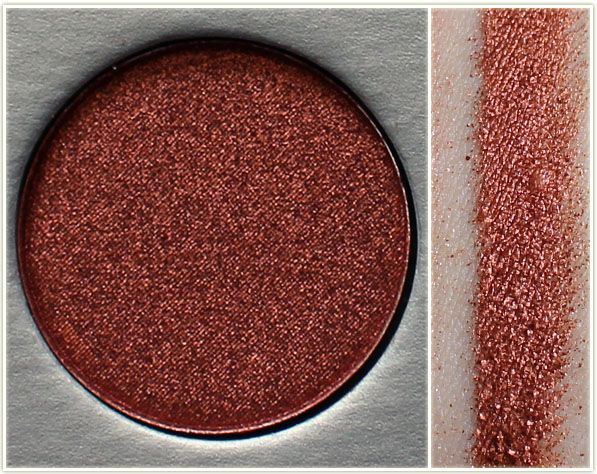
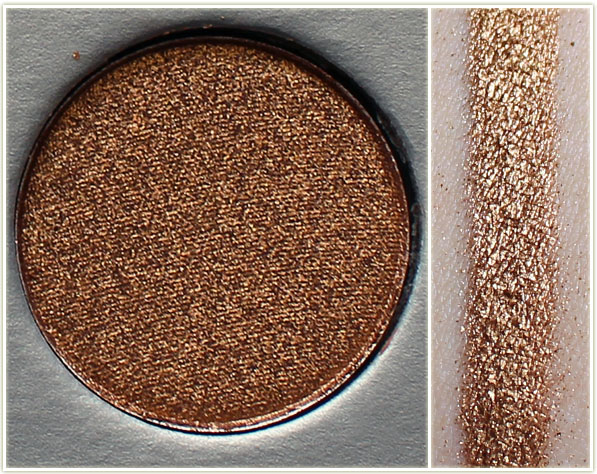
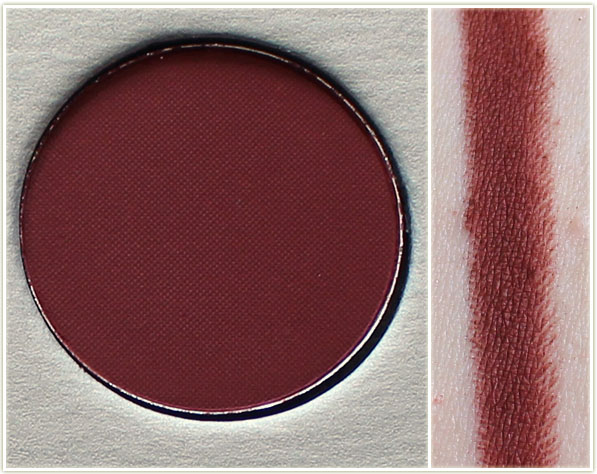
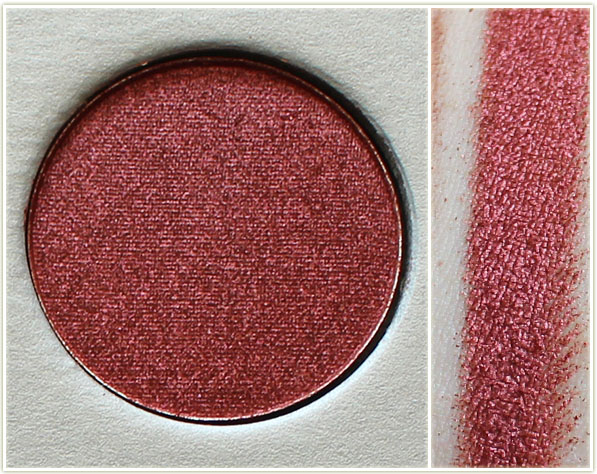
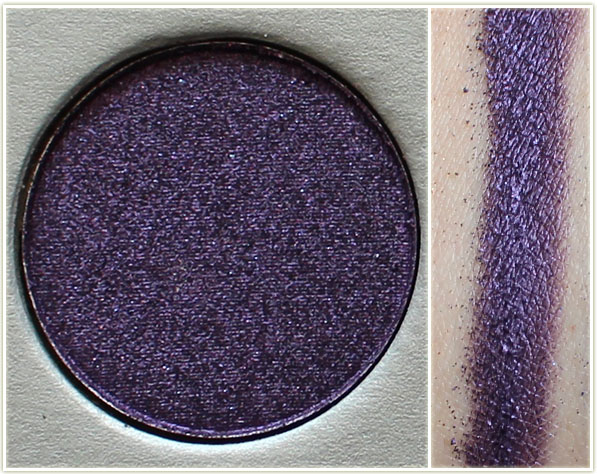
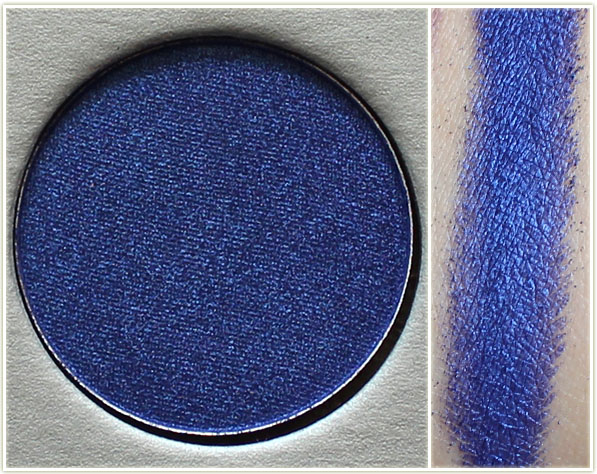
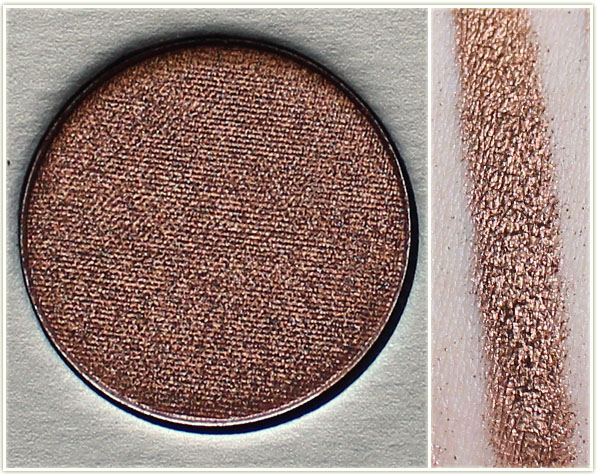
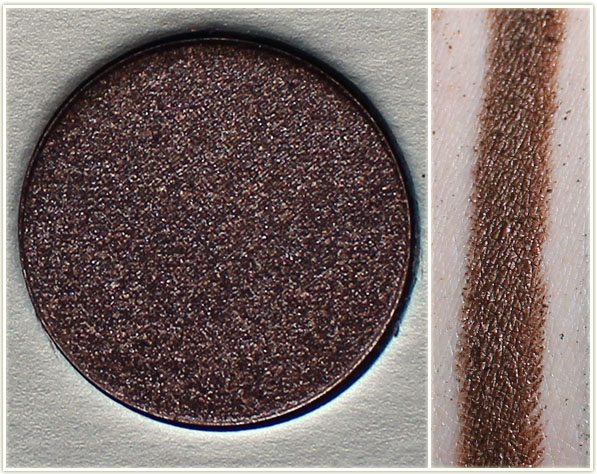
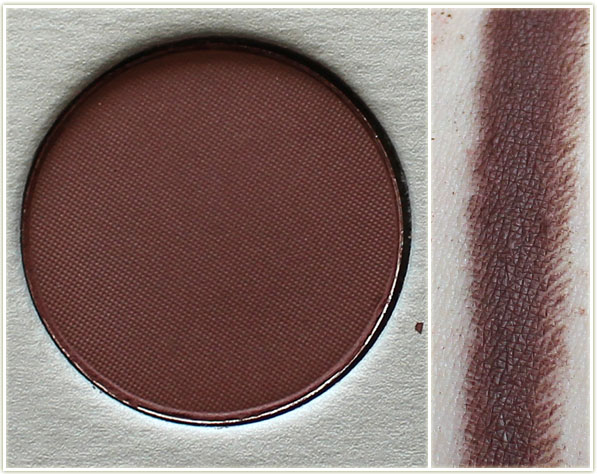
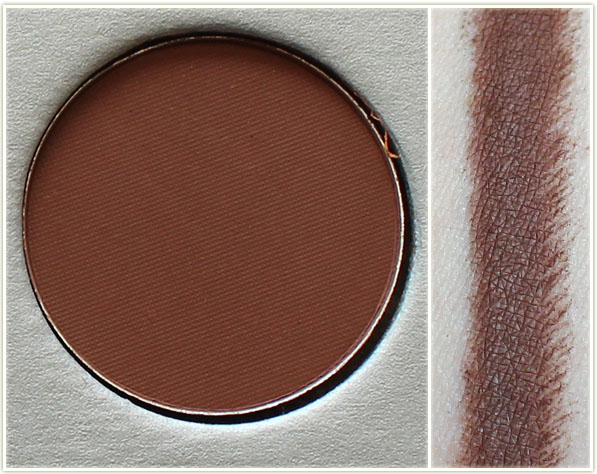
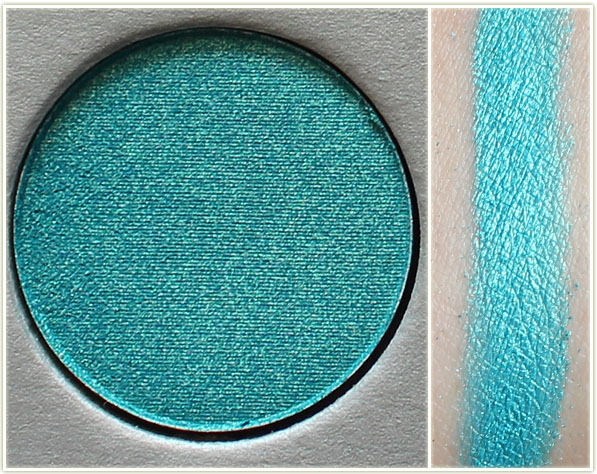
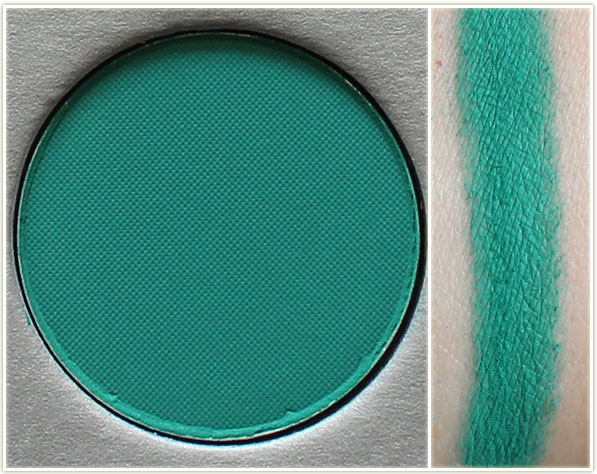
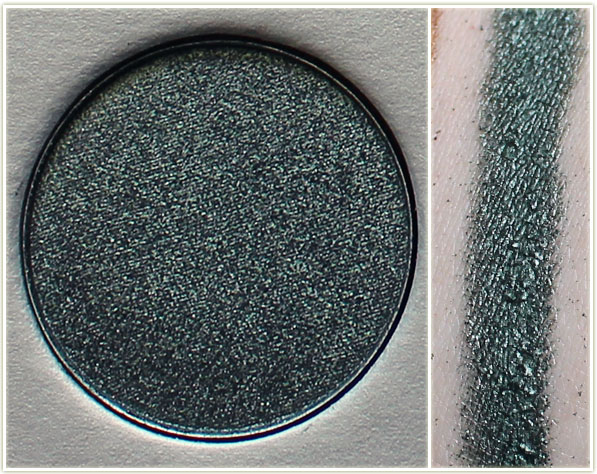
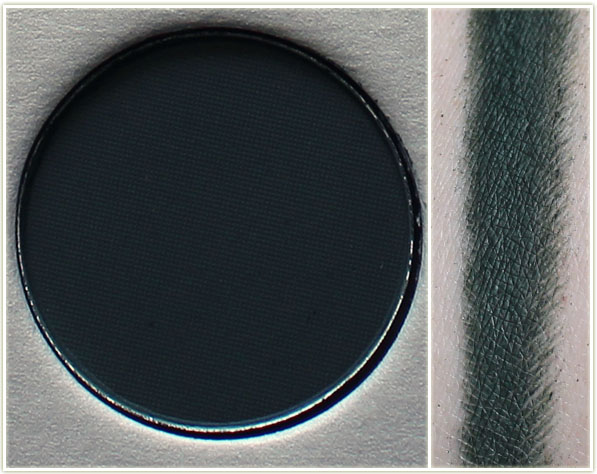
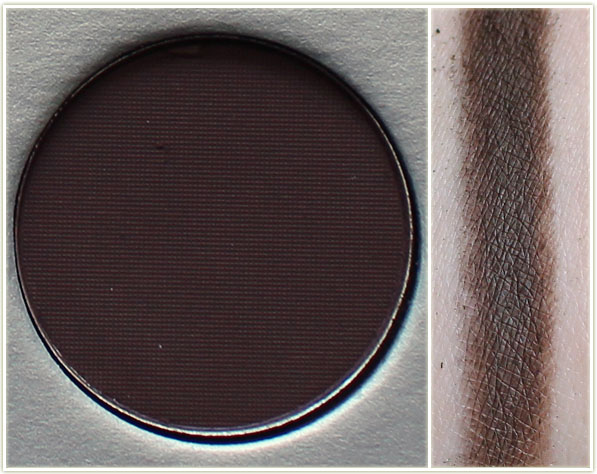
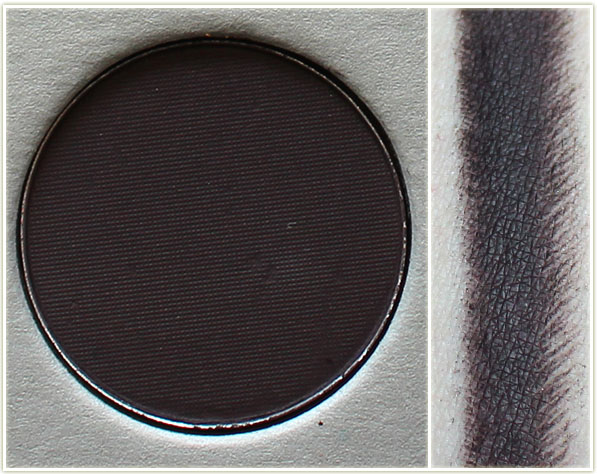
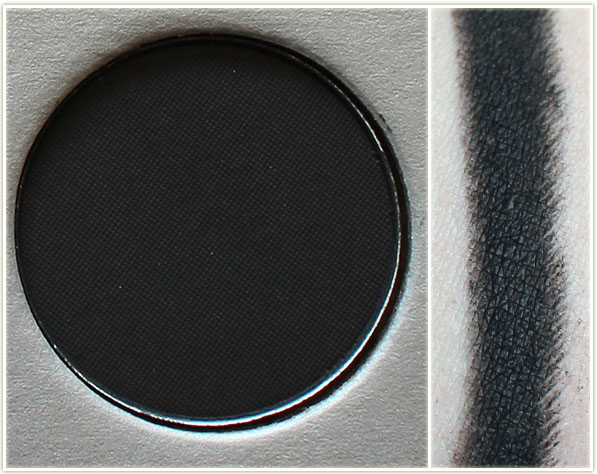
Morphe – The Jaclyn Hill Palette Swatches


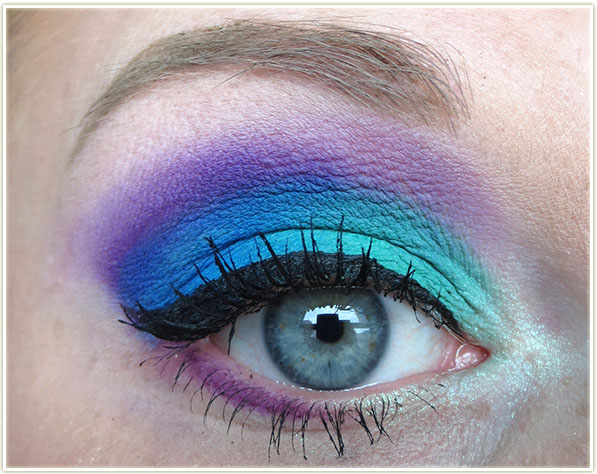
What’s On My Face – Volume 34
Another makeup looks roundup!

I was playing around with some matte shades… then decided I needed some glitter.
Well WHOOPS. I totally messed up the colour map…
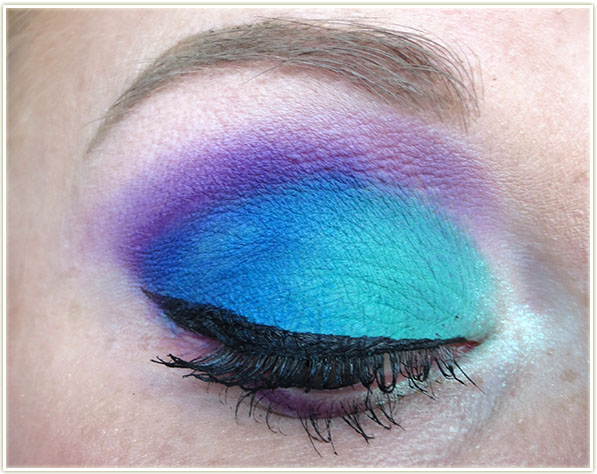
Eyes
- The Balm Matt Abdul all over the lid.
- The Balm Matt Johnson in the crease.
- The Balm Matt Malloy on the brow bone.
- Illamasqua Static pigment was applied all over the lid directly on top of the lid shade.
I used Kat Von D‘s Tattoo Liner in Trooper to create the wing, then applied Too FacedBetter Than Sex mascara to my lashes.
Rest of the Face
- Bronzer: Joe Fresh Sand
- Blush: Cargo Mendocino
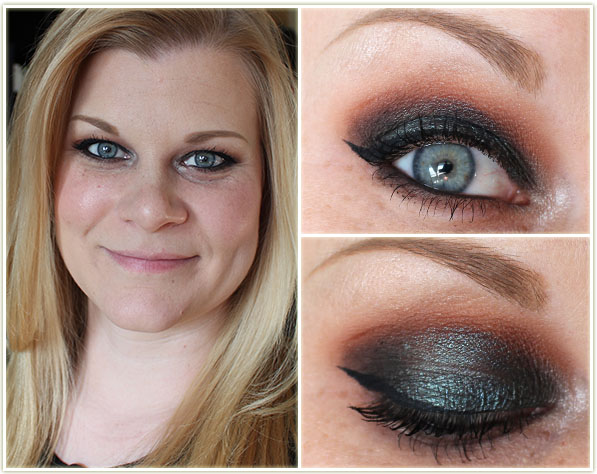
This was a straight rip from a recent Jaclyn Hill YouTube tutorial that I just loved. I had almost all the same products (always a blessing when you watch a tutorial) and loved how it looked on her so I decided to replicate it as best I could. This ended up being near identical to the look I wore on Valentine’s Day.
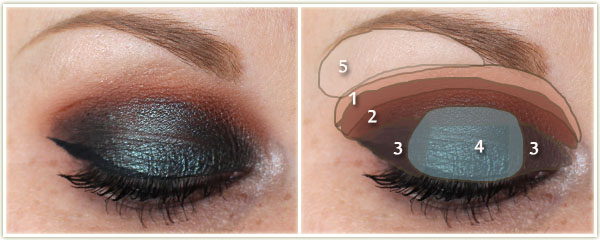
Eyes
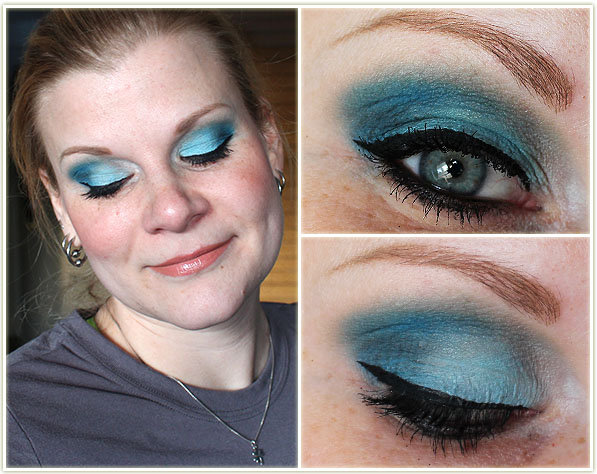
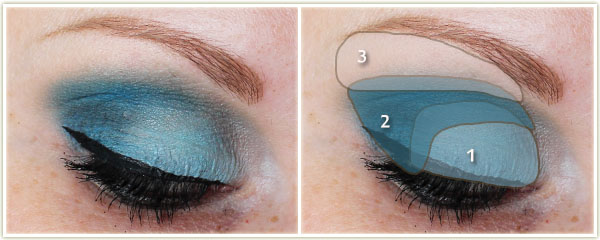
- Makeup Geek Peach Smoothie and Creme Brulee mixed together at the top of the crease.
- Makeup Geek Cocoa Bear heavily through the crease.
- Too Faced Dark Chocolate (from the A few of my Favorite Things palette) in the inner and outer third of the eye.
- Makeup Geek Houdini on the center of the lid.
- Makeup Geek Vanilla Bean on the brow bone.
- (not marked) MAC Nylon on the inner tearduct and lightly on the brow.
I used Make Up For Ever‘s Ink Liner to create the wing, then tightlined my upper and lower lash line with Urban Decay‘s Black Velvet liner. Blended along my lower lash line is Cocoa Bear and Dark Chocolate. On my lashes is Make Up For Ever Smoky Stretch mascara.
Rest of the Face
- Foundation: Bourjois Healthy Mix Serum in shades 51 Light Vanilla and 52 Vanilla mixed together
- Bronzer & Highlighter: Make Up For Ever Pro Sculpting Duo #1
- Blush: Hourglass Diffused Heat
I hadn’t touched my Naked Cosmetics pigments much since I picked them up in November, so I decided to just pick a colour at random (the pink) and work with it.
Eyes
- Naked Cosmetics Tropical Indulgence pigment stack, peachy pink colour applied wet all over the lid.
- Sleek Ink on the outer corner and through the crease.
Too Faced Better Than Sex mascara is on my lashes.
Rest of the Face
- Foundation: Bourjois Healthy Mix Serum in shades 51 Light Vanilla and 52 Vanillamixed together
- Bronzer: Joe Fresh Sand
- Blush: Can’t remember! 🙁
- Lips: Too Faced Coral Fire
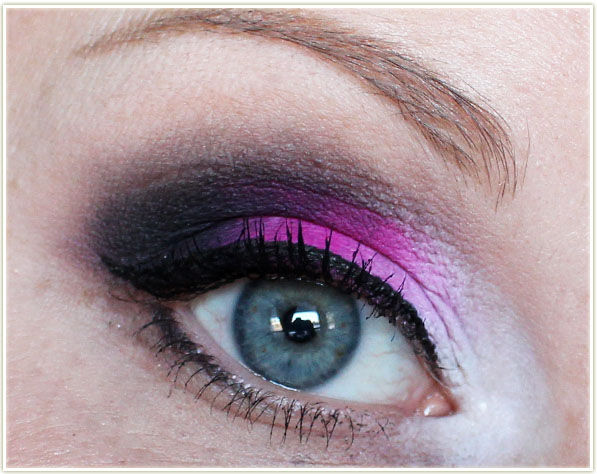
This one disappointed me. I applied some black glitter to the lower lash line, but you can’t even really tell – it just looks like I HEAVILY outlined my lower lash line with black eyeliner. Boo. 🙁
Eyes
- Sleek Chill all over the lid.
- Sleek Bolt on the outer half of the lid and through the crease.
- Wet n Wild Brulee on the brow bone.
I used Tarte‘s black gel liner to create the wing. I then lined my lower lash line with MAC‘sPhone Number eye kohl, applied some Too Faced Glitter Glue on top and then patted onLit Cosmetics‘ Back in Black glitter on top. I lined my lower rim with CoverGirl‘s Liquidline Blast in Black Fire and applied Too Faced Better Than Sex mascara to my lashes
Rest of the Face
- Bronzer: Joe Fresh Sand
- Blush: MAC Ripe Peach
- Lips: Too Faced Melted Nude with NYX Butter Gloss in Peaches and Cream on top
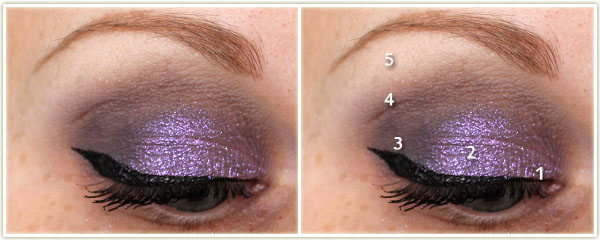
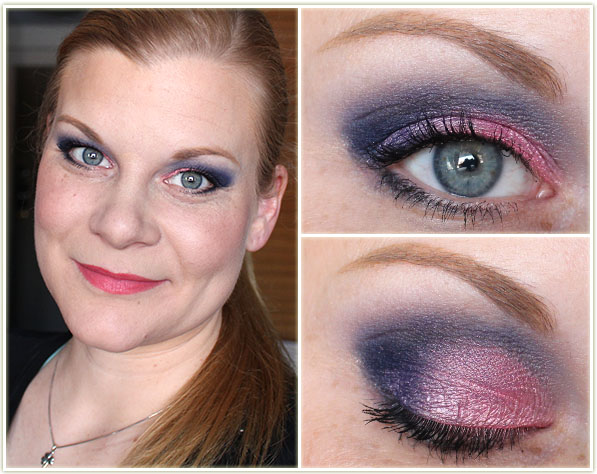
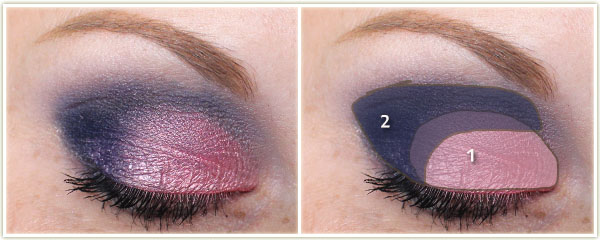
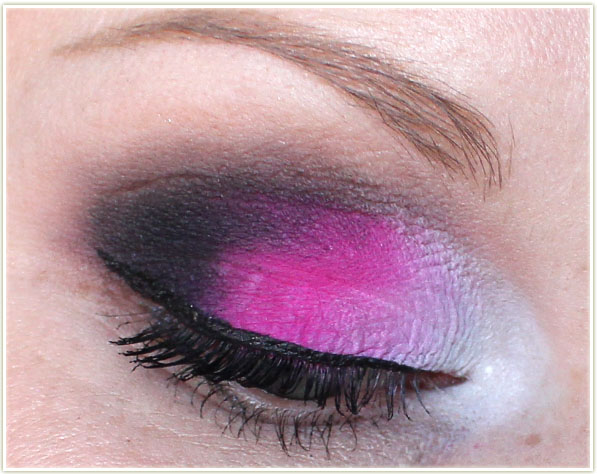
This look was created as a guest post on Jodi’s blog; Up The Rollercoaster. The theme was red, white and pink. So I opted for a more neon shade of pink to suit my fancy. Most of the colours used are from my Morphe palette, but since they have no true names, I just used colour names to describe them.
Eyes
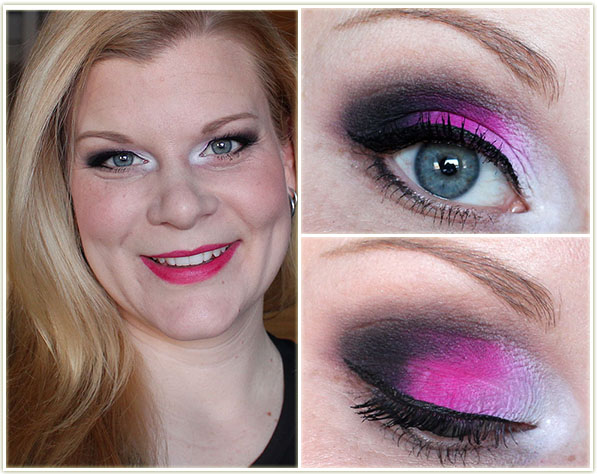
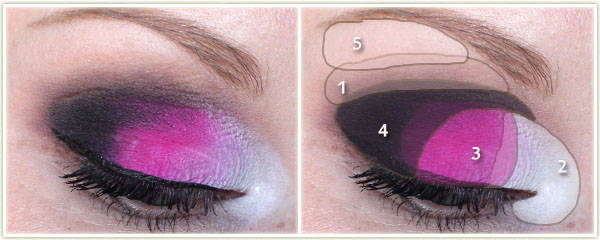
First off, I applied an eyeshadow primer, then layered NYX‘s Jumbo Eyeshadow Pencil in Milk all over the lid. Pat that in, then proceed:
- Makeup Geek Creme Brulee through the crease.
- White on the inner third of the eye, brought heavily around the inner tearduct.
- Neon Pink on the middle of the lid.
- Black on the outer half of the eye and lightly through the crease to tie it all together.
- Pale beige on the brow bone.
I used Kat Von D‘s Tattoo Liner in Trooper to create the wing on the upper lash line, then used MAC‘s Phone Number pencil lightly on the outer corner of the lower lash line. On my lashes is Too Faced‘s Better Than Sex mascara.
Rest of the Face
- Foundation: Bourjois Healthy Mix Serum in shades 51 Light Vanilla and 52 Vanillamixed together
- Bronzer: Joe Fresh Sand
- Blush: Hourglass Ambient Lighting Blush in Diffused Heat
- Highlighter: Hard Candy Tiki
- Lips: Too Faced Melted Ruby (this was applied lightly, rubbed onto the lips with my finger and then blotted off with a tissue – I wanted it to be more of a stain than a flat out lipstick)
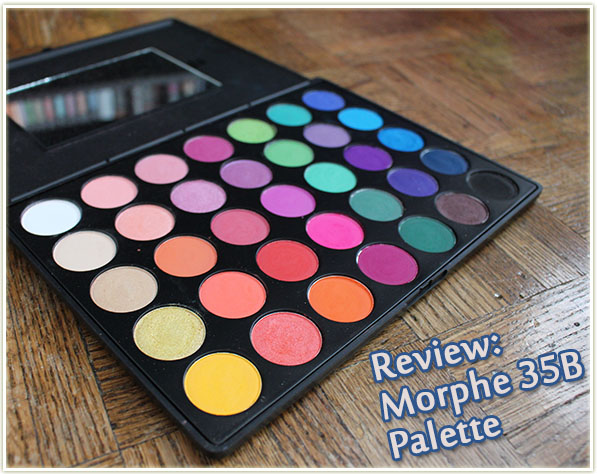
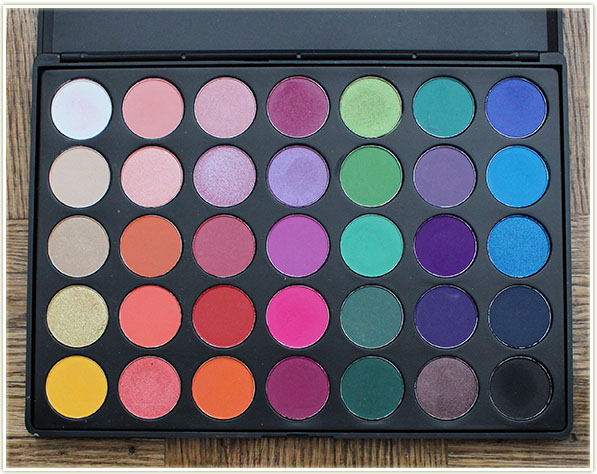
Review: Morphe 35B Palette
This is an awkward post to create; primarily because I’m doing it for one very specific reason: I’ve never heard anyone ever say anything bad about Morphe‘s products. I feel like since I’ve had such a completely different experience to everyone else that I needed to get my viewpoint out there and share it.
So to get right to the point… I do not feel that Morphe makes quality eyeshadows. I know everyone is bonkers for the Jaclyn Hill palette, but I can only speak to my own experience using the 35B.
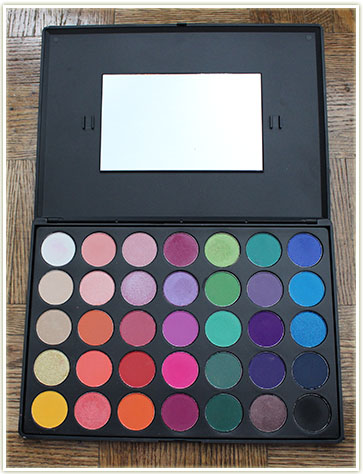
I picked up the 35B Morphe palette at IMATS in 2014. It was $20 CAD, how could I resist? Vibrant, beautiful colours that range from shimmery to matte. I was especially drawn to the bright matte shades because those are the kinds of colours I like to play with the most.
Unfortunately, the quality just isn’t there. Mattes, by their general nature, can be quite difficult to work with. Tough to blend, sometimes hard as a rock, etc. But never in my life have I encountered an eyeshadow that applied as if was made using blackboard chalk.
I first ran into issues when I decided to create a look for Zoe when she was going on vacation and needed some guest posters. She had suggested I do something vibrant, and I knew just want to use, my new Morphe palette! I pulled it out and got to work. I applied my usual Urban Decay eyeshadow primer and then started applying the colours. I immediately ran into issues. The colour would just not adhere to my lid despite the primer. I tried to pack it on to get more impact, but whenever I’d try to blend the edges, the shadow would just literally fall off my lid. I’ve never seen anything like it. There was just no adhesion to my lid whatsoever.
I tried a few different shades, to see if any of them would stick, but had no luck. Irritated, I wiped everything off my face and started again. (A smarter person would’ve chosen a different palette, but I’m too damn stubborn.)
This time I used two primers and NYX‘s Jumbo Eyeshadow pencil in Milk to get a sticky base going. From there, I was able to pack on the colour enough to an intensity that was suitable, but blending became the perfect nightmare. I mean, how exactly do you blend chalk? Or a product that treats your eyelid as though it’s made out of teflon?
I know what you’re thinking (or maybe not)… you’ll likely think this looks quite blended and perhaps quite pretty. And I’ll admit, it does. But if you look closely, you can see the patchiness. Nothing is so much blended as it is layered. There are jagged edges that reflect where each colour starts and ends. Hell, there’s even a bald spot in the middle of the bright blue.
And maybe that’s good enough for some people. But I think it’s unbelievable that I had to use three bases to get this. There are brands out there that can do vibrant mattes far better than this and they DON’T require that you spend twenty to thirty minutes on each eye lid. (I’m looking at you Sleek – you and your brights – you’re awesome!)
Even though the price point ($20) of these palettes makes them a very cheap buy, this isn’t the sort of eyeshadows that a beginner should be using. Even if you have a ton of experience, you probably don’t want the hassle of these either. There’s nothing fun about using products that don’t want to be there in the first place.
Well, I had another guest post coming up (this time for Jodi) and I was like “okay, let’s give this another go. There has to be something worthwhile in this palette!” So I tried completely different shades, anxious to make this work.
Once again I had to pack on the bases to get the shadows to stick. While blending the shades together, more and more of the colours kept lifting off my lid. If you look at the shot above, this is a far better example of the pain I had with blending. This isn’t even blended – this is mashed together in an attempt to make it look like I was able to blend anything.
I want to love this palette so much. The colours are gorgeous in the pan, but they are just not worth the effort. It’s an arduous task to blend out the shades and that’s only if you can even get them to stick to your lids in the first place. I don’t consider myself a total rookie when it comes to makeup, I mean, I was able to get something decent out of these colours after all, but I can’t really recommend this particular palette to anyone. It’s not even helpful if you want to dabble in colour because you’d probably get so irritated with the application you’d be totally turned off of vibrant shades.
If you’ve tried out this palette, or others from Morphe, let me know what your thoughts are. Maybe the shimmers are better?