Tag Archives: Makeup Geek
VIDEO: My Favourite Makeup Geek Shadows
What’s On My Face – Volume 45
As I was putting together this roundup of looks, I started to realize just how much I’ve been using my Makeup Geek shadows lately. I mean, I use them a lot on a regular basis, but three out of the five looks are solely Makeup Geek in here!
I did this for a YouTube video tutorial but had to repost it here because I know not everyone has the time for videos (I’ll continue to repost my video tutorial looks on the blog as time goes on).
Eyes
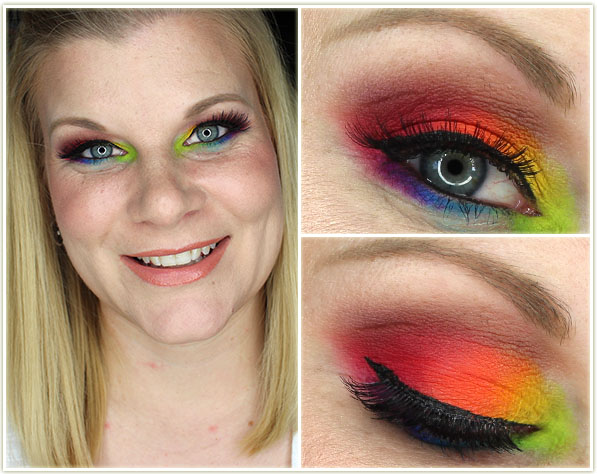
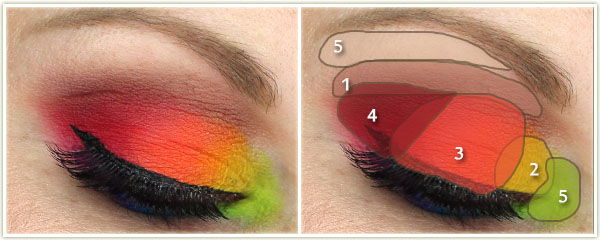
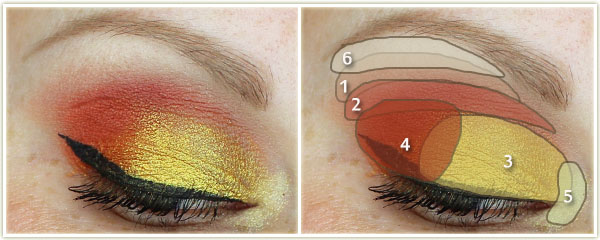
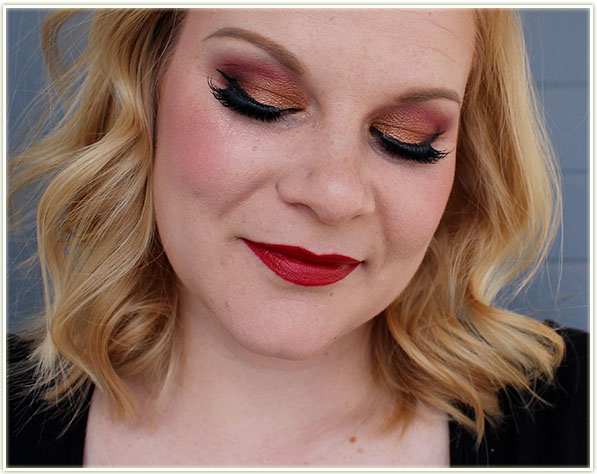
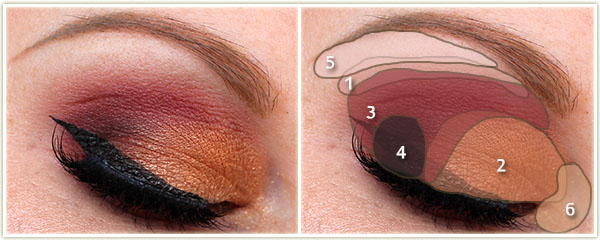
(using the Viseart 08 Editorial Brights palette) I first covered my lid with NYX‘s Jumbo Eyeshadow Pencil in Milk and then:
- MAC‘s Cork in the crease.
- The yellow shade from the palette on the inner third of the lid.
- The orange on the middle of the lid.
- The red on the outer half of the lid.
- The lime green on the inner corner of the lid.
- (also listed as 5) MAC‘s Blanc Type to highlighter the brow bone.
I applied the light blue to the middle of my lower lash line and the purple to the outer section of the lower lash line. I created the wing with Kat Von D‘s Tattoo Liner in Trooper and tightlined my water lines with Marc Jacobs‘ Highliner Gel Crayon in Blacquer. I coated my lashes with Make Up For Ever Smoky Stretch mascara and applied House of Lashes Bombshell falsies.
Face
- Primer: Make Up For Ever Step 1 Smoothing Primer
- Foundation: Make Up For Ever UltraHD in Y225
- Bronzer: Joe Fresh Sand
- Blush: Hourglass Diffused Heat
- Highlighter: Becca Champagne Pop
- Lips: Too Faced Melted Chocolate Milkshake with Sephora‘s lipgloss in Good Fairy
Although I love the Kat Von D Mi Vida Loca Remix palette, I’ve not been using it because I was trying to work through a bunch of other palettes. I said enough was enough, and went back to it for it this look!
Eyes
(Using the Kat Von D Mi Vida Loca Remix palette) I first applied NYX‘s Jumbo Eyeshadow Pencil in Milk to my lid, then:
- Misfit on the inner third of the lid.
- Synth on the middle of the lid.
- Dark Wave on the outer corner.
- (numbers are screwed up, sorry) Vinyl on the inner corner (to the right of 1).
- Ignore this one… I haven’t a clue if I put anything on my brow bone.
Echo is lining the outer half of my lower lash line. I coated my lashes with Make Up For Ever‘s Smoky Stretch mascara.
Face
- Bronzer: Joe Fresh Sand
- Blush: MAC Warm Soul
- Lips: MAC Sweet Tooth
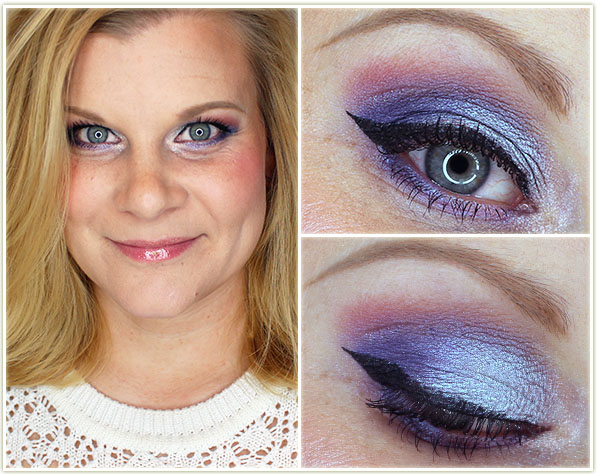
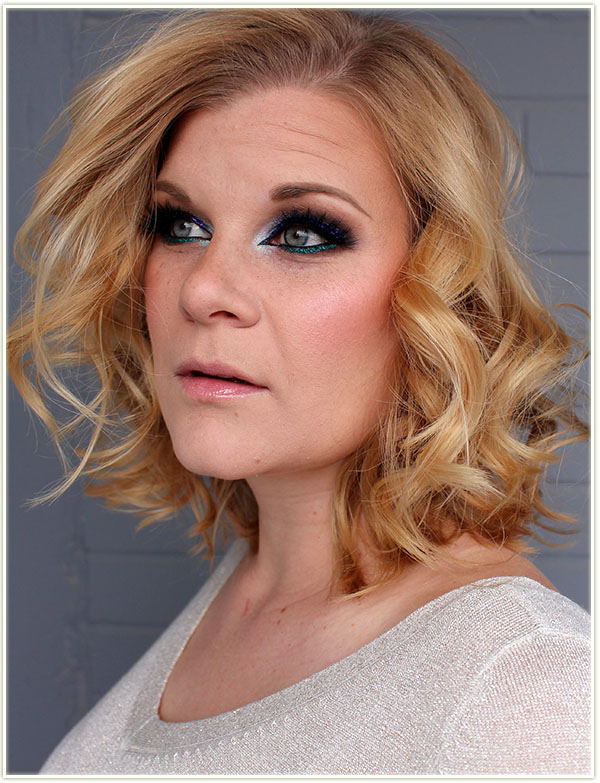
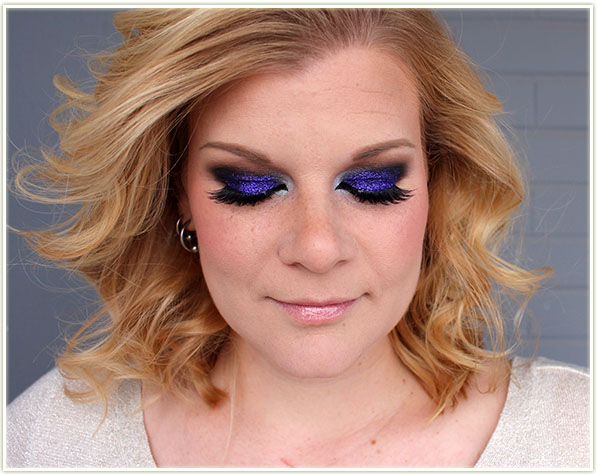
Playing around with my new Makeup Geek duochromes!

Eyes
(all Makeup Geek)
- Cupcake through the crease.
- Kaleidoscope on the lid.
- Pop Culture on the outer third of the lid.
- Duchess on the outer corner.
- Prism on the inner corner
- Vanilla Bean on my brow bone.
I used Blacklight on the lower lash line and created the wing with MAC‘s Blacktrack fluidline. I covered my lashes with Make Up For Ever Smoky Stretch mascara.
Face
- Foundation: Revlon Colorstay in 200 Nude
- Bronzer: Joe Fresh Sand
- Blush: MAC Life’s A Picnic
- Lips: Sephora Good Fairy
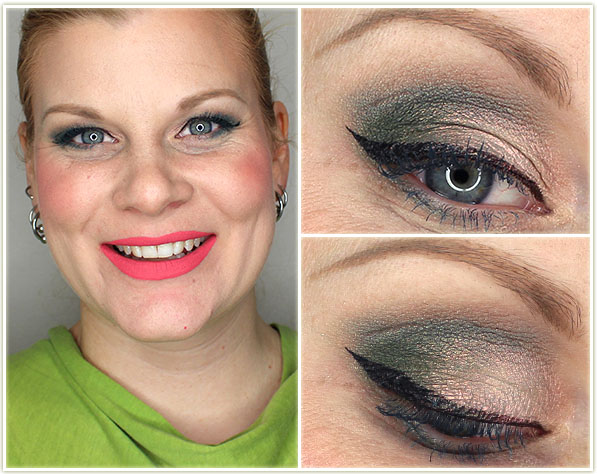
Before anyone says anything – I know the lips look weird. I was playing around with different shades and I *thought* this went together. It wasn’t till I saw the photos that I was like “ohhh….”. haha
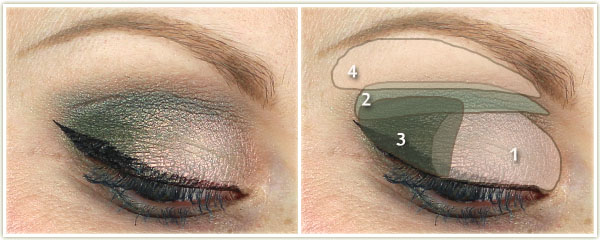
Eyes
(all Makeup Geek)
- Prism all over the lid.
- Typhoon through the crease.
- Dirty Martini on the outer third of the lid.
- Vanilla Bean on the brow bone.
I created the wing with Kat Von D‘s Tattoo Liner in Trooper and coated my lashes with Clarins’ Aquatic Green mascara.
Face
- Foundation: Revlon Colorstay in 200 Nude
- Bronzer: Joe Fresh Sand
- Blush: Tarte Blissful
- Lips: Colour Pop Donut
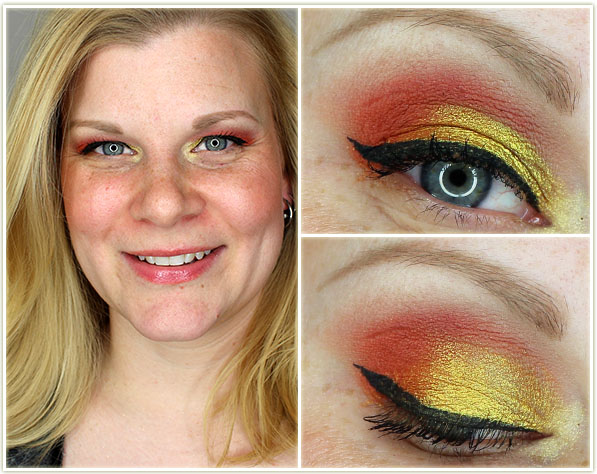
More Makeup Geek goodness!
Eyes
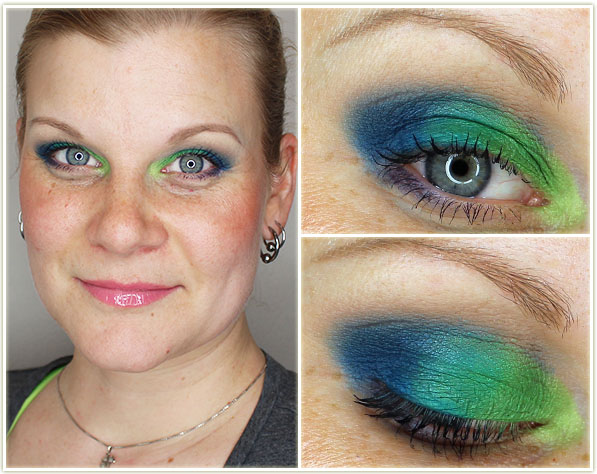
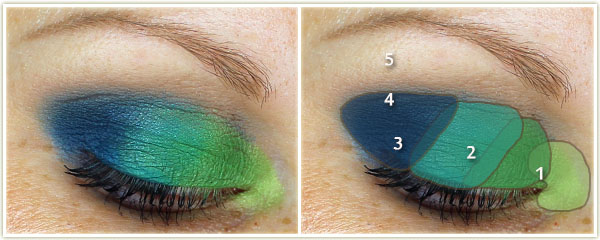
(all Makeup Geek)
- Peach Smoothie through the top of the crease.
- Poppy through the crease.
- Fortune Teller on the lid.
- Morocco on the outer third of the lid.
- Voltage on the inner corner.
- Vanilla Bean on the brow bone.
I created the wing with MAC’s Blacktrack fluidline and coated my lashes with Make Up For Ever‘s Smoky Stretch.
Face
- Bronzer: Joe Fresh Sand
- Blush: Hourglass Incandescent Electra
- Lips: Benefit Coralista gloss
Makeup Geek Duochromes (Full Collection – Swatches, Review & Looks)
Oh man. I have been lusting and lusting over the Makeup Geek duochromes since they first launched back in September. At the time, I couldn’t justify the cost of the whole collection, but come December I was back in a position to purchase ALL OF THEM. I picked up the entire duochrome set in a packaged bundle for $150 USD. That set comes with all twelve duochrome shadows and all eight duochrome pigments. As I’m typing this, the set is currently out of stock, but it’s expected to be back in stock in early February.
Sidenote: If you’re ever wondering WHEN something will be back in stock at Makeup Geek, always be sure to check their spreadsheet here. They’ve had it for years and it’s continuously updated.
The duochrome eyeshadow singles are packaged in the usual single pan packaging (no case for these guys yet, so you’ll need a Z-palette).
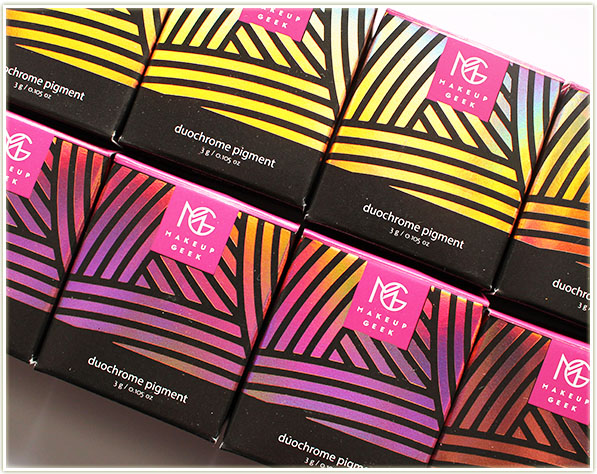
The pigments come in the same original containers as the MUG pigments, but they’ve had an updated lid and logo design that is much more appealing than its earlier incarntion.
As we get into the shades, please keep in mind that since these shadows reflect multiple colours, sometimes a camera cannot capture each shade. At the bottom of all of the swatches are out of focus shots that I’ve taken in an attempt to show you the dimension of each shade.
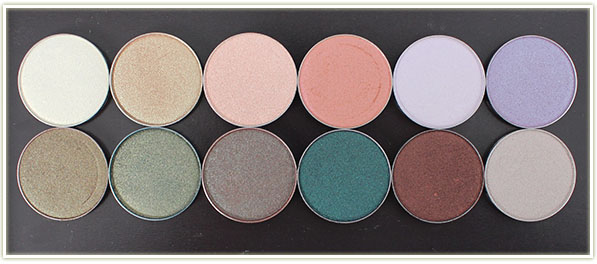
Makeup Geek Duochrome Eyeshadow Swatches
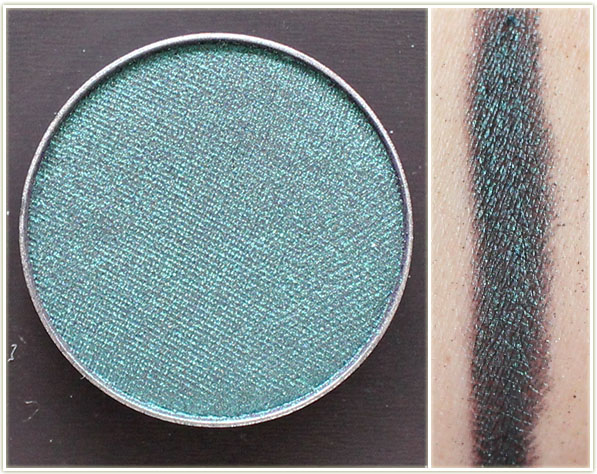
Blacklight is a purple with teal reflect. This is an incredible shade to use with a black base since it will do a lot to change the colour of the shadow.
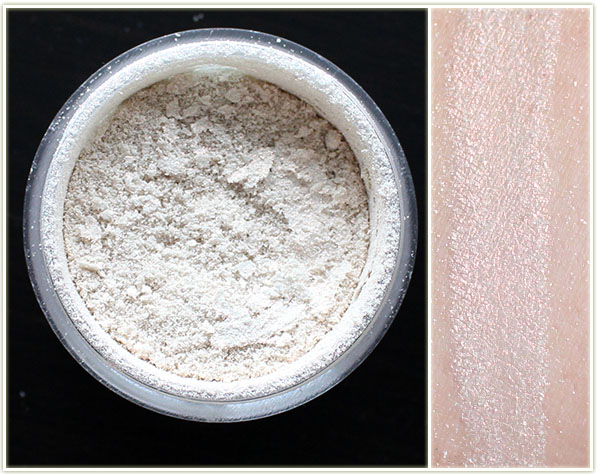
Phantom is a white shadow with a purple reflect. I find this very similar to MAC’s Vellum, although the texture on the Makeup Geek shadow is a million times better. I’ve had several pans of Vellum over the years and it ALWAYS develops crusty hardpan. (Very annoying!) I’m so pleased Phantom doesn’t do that!
Karma is an orangey-gold with green reflects.
Voltage is a colour I am so, SO FREAKING HAPPY TO HAVE. I had an old MAC duo that was very similar to this shade and I’ve never ever found a dupe for it (was the light white/gold shade from the Illusionary/Burning Ambition duo).
Steampunk is another unique shade I wasn’t expecting to see and it’s jawdropping. It’s a black base with a bronze reflect. And it’s EXACTLY what I would expect a shadow called “Steampunk” to look like.
Havoc, to me, is your basic MAC Club. It’s an orangey-brown base with some teal reflect.

Typhoon is another one that took me by surprise. It looks pretty, you know.. green in the pan. Even perhaps a pale green. However, once you swatch it, the colour actually DEEPENS (sayyyyy what?) and it develops this gorgeous teal with gold and green reflect. Insanity.
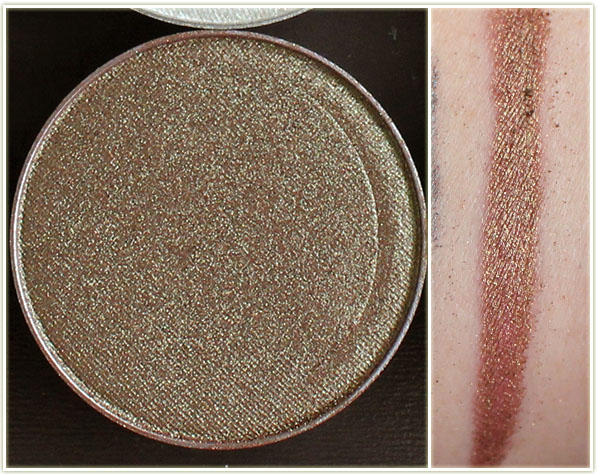
Another stunner! Secret Garden also deepends up once you apply it. It’s a dark brown base with sharp green reflect. This is the perfect shade if you only want to wear one colour on your eye – it’ll be dark green on the lid and smudge out to a brown in the crease.
Ritzy has a reddish brown base with gold reflects.
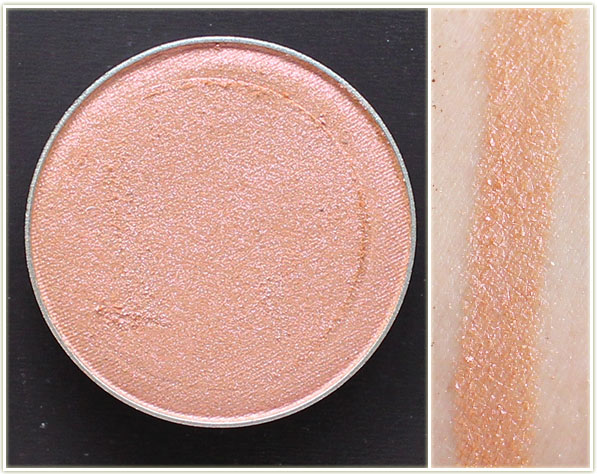
Mai Tai is a peach shade with a subtle lilac reflect.
I’m Peachless is a champagne with peach-pink reflects. Stunning on the lid and on the inner corner.
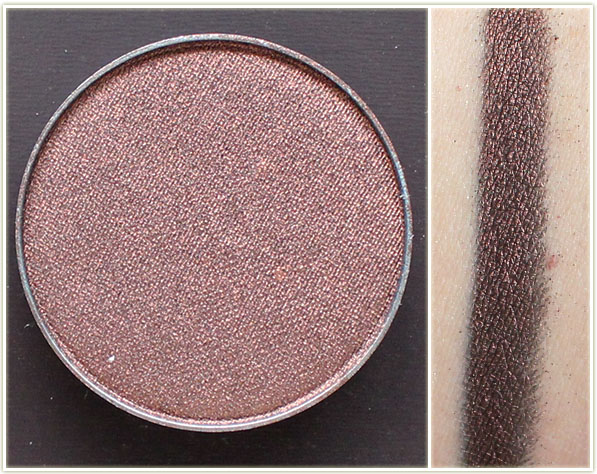
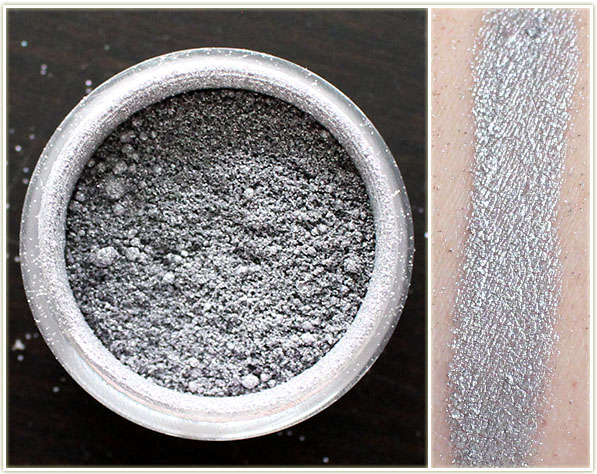
The already existing shade (although now added to the duochrome lineup) is Rockstar, a dull silver with purple and pink reflects. I find this very, very similar to MAC’s Vex.
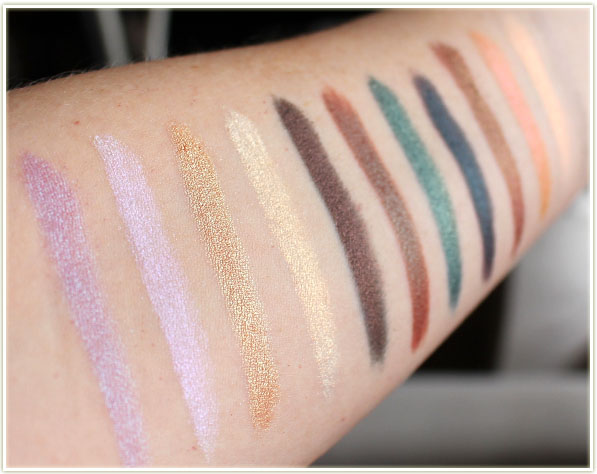
The shot above is every shade in the eyeshadow collection taken out of focus so you can see some of the reflect to the shades.
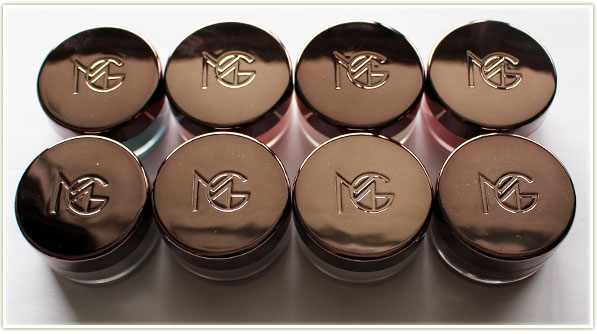
Makeup Geek Duochrome Pigment Swatches
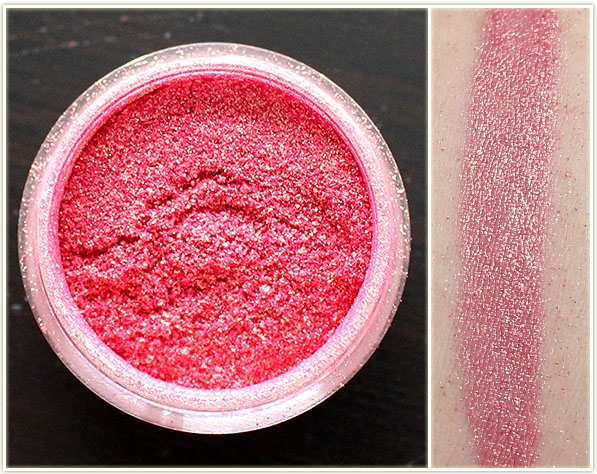
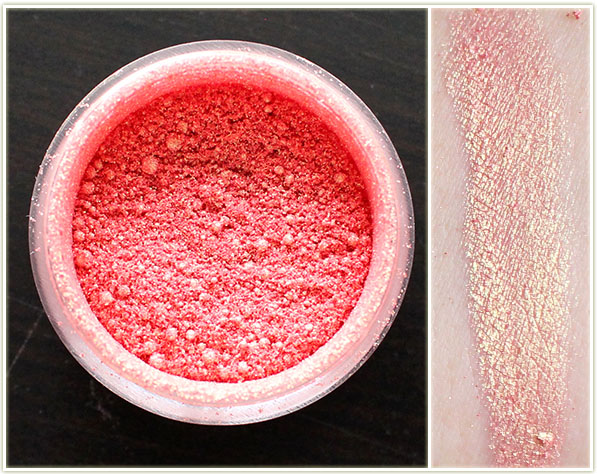
Wildfire is a red-coral with gold reflects. STUNNING.
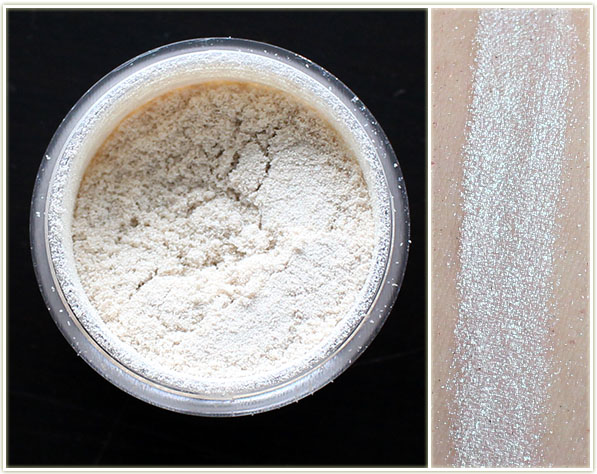
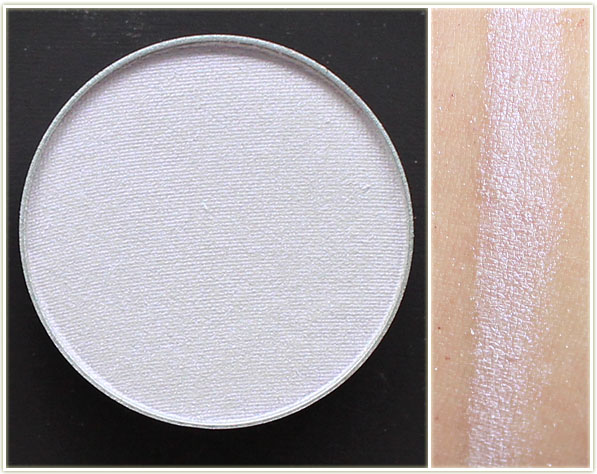
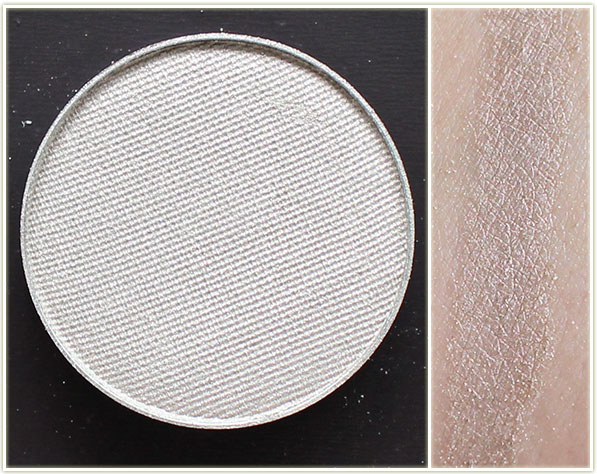
Sugar Rush is a white with a teal reflect. The shot above does nothing to do it justice. Scroll down to see the out of focus shot and you’ll see more of the teal coming out.
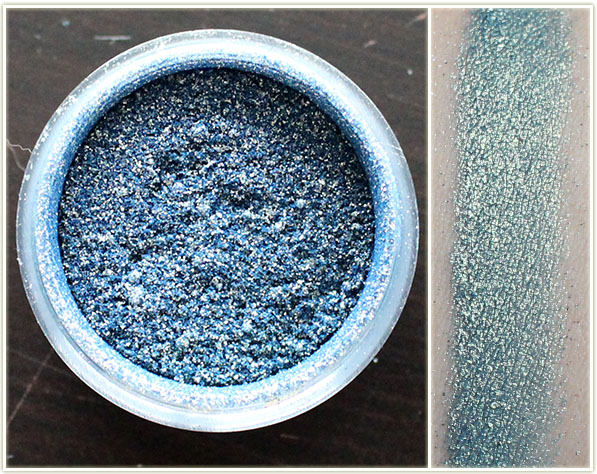
Chameleon is kind of cool in the pot – it looks blue and silver, but as soon as you swatch it it goes teal with gold reflects.
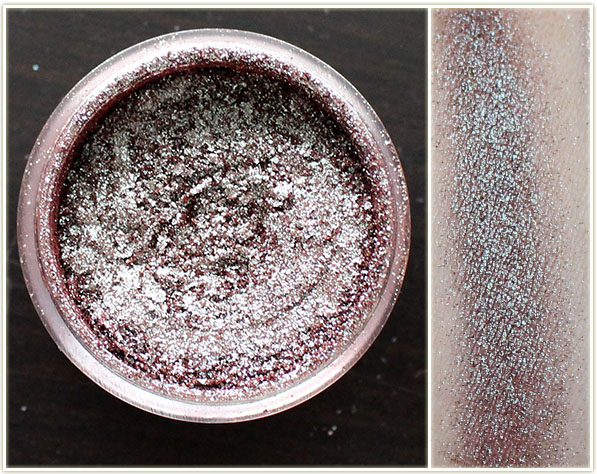
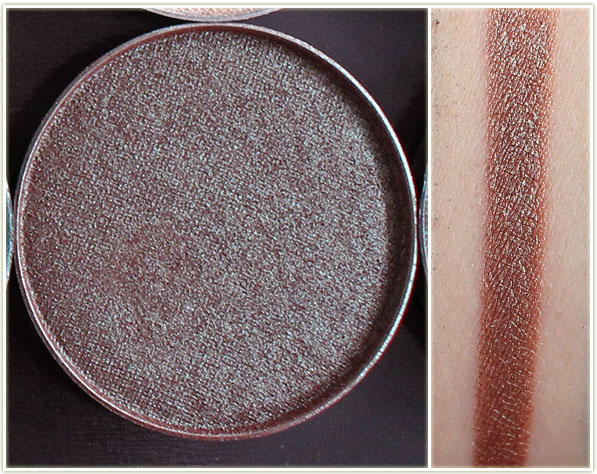
Insomnia is an existing shade for MUG, but I didn’t own it before (so I was happy to have it in this set). It’s a red-brown with blue reflects (also similar to MAC’s Club).
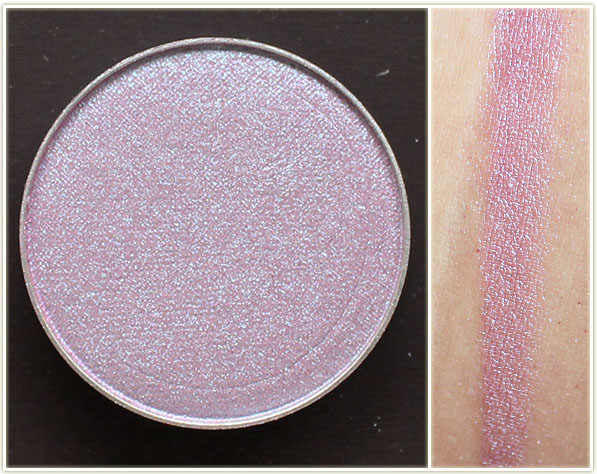
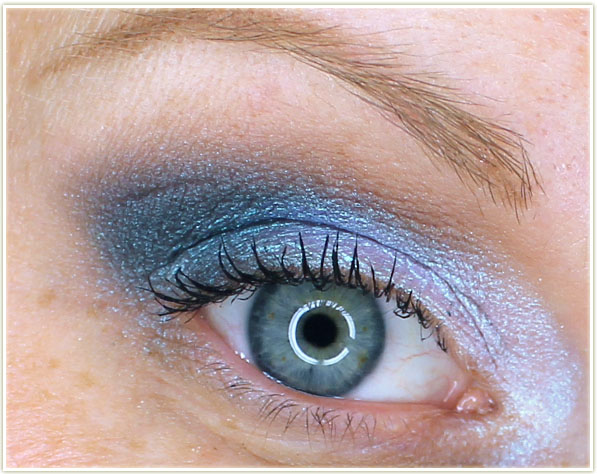
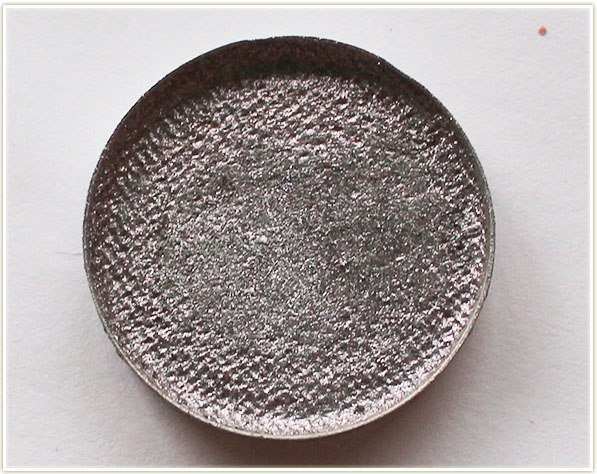
I cannot photograph Kaleidoscope to save my life. It’s a medium silver with pink, purple and teal reflects that are very visible in person.
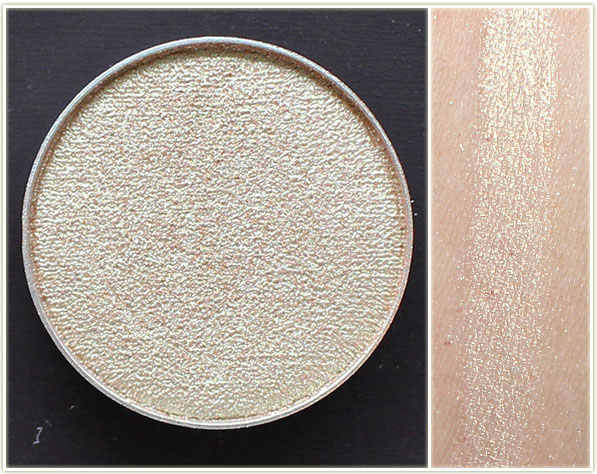
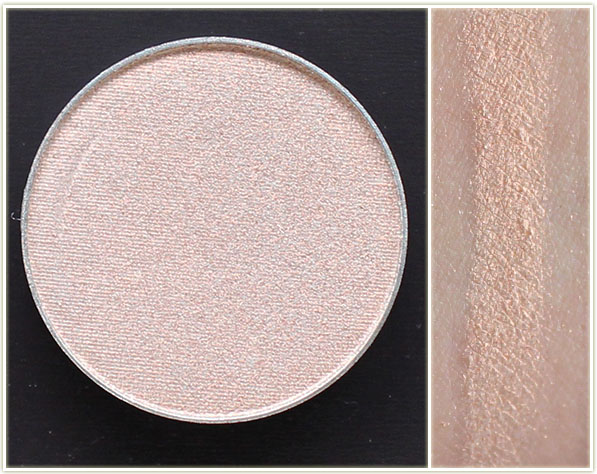
Prism is another one of those icy white shades with a peachy-pink reflect.
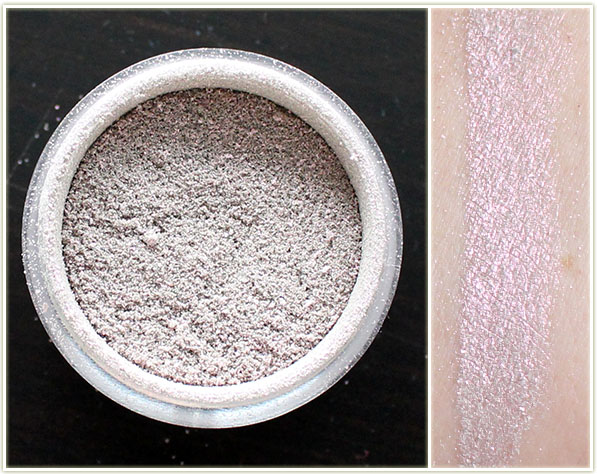
Mood Ring is a pale grey with lavender reflects.
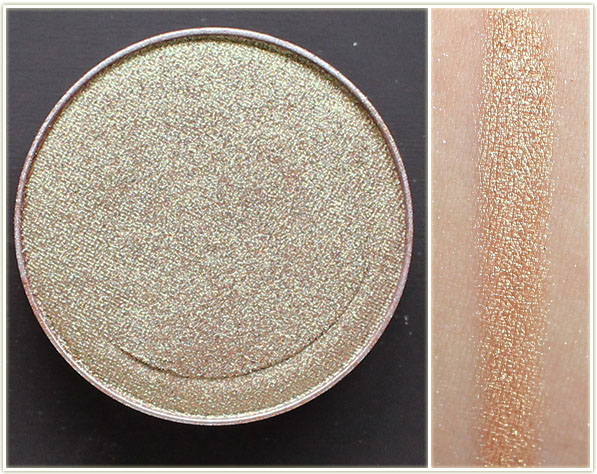
Hologram is a favourite of mine – while the base is quite orange, you get a LOT of gold punch to it on the lid.
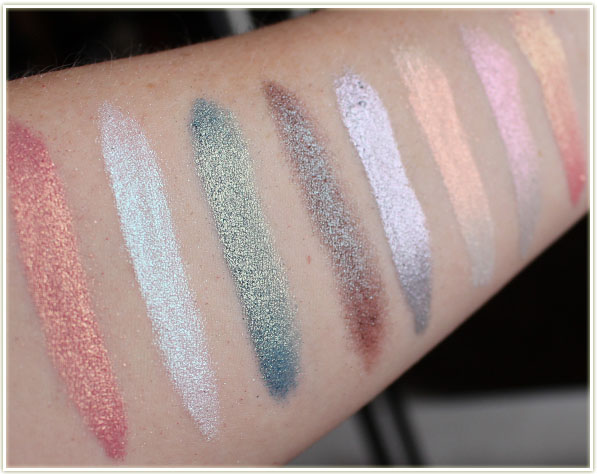
See how the colours on the right side of the swatch stand out more when they’re out of focus? So, SO pretty.
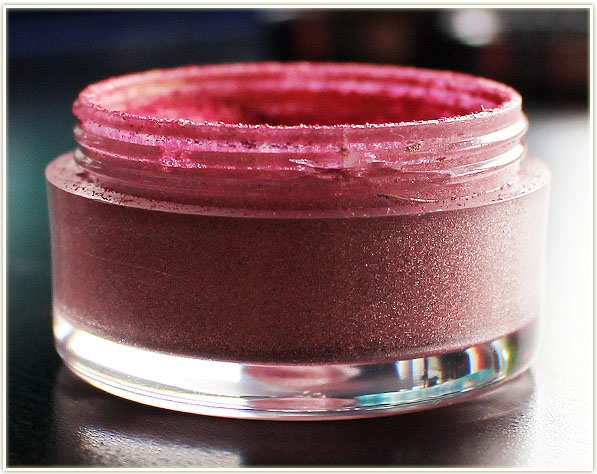
A note on the packaging: My pigments did not come with the sifters inside the jar and instead were in a separate baggie inside my order. Since I knew about the problem of the sifters breaking the jars, I decided to only try it on one of my pigments. As soon as I applied the sifter, it cracked the side of the lid around the screwtop. My husband pulled the top off for me, and I just decided to leave all the pigments as is without slotting in the sifters. Sure, they’re a bit messy, but pigments usually are. Applying the sifter isn’t worth it to me if it’ll crack the jars. Additionally, having the sifter on actually made it difficult to screw the tops closed (without the sifter on, it it glides through the grooves seamlessly.).

As you can see from the shot above, the lid of the pigments are suited to having the sifters on (the circle sticks out and slots into the hole in the sifter). I’m hoping they fix the packaging in the future so that that sifters don’t crack the jars, but until then it’s definitely not a deal breaker for me: I love the pigments and will continue to use them without the sifters.
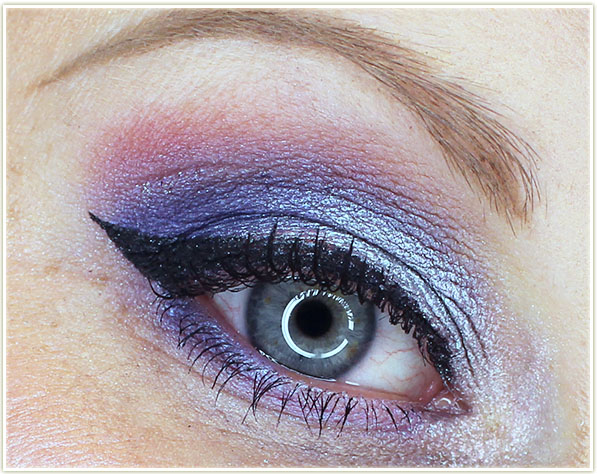
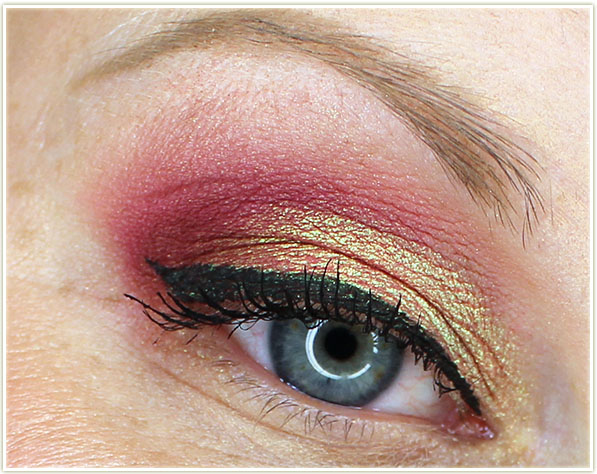
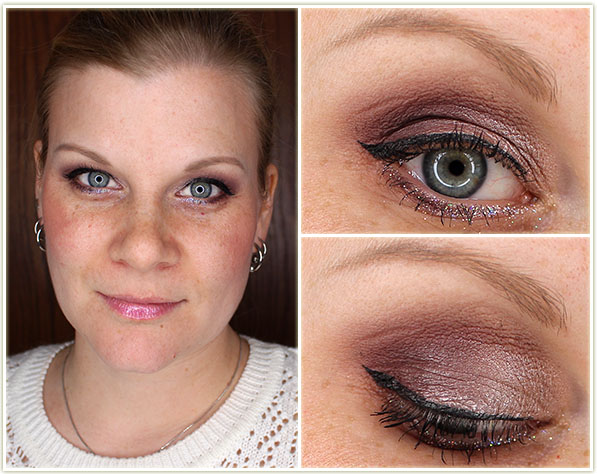
Makeup Geek Duochrome Looks
Here’s a few looks I cooked up using some of the pigments:
Pressing The Pigments
I know some people don’t like the mess of pigments, so I decided to press Kaleidoscope to see how it would turn out (plus I wanted to send it to a friend). For a tutorial on how to press pigments, check out this post.
It definitely works, and the swatch ends up looking rather similar:
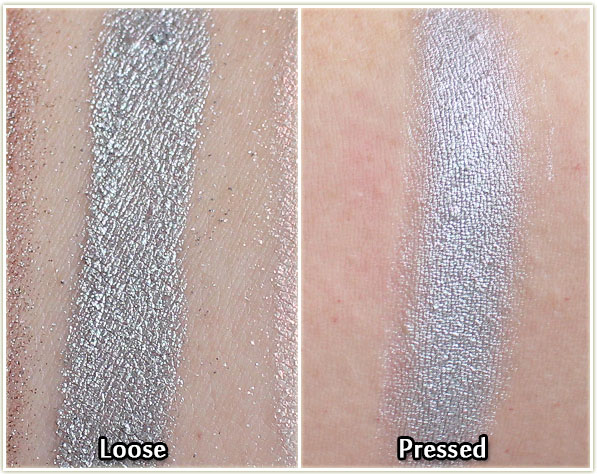
If anything, it’s a bit softer of a colour when it’s been pressed and then swatched, but the different colours are present when you tilt the shadow towards the light. (I know you can’t see it in the swatch, which is a shame, because Kaleidoscope is so utterly unique!)
Final Thoughts
These are PHENOMENAL. They are so much fun to use and play with. Since the duochromes have multi-coloured shifts, you can mix and match with other eyeshadows you have to pull out more colour as you wish. For example, to pull out the red tones in Hologram in my eye shot above, I used some darker red/orange shades. You can also use different bases to augment different shades in the pigment (try playing around with it!).
My personal favourites eyeshadow shades are Blacklight, I’m Peachless, Phantom and Secret Garden. For the pigments, I love Hologram, Wildfire, Sugar Rush and Prism. They’re all good though, and the pigmentation as amazing as every other Makeup Geek shadow I’ve tried! If you REALLY want to see the multi-faceted shades in one of these, next time you place a MUG order, pick up the Kaleidoscope pigment. I actually gasped when I swatched that one!
So if you couldn’t tell, as per usual, these are total winners from the Makeup Geek brand. The duochrome eyeshadows are the same $6 USD price tag you’re used to from MUG, although the pigments will set you back $12 USD each. If you get some, tell me about your experiences with the shades!
What’s On My Face – Volume 44
Alright, it’s been a while since I’ve done a roundup of looks. Unfortunately, there wasn’t a lot of pizzazz in my looks throughout December as I felt like I was eternally rushing around, so this roundup is going to include my actual New Year’s look, some guest posts and a suuuuper old look from June I still hadn’t posted yet. Enjoy!
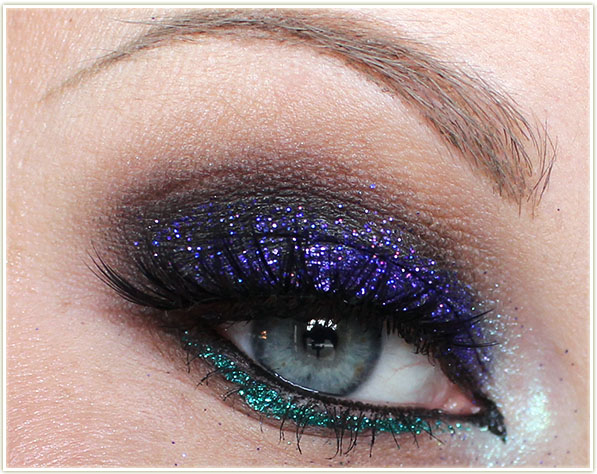
So here’s what I actually wore on New Year’s Eve. We didn’t have extravagant plans (we ended up going to an arcade), but I wanted to at least have a splash of glitter on! I ended up applying false lashes later on, but didn’t get around to reshooting the pictures, so what you’re looking at is sans falsies. This look does use the Too Faced Chocolate Bon Bons palette, but I promise there’s a full Challenge Week coming up focusing on that palette soon!
Eyes
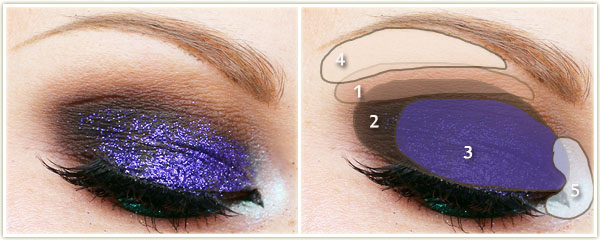
(Too Faced Chocolate Bon Bons palette)
- Pecan Praline through the crease.
- Cafe Au Lait on the lid.
- Bordeaux on the outer half of the lid.
- Divinity on the brow bone.
I applied Make Up For Ever Glitters in 13 to my lower lash line using some Too Faced Glitter Glue. I created the wing with Kat Von D‘s Tattoo Liner in Trooper and applied Make Up For Ever Smoky Stretch mascara to my lashes.
Face
- Bronzer: Charlotte Tilbury Filmstar Bronze & Glow
- Blush: Clinique Cola Pop
- Highlighter: Charlotte Tilbury Filmstar Bronze & Glow
- Lips: Sephora lipgloss in Queen Bee
This look was completely focused on featuring Too Faced’s Melted Villain lipstick. Although it’s a dark purple, I have to admit that it mostly comes out looking black on me. that’s okay though! I love the colour and it’s NOT patchy! (And yes, I did wear this exact look to work that day!)
Eyes
(all Makeup Geek)
- Peach Smoothie through the top of the crease.
- Grandstand on the lid.
- Hipster through my crease.
- Burlesque on the outer half ofthe lid.
- Vanilla Bean on the brow bone.
I applied Make Up For Ever‘s Smoky Stretch mascara to my lashes.
Face
- Foundation: Bourjois Healthy Mix Serum 51 Vanilla
- Concealer: Collection Lasting Perfection concealer in 2
- Bronzer: The Body Shop Honey Bronzing Powder in 01 Light Matte
- Blush: Hourglass Luminous Flush
- Highlighter: MAC Soft & Gentle
- Lips: Too Faced Melted Villain
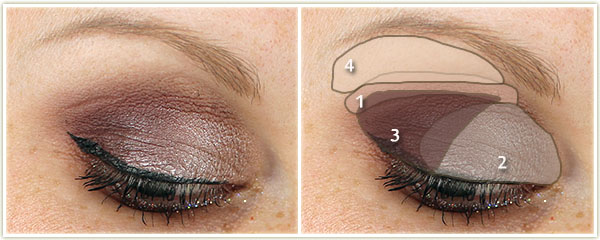
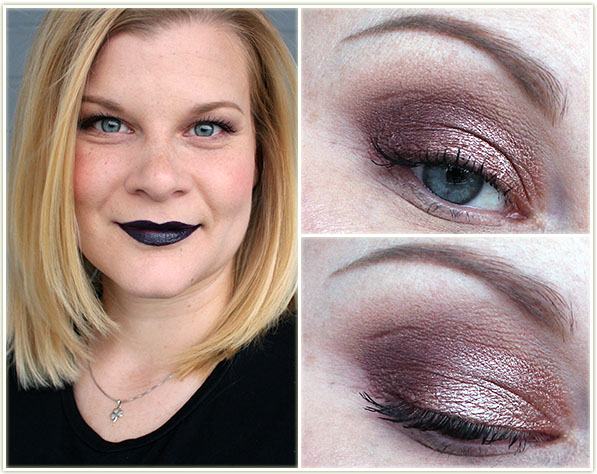
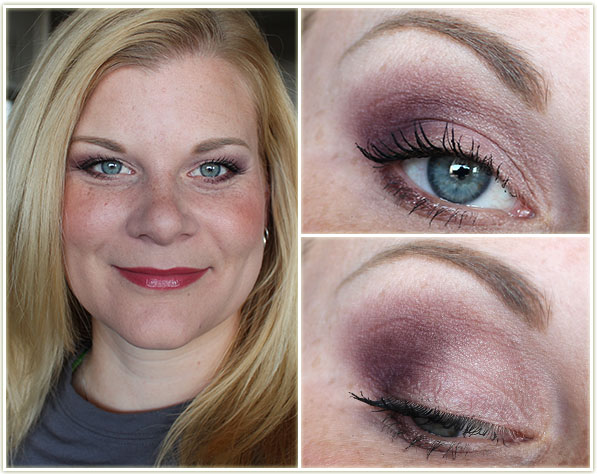
I looooved this look! I did this as a guest post for Up The Rollercoaster last month and just adored how the shots came out. I wasn’t sure how the cranberry tones in the shadows would work with a red lip and if I’m honest, I think it’s a LITTLE bit off, but the overall effect is WA-BAM!

^^ That right there’s a money shot. I’m so pleased with it! 😀
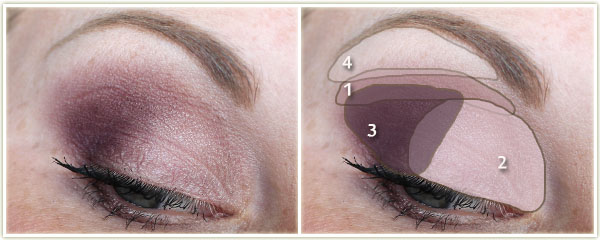
Eyes
- Makeup Geek Peach Smoothie through the top of the crease.
- Makeup Geek Glamorous all over the lid.
- Makeup Geek Bitten on the outer half of the lid and through the crease. I also used Bitten to liner my lower lash line.
- Makeup Geek Corrupt to deepen up the outer corner.
- Makeup Geek Vanilla Bean to highlight the brow bone.
- I used some old MAC gold glitter flecks to add some sparkle to the inner corner. Any gold glitter will do!
I created the wing with Kat Von D‘s Tattoo Liner in Trooper and tightlined my upper water line with Marc Jacobs‘ Highliner Gel Crayon in Blacquer. I coated my lashes with essence‘s get BIG! lashes volume boost waterproof mascara and applied a pair of Noir Fairy false lashes by House of Lashes. My brows are filled in with Anastasia’s Dipbrow Pomade in Blonde.
Face
- Foundation: Bourjois Healthy Mix Serum in 51 Light Vanilla
- Bronzer: Make Up For Ever Pro Bronze Fusion in 30M
- Blush: Clinique Cola Pop
- Highlighter: Becca Champagne Pop
- Lips: MAC Russian Red with Brick lipliner to even out the lip lines
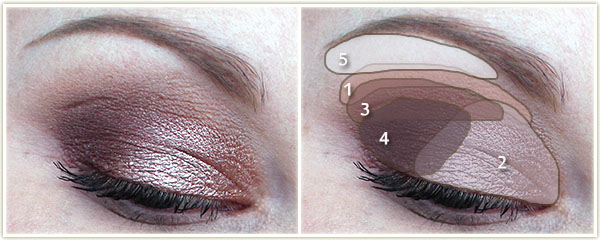
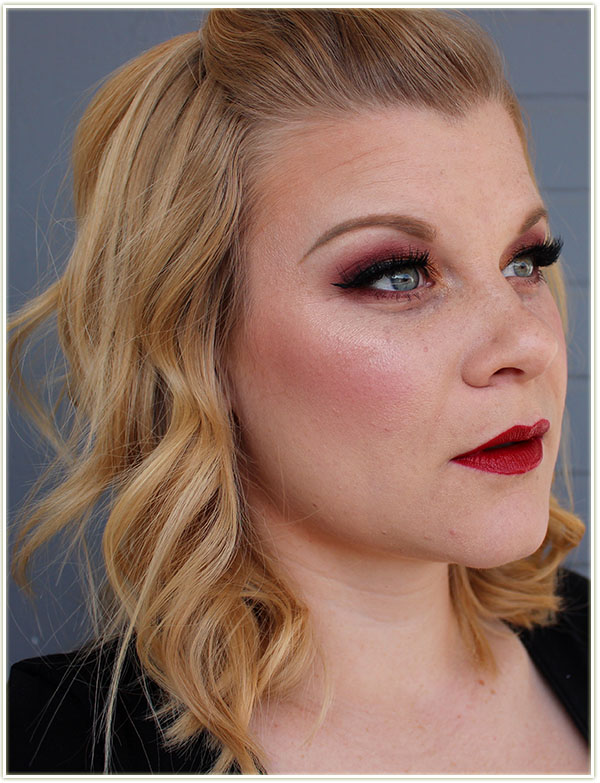
Another guest post! (This time for Writing Whimsy.) I really love doing guest posts because it gives me an opportunity to be totally creative. Usually I’ll take a Saturday afternoon and spend a couple hours working on one. This is very different from my usual makeup roundups which are done almost exclusively as my daily work makeup (which doesn’t always afford me the luxury of playing around with glitter since I’m usually in a rush!).
Eyes
After priming my eyelids, I applied NYX‘s Jumbo Eyeshadow Pencil in Black Bean all over the lid and blended out the edges. Then:
- I deepened my almost non-existent crease (thanks hooded lids) with MAC‘s Cork.
- I covered the entire lid with Urban Decay‘s Blackout, making sure to blend it into Cork.
- I then patted on Lit Cosmetics’ glitter in Disco Diva using their glitter adhesive.
- MAC‘s Blanc Type is on the brow bone to even everything out.
- On the inner corner, I blended together Naked Cosmetics IV-05 and IV-03 and patted it on.
I created the inner corner point with Kat Von D‘s Tattoo Liner in Trooper, thinly lining my upper lash line with it as well. I tightlined my water lines with Marc Jacobs Highliner Gel Crayon in Blacquer and applied essence get big! lashes waterproof mascara to my lashes. I lined my lower lash line Lit Cosmetics Peacock glitter.
Face
- Foundation: Revlon Colorstay in 200 Nude
- Bronzer: Too Faced Milk Chocolate Soleil
- Blush: Hourglass Diffused Heat
- Highlighter: Make Up For Ever Pro Sculpting Duo #1 (highlighting shade)
- Lips: Sephora Good Fairy lipgloss
Alright this one’s just super old. I had toyed with doing a Challenge Week for Laura Mercier‘s Artist palette, but I never got around to finishing it (likely something new and exciting caught my eye!). I did this look sometime in June of 2015.
Eyes
(all Laura Mercier Artist palette)
- Plum Smoke through the crease.
- Guava on the lid.
- Kir Royale on the outer half of the lid.
- Sparkling Dew on the brow bone.
I coated my lashes with essence‘s Lash Princess mascara.
Face
- Foundation: Boots No7 Instant Radiance in Cool Vanilla
- Bronzer: NYC Fire Island Tan
- Blush: MAC Sea Me, Hear Me
- Highlighter: Make Up For Ever Pro Sculpting Duo #1 – Highlighter
- Lips: MAC Mystical