So this is me right now. The fucking idiots over at Host Rocket suffered a “catastrophic hardware failure” this morning resulting in “complete data loss”.
AKA my web site is gone.
Totally gone.
SO THAT’S FUCKING AMAZING.
However, thankfully Google Cache is a thing (as my husband has blissfully discovered), and I’m going to start rebuilding all the posts I had on here. This will take a long, painful amount of time but I am totally determined to get everything back up and running. I am totally heartbroken (although less so now that I know my posts are cached somewhere). 🙁
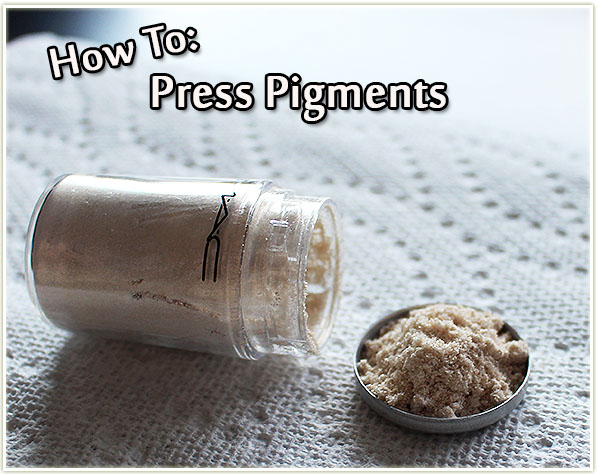
Shawna over at Spill The Beauty was asking me about how I press my pigments one day and I thought I’d just go ahead and dedicate a whole post to the process. If you’re like me, you find that pigments are a freaking disaster to deal with. They’re unnecessarily messy – I often end up with more pigment on my furniture, than I do on my lids! To solve this problem, I press all of my pigments.
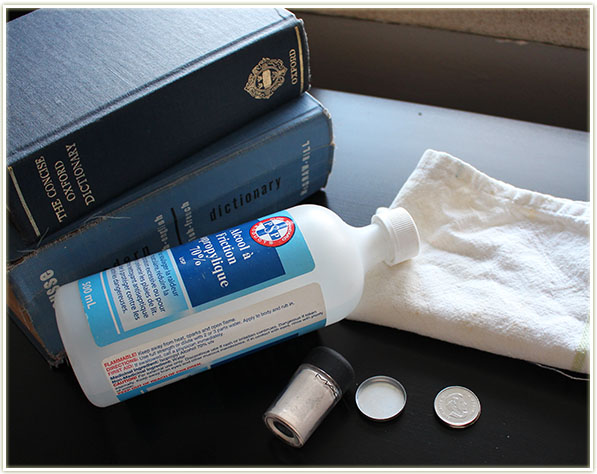
What you’ll need to press your pigments
The key ingredients to pressing any pigment are plain old rubbing alcohol (I bought that enormous bottle for something like $3), an empty shadow pan (this is from an old MACeyeshadow I had finished), a couple of quarters, a few heavy books to press the actual shadow, and a clean dish towel. And of course, whatever pigment you’d like to press! In general, I find that shimmers are the easiest pigments to press. Mattes can go a bit dusty (although it’s still feasible) and glitters are a total no no.
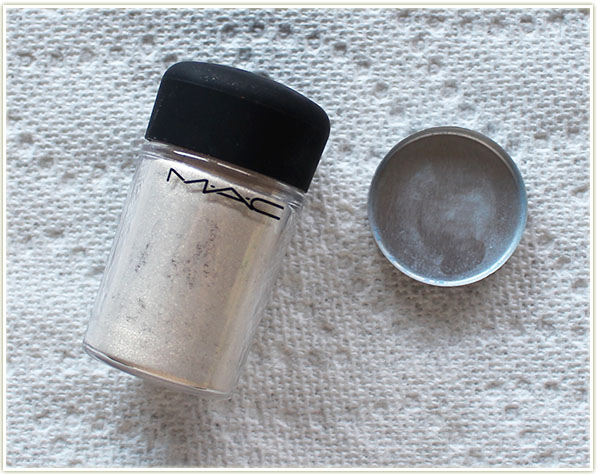
Today I’ll be pressing MAC’s Vanilla pigment
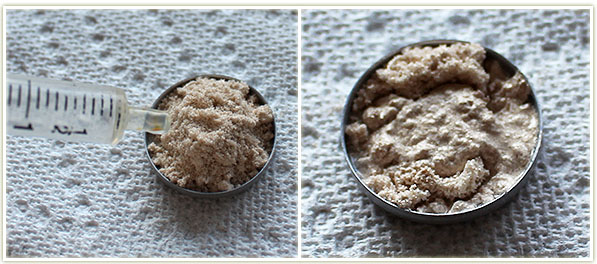
Alright, let’s get to it! Take your empty shadow pan and clean of any remaining dusty shadow particles.
Firstly, get your pigment into that eyeshadow pan!
Pile your pigment high into the pan. The more you can get in there, the better. We’ll be adding alcohol to this and it’ll soak down the pigment. The shot above shows you how much I put in initially, but that’s barely enough for half the pan. You need far more pigment than you think you do to press one into such a tiny pan.
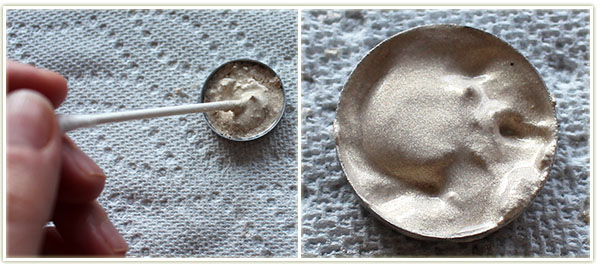
You want a paste-like consistency after you’ve added your alcohol into the mix
I then add rubbing alcohol via a dropper directly to the pigment in the pan. There’s no rhyme or reason to this and unfortunately I don’t have an exact measurement. I will say that you want your pigment to end up slightly chunky. In the shot on the right, you can see the texture is quite thick and the powder has dropped down in size. At this point I’ll start adding more pigment or more alcohol to get the right consistency. Do not let your pigment get “thin” or super runny – it means you’ve got way too much alcohol in it. If that happens, add more pigment until it gets thick again.
Stir up the pigment and alcohol thoroughly
I typically take a cotton bud, snap off the end, and use that to mix up the pigment with the alcohol. Since the alcohol is the binding agent, you want to make sure the entire pigment is thoroughly mixed with the alcohol. The shot on the right (above) shows the best consistency: It’s a bit thick, can hold some form, but is still somewhat liquid.
Drop the pan a few times to level out the pigment
From there, I pick up the pigment pan and drop it lightly a few times. This levels off the pigment so that you get a flat surface.
Almost there!
Tada! A level surface! At this point, your pigment is too wet to press, so you have to let some of the alcohol evaporate. I’ll generally leave it alone for an hour or so then come back to press it.
Pressing the pigment
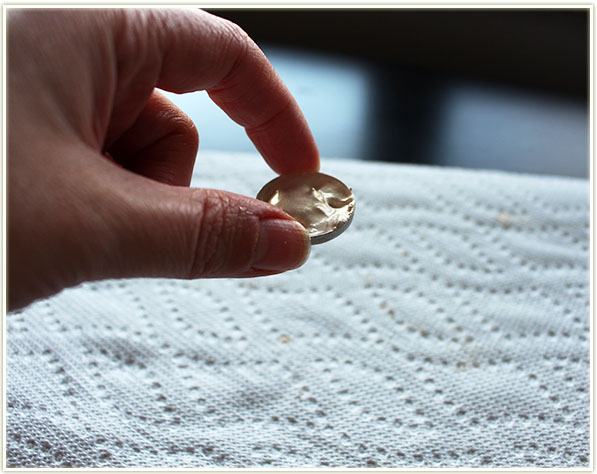
We’re almost there! Once your pigment is soft to the touch, but not sopping wet, take a tea towel, place it over pan, then slot in two quarters on top.
Heavy books will press the pigment while it dries
Add a heavy book or two on top of the quarters and let it dry completely overnight.
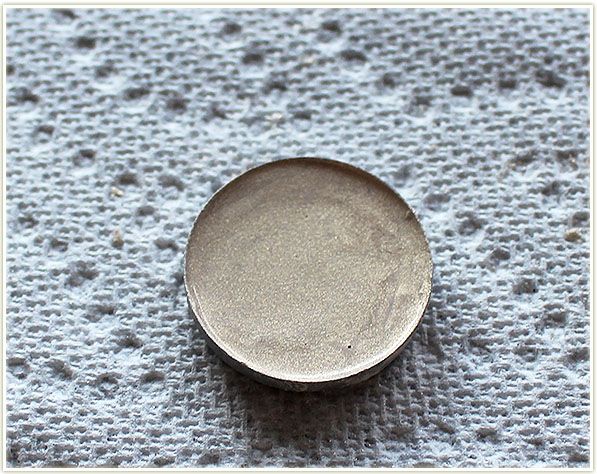
Voila! Your pressed pigment is now done!
And there you have it, a freshly pressed pigment that won’t cause you so much grief! Keep in mind that whatever tea towel you use, that’s the imprint you’ll end up with on the pigment.
I hope this helped! Let me know if this works out for you. 🙂
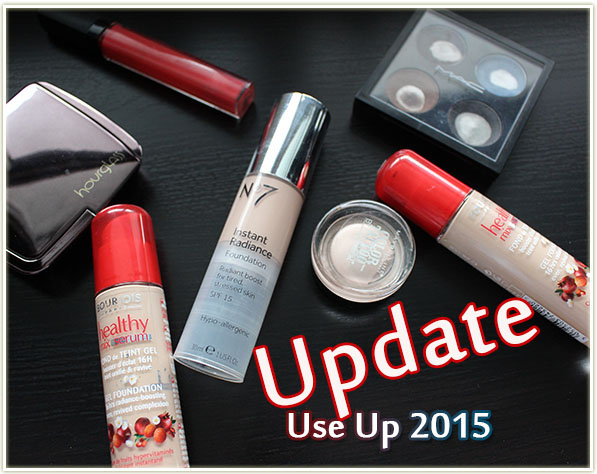
In January I rounded up 10 makeup items I wanted to be done with come the end of 2015. Since the month of June marks the halfway point of the year, I wanted to post an update on my progress.
Hourglass Ambient Lighting Powder in Ethereal – Before and After
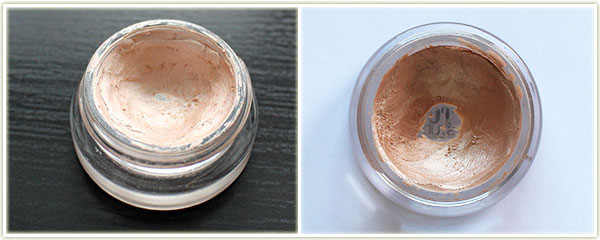
Oh my godddddd THIS… THING. I’m not a powder person as I’ve since discovered since purchasing this one. This thing just won’t go DOWN! I use it roughly twice a week to set my foundation (liberally, I might add) and it just won’t go anywhere! I can see a dent in it but I really have no hope in hell of getting through this damn thing this year.
Maybelline Color Tattoo in Barely Beige – Before and After
Well… there’s progress on this Color Tattoo, but not much. In my original post I mentioned that my Color Tattoos are drying out and that I wasn’t sure if this would make it the whole year. It still has some life left in it, but I’ve been having so much fun using my other products that I haven’t really been reaching for this one. This one may very well just get junked at the end of the year.
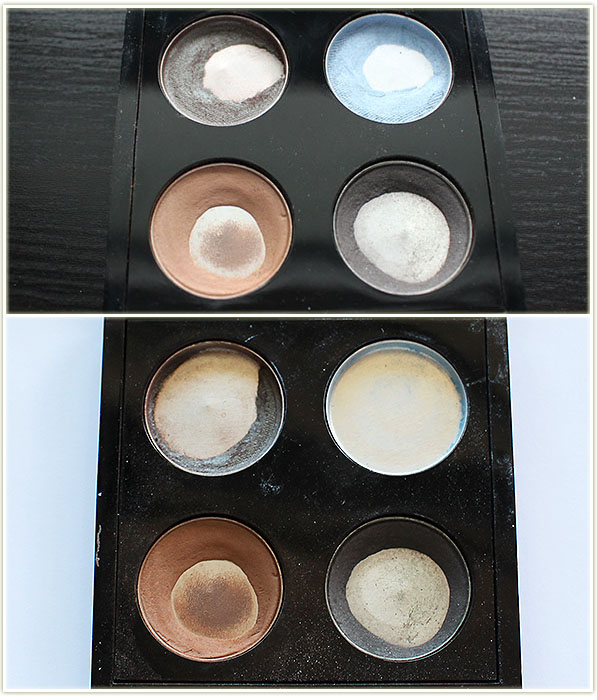
MAC eyeshadows in Club, Fade, Cork and Print – Before and After
Small progress on these ones!
I’ve managed to wear down Club a whole lot during the winter but I haven’t dipped into it much lately.
Fade, the light blue, got used once for a guest post over on Workaday Beauty, but I noticed the pigmentation was seriously lacking and it was just crumbling to bits. I ended up scraping out the rest of the pan and dumping it. It’s a super old shadow so I think it’s just gone off.
Cork‘s been used a wee bit, but not much. Oddly, I have very little use for browns in my day to day looks.
Same as Cork, Print has been used a bit, but not much. I really need to get cracking on this one!
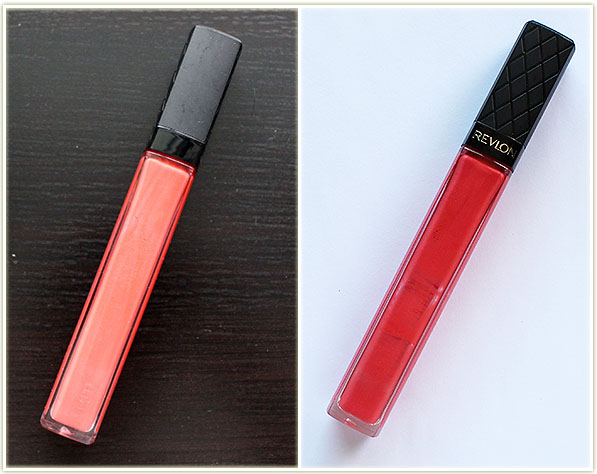
Revlon gloss in Papaya
This gloss is hard to figure out where I stand with it. The gloss is so thick that it sticks to the edges of the tube and never really settles down. I ended up scraping off the side of the tube so I could at least show you some progress… but I really couldn’t say how much is left in there. Maybe 40%? 30%? Hard to tell. However, I’m not that bothered – Revlon’s Papaya is such a lovely shade that it’s fun to wear.
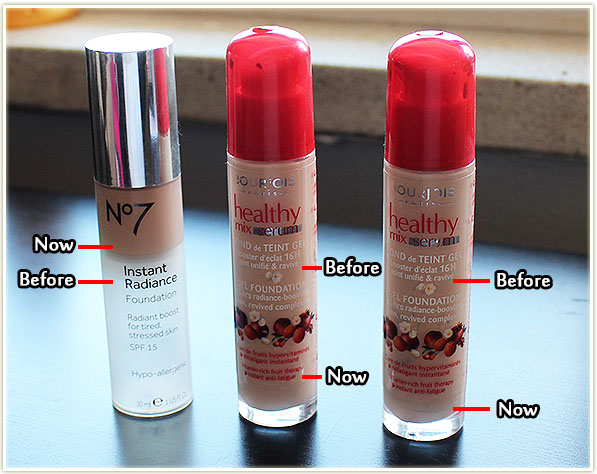
Boots No7 Instant Radiance and two bottles of Bourjois Healthy Mix Serum
Loads of progress here!
Boots No7 Instant Radiance in Cool Vanilla – I LOVE this foundation. It’s my absolute favourite out of all the ones I own, but it’s also coming on three years old so I really need to get this finished up. It’s the perfect match for my “spring into summer” skintone so I’ve only really been able to use it throughout May and June so far this year.
Bourjois Healthy Mix Serum (shades 51 Light Vanilla and 52 Vanilla) – I can no longer pump anything out of 52, so I’m scrapping the sides to use it up. I really don’t want to toss it till I finish it because I love it so much. 51 still has about half and inch left in the bottle but I won’t get to use it again until late fall/winter when I’ve lost most of my summer tan.
That’s it! I’m way behind in a few products and there’s quite a few I really don’t think I’ve got a hope in hell of finishing. That being said, I’m pretty impressed with my foundation usage!
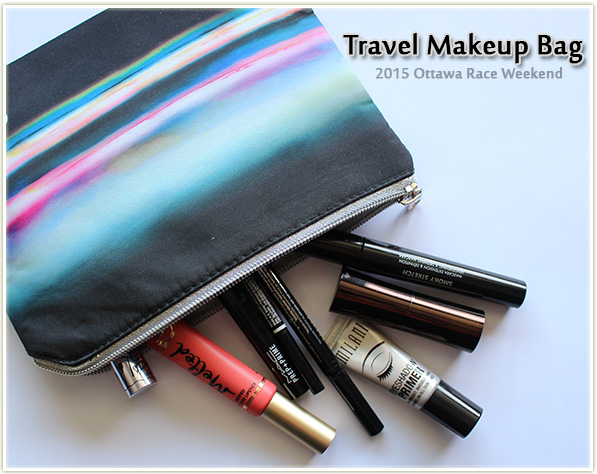
I’m taking a(nother) long weekend this coming one to head to Ottawa for Race Weekend.Last year I did the 5k, and this year I’m going back for the half marathon which my father will also be running! And what’s a weekend away if not to bring along some makeup products I want to get better acquainted with?
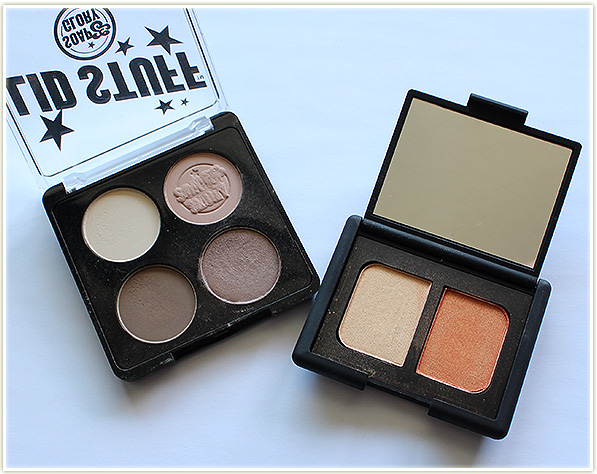
Soap & Glory Lid Stuff in What’s Nude and NARS dup in Mediteranee
I’m only bringing along two small eyeshadow palettes because I find I never reach for these on a day to day basis, often opting for my larger palettes. The more neutral toned palette is Soap & Glory‘s Lid Stuff in What’s Nude and the NARS duo is Mediteranee (and the orange in that duo is everything). It won’t make for especially enthralling makeup looks while on vacation, but it’ll be fun for me to play with these shadows a bit more.
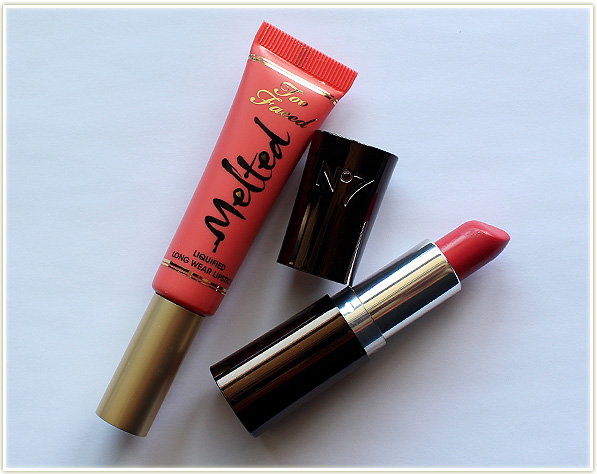
Too Faced Melted Coral and Boots No7 Sweet Copper
Two options for lips here, and I’m sure this is probably overkill for four days, but anyway…Too FacedMelted Coral (more orange than coral really) and Boots No7Sweet Copper. They’re both on the orangey-side of things, but I’m okay with that.
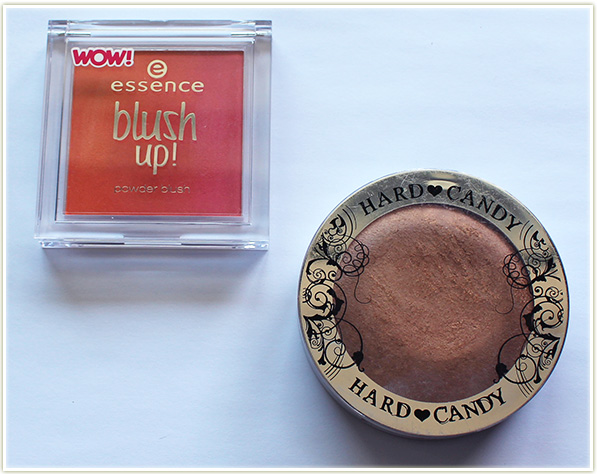
essence blush up! in Heat Wave and Hard Candy Hula Hula
I love that ombre blushes give me the option between two colours in one compact (and a third if you swirl them together), so I’m bringing along essence‘s Heat Wave. My bronzer of choice lately has been Hard Candy‘s Hula Hula. I just can’t get enough of how golden and bronzey this makes my face.
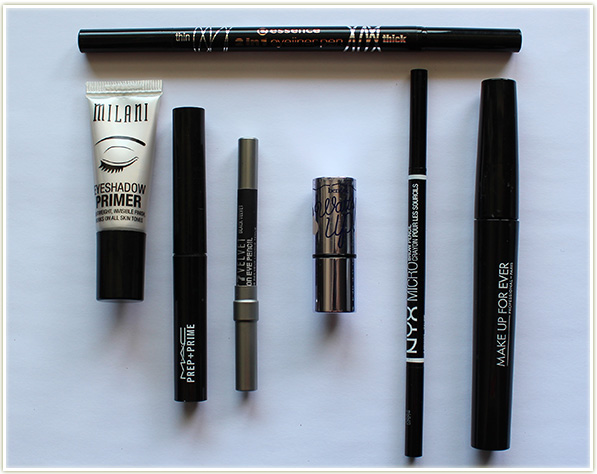
The usual (boring) suspects
And all the bits and bobs that finish my looks off:
I’m giving my Milani eyeshadow primer time to fully prove itself to me.
MAC‘s Prep + Prime for lips because I can’t live without it.
Urban Decay‘s Black Velvet liner predominantly for tightlining (if it even comes to that).
BenefitWatts Up because it’s tiny, compact and packs a punch for highlighting my cheekbones.
NYX Micro brow pencil in Taupe
Make Up For EverSmoky Stretch mascara (the love affair continues!).
essence‘s 2-in-1 liner because I’ve got a review coming up and I want to make sure I put this to the test.
And in looking at this stuff… jeez is it ever boring. I think next time I go somewhere I need to bring stuff that’s wayyyy more interesting to post about! Anyyyyyway, wish me luck on my half! My fingers are crossed that it’ll be cool, even slightly rainy on Sunday!
Hi everyone, I’m MizzJ from JustJ.ca, a Vancouver based beauty and lifestyle blog! I’m really happy to guest post today for Chelle for this month’s CBB guest post theme, which is pastels. I love doing makeup look posts, so of course I had to attempt doing one for Chelle, who is renowned for her eyeshadow prowess! Since Chelle is such a pro, I knew I needed to up my makeup game, so I decided to do a look inspired by one of my favourite spring flowers: sakura.
I’m very fortunate in that my street is lined with cherry blossom trees and right now, it’s literally snowing outside with pink petals! So romantic right? To create this look, I also took inspiration from a few Asian beauty trends, namely dewy skin, under-eye or “Momoko” blush, and gradient lips. These trends are all designed to give the wearer that fresh-faced, innocent look and is perfect for capturing that pretty, glowy spring feeling.
For my pastel/sakura inspired look, I decided to capture the pinks and greens of the cherry blossom tree. The focus here is the eyes, but also on a bright pop of color on the cheeks. After two failed attempts, here is the final look!
sakura pastel face of the daysakura pastel face of the day
And now, here is how you can recreate this at home…
Face
Guerlain Meteorites Perles les Blush Angelic Radiance | Paul & Joe Moisturizing Foundation Primer N in 03 Creme | Make Up Forever Pro Sculpting Duo in Pink Beige | Clinique Beyond Perfecting Foundation + Concealer in Creamwhip | Hourglass Ambient Lighting powder in Dim Light
The key here is to create a flawless, radiant base. I started off by using a moisturizing primer, like the Moisturizing Foundation Primer N from Paul & Joe; this primer contains a hint of shimmer and provides a smooth base for makeup. Next, I applied a full coverage foundation to smooth out any bumps and cover any discolouration. TheBeyond Perfecting foundation + concealer from Clinique is perfect for this purpose and photographs beautifully. Instead of setting this with powder, I wanted to keep the dewy thing going by instead dusting my face generously with the Hourglass Ambient powder in Dim Light.
The last two items I used here for my face was blush and highlighter, which I applied after I did my eyes in case there was fallout that I need to clean away. For the blush, I really wanted a rosy-pink color that emulated flushed cheeks and the Guerlain Meteorites Perles les Blush Angelic Radiance fit the bill. To create this youthful, Japanese blush look, generously sweep the blush right under the outer-half of your eye, sweeping it up and around to your temples and always keeping it at the top or above your cheekbones. Lastly, sweep a shimmery highlighter along the tops of your cheekbones to provide light and to eliminate any blush that may have crept downwards.
Eyes
Revlon Photoready Eye Art Lid + Line + Lash in Fuschia Flash | Jill Stuart trio | Urban Decay Naked 3 | Bourjois Trio d’Ombres a Paupieres in Les Verts | Almay Intense i-color eyeliner in Purple amethyst | Lancome Definicils waterproof mascara
Next is the funnest part of doing makeup – the eyes! First, I applied Revlon’s Photoready Eye Art Lid + Line + Lash in Fuchsia Flash all over my lid; it’s a frosty cream shadow that doubles as a great base. Then, I took the golden shimmer shade Trick from my Urban Decay Naked 3 palette and applied it from lash line to just above the crease. Next, I needed to apply my green accent, so using my fingers, I liberally applied the middle shade from the Bourjois Trio d’Ombres A Paupieres trio in Les Verts to the outer-half of my eyes. I’ve always loved how Temptalia lines the bottom rim of her eyes in a contrasting colour, so I decided to do that here, with a bright purple liner from Almay. I then went over that liner with a lilac glitter shadow from the Jill Stuart Eternal Platinum trio palette. Lastly, I topped off my peepers with two coats of black mascara.
Annabelle TwistUp lip crayon in Sorbet | Bobbi Brown lip gloss in Crystal
Last, but not least, were the lips. To create a gradient lip, blank out your lips with concealer; I just used the leftover bits of foundation on my buffing brush to do this. Then, very carefully, dab on a strawberry coloured lipstick to the centre of your top and bottom lip. I’d recommend using a lipstick brush for this as it’s pretty tricky to keep the color just to the center otherwise. Finally, top lips with clear gloss, again using a lip brush and working from the outside in, so as not to smudge your colour. This was my first attempt at creating a gradient lip and I found it pretty tricky, but the overall effect is so pretty, I’m definitely trying this again.
sakura pastel face of the day
I hope you enjoyed this look! Have you tried any of these Asian makeup trends before? If so, I’d love your tips and don’t forget to visit me as well on my blog!
Chelle’s Aside:
Isn’t MizzJ’s eyeshadow application beautiful? I love how it just whispers spring to me. However, one of the most standout parts of this look has to be the undereye blush. I *love* how this looks on her! It’s so different to how I apply my own blush – I really want to give this technique a shot. It may not come out nearly as lovely on me, but hey, at least I’ll be trying something new, right?
Totally agree about the contrasting colour on the lower lash line as well. I’ve seen more and more people doing it lately and I feel it adds depth to any look.
Thanks so much for putting together such a beautiful look for my blog today!