Category Archives: Tutorials

What’s On My Face – Volume 12

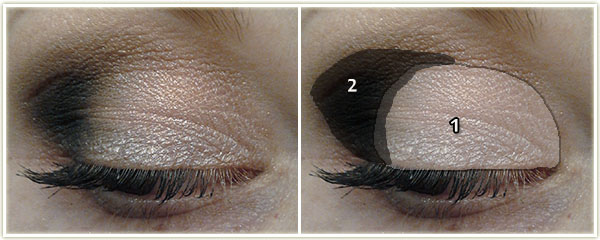
More recent makeup looks! A few neutrals mixed in with the bright ones.
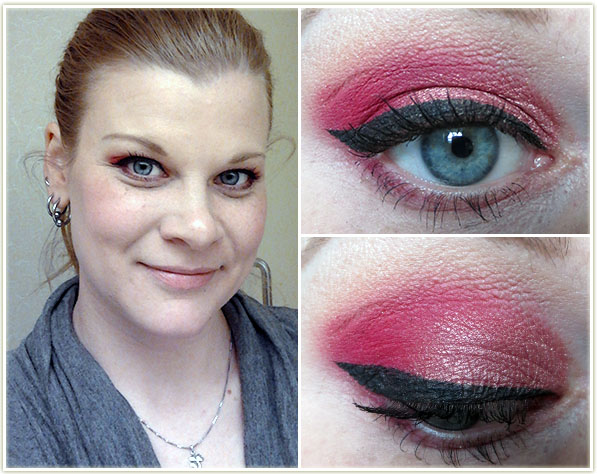
20140319_look4.1

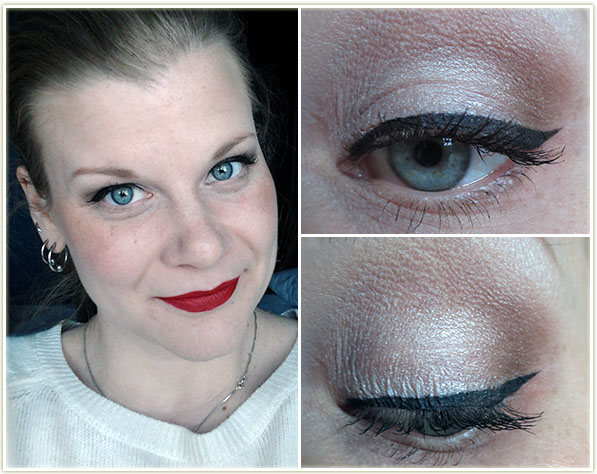
I got this idea from Jaclyn Hill (her tutorial). She used some beautiful Makeup Geek shadows and while I had most of them, I had to improvise the lid colour. Her looks came out a lot more pink, whereas mine leans more towards red. I know red shadow isn’t something anyone really gravitates towards, but red and orange are my favourite colours to play with on the eyes – probably because they’re rather unconventional.
20140319_look4.2

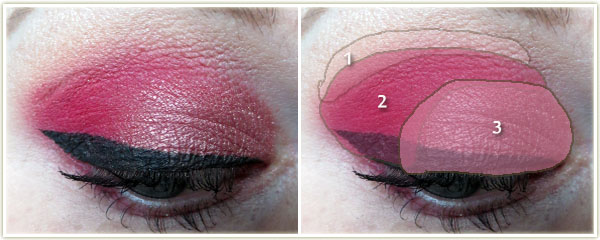
Eyes

  1. Makeup Geek Peach Smoothie at the top of crease.
  2. Makeup Geek Razzleberry heavily in the outer corner and through the crease (don’t blend above Peach Smoothie). Lightly line the lower outer corner of your bottom lashline as well.
  3. Taking the Sleek Sunset palette, mix together the third shade from the left (top row) with the first shade on the right (bottom row) and apply the mixed shadows to your entire lid, blending it into Razzleberry.

MAC Shroom to highlight the brow, MAC Blacktrack fluidline for the winged liner and L’Oreal Voluminous Carbon Black on my lashes.

 Rest of the Face

  • Foundation: none
  • Blush: Tarte Charisma
  • Bronzer: Physicians Formula Happy Booster in Light/Medium
  • Lips: MAC Shy Girl

20140319_look1.1

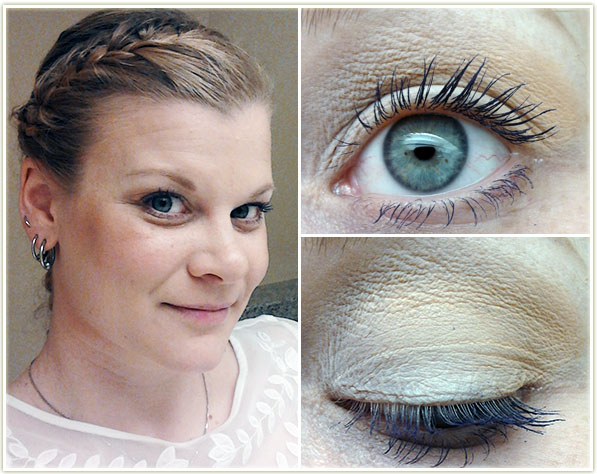
This the look I do when I need to be a bit more dressed up, but have no idea what to wear on my face. There isn’t an outfit in the world that this eyeshadow won’t match!
20140319_look1.2

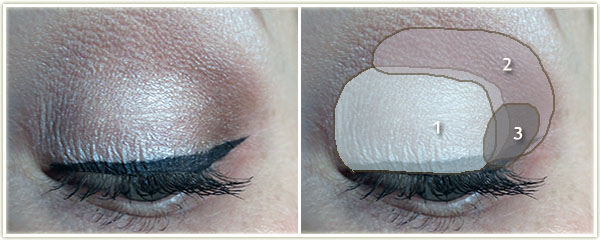
Eyes 

  1. (all Urban DecayVirgin all over the lid.
  2. Buck in the outer corner and through the crease.
  3. Smog in the very outer corner.

Virgin to highlight the brow, MAC Blacktrack fluidline for the winged liner and Too Faced Better Than Sex mascara on my lashes.

Rest of the Face

  • Foundation: Yaby in Buff
  • Brows: Urban Decay Naked (only mentioning this since I usually use MAC Omega)
  • Concealer: Collection Lasting Perfection in Shade 2 Light
  • Bronzer: Tarte Park Avenue Princess
  • Blush: Tarte Darling
  • Highlighter: Hard Candy Tiki
  • Lips: MAC Brick lipliner with MAC Russian Red on top
20140319_look3.1

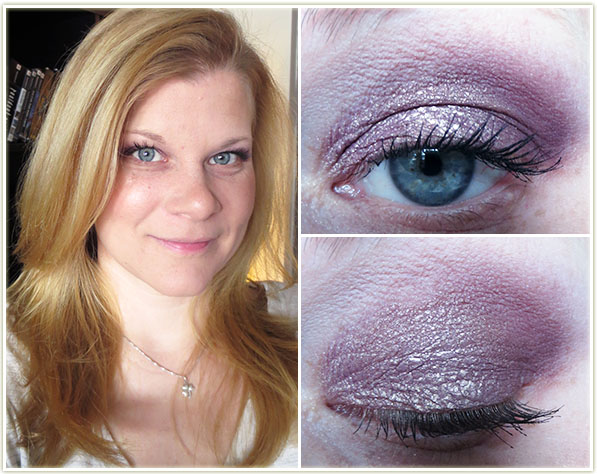
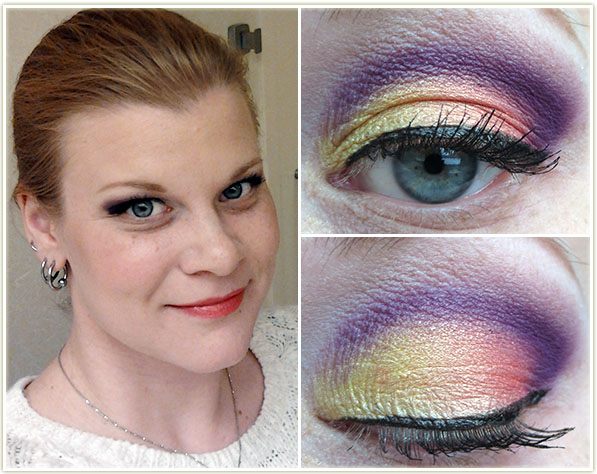
I don’t usually do a cut crease because I honestly don’ really know what I’m doing. This ended up a bit more smoothed out through the crease than it should be, but I really love the colour combination for this one.
20140319_look3.2

Eyes

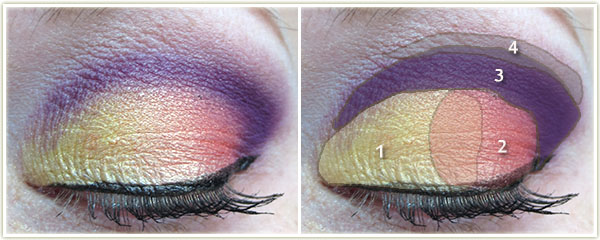
I first applied NYX‘s Jumbo Eyeshadow Pencil in Milk all over the lid and smoothed it out. Then:

  1. Applied a mixture of a very yellow-gold from a Sephora palette I own (sorry, no name!) to the inner half of the lid.
  2. Inglot AMC Shine #15 on the outer half of the lid.
  3. Inglot Matte #325 at the very outer edge then pulled as sharply as you can through the crease.
  4. Makeup Geek Creme Brulee to blend out the very upper edge of the purple shadow.

Too Faced Cream Colored Ponies to highlight the brow, Make Up For Ever Aqualiner in 13 Black for the wing and L’Oreal Voluminous Carbon Black on my lashes.

Rest of the Face

  • Foundation: CoverGirl CC Cream in 110 Classic Ivory mixed with Bourjois Healthy Mix Serum in 51 Light Vanilla
  • Blush: Sleek Crochet
  • Highlighter: MAC Whisper of Gilt
  • Lips: NYX Cherry Cheesecake

20140319_look2.1

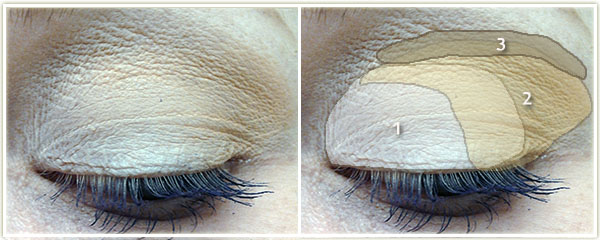
This was out of my comfort zone because it required toning down my eye makeup so that I could make the purple mascara pop more.
20140319_look2.2

Eyes

  1. MAC Blanc Type all over the lid.
  2. Makeup Geek Peach Smoothie on the outer half of the lid.
  3. Makeup Geek Creme Brulee lightly through the crease.

Blanc Type to highlight the brow and Sephora Full Action Extreme Effect Mascara in Purple on my lashes.

Rest of the Face

  • Foundation: CoverGirl CC Cream in 110 Classic Ivory mixed with Bourjois Healthy Mix Serum in 51 Light Vanilla
  • Bronzer: Physicians Formula Bronze Booster in Light/Medium
  • Blush: MAC Gingerly
  • Highlighter: MAC Whisper of Gilt
  • Lips: Nothing

20140319_look5.1

I used a gold base for this one because the previous time I’d done this look, I didn’t feel like the purple-gold (African Violet) had enough punch to it. I much prefer this with the base because it gives the shade a lot more of the gold dimension that’s already there but slightly hidden.
20140319_look5.2

Eyes

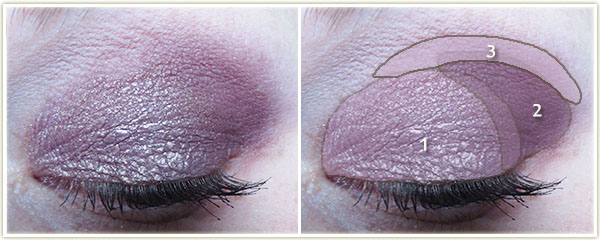
First I applied Maybelline‘s Color Tattoo in Bold Gold all over the lid. Then:

  1. (all Laura MercierAfrican Violet all over the lid.
  2. Kir Royal in the outer corner.
  3. Plum Smoke through the crease.

Vanilla Nuts to highlight the brow and L’Oreal Voluminous Carbon Black on my lashes.

Rest of the Face

  • Foundation: CoverGirl CC Cream in 110 Classic Ivory mixed with Bourjois Healthy Mix Serum in 51 Light Vanilla
  • Blush: I’m not positive, but it might be Tarte Exposed
  • Bronzer: Physicians Formula Bronze Booster in Light/Medium
  • Highlighter: MAC Whisper of Gilt
  • Lips: Nothing

Thanks for reading. I hope something inspired you. 🙂
St. Patrick’s Day Makeup Ideas

Aside from Halloween, St. Patrick’s Day is my absolute favourite “holiday”. I tend to do a lot of green looks in general, but I thought I’d do a few more and compile them together for a post specifically dedicated to the holiday of all things green!

20140307_look4.1

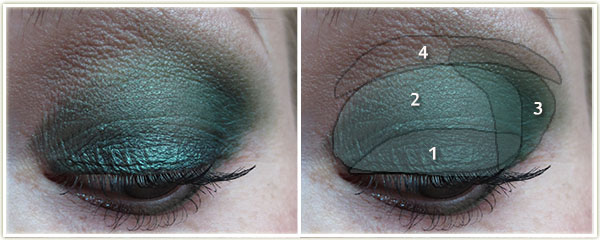
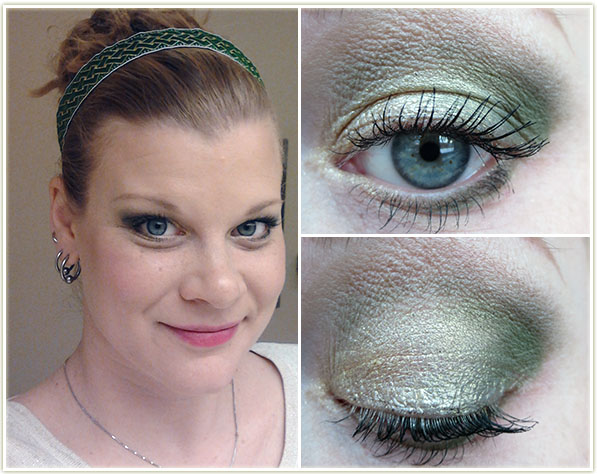
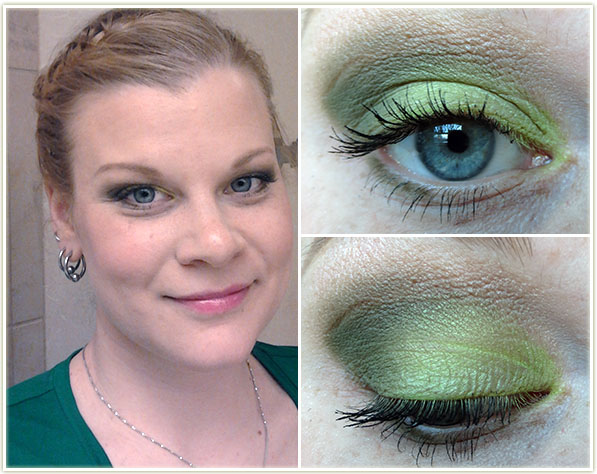
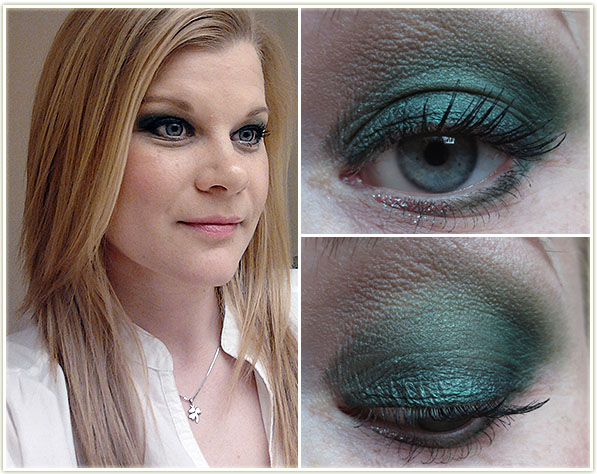
Dark forest green with a hint of glitter. One of the stronger looks in this post and heck… you really can’t go wrong with glitter!

20140307_look4.2

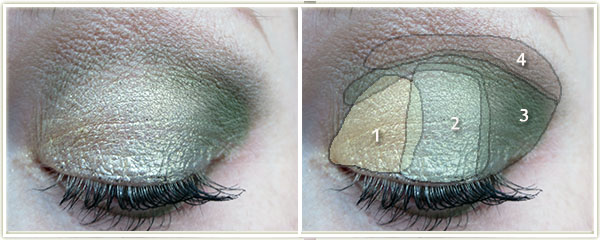
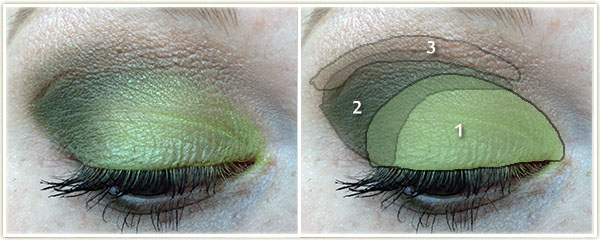
Eyes:

  1. I first lined my lower lashline thickly with MAC Feline Kohl Power pencil and smudged it out into a really messy, thick line.
  2. Too Faced Evergreen was placed all over the lid, on top of the black liner.
  3. Sleek Fern in the outer corner.
  4. Makeup Geek Creme Brulee at the top of the crease.

MAC Shroom was used to highlight the browbone. On the lower lashline I smudged Evergreen on the outer half and then used some Too Faced Glitter Glue on the inner half and appliedToo Faced Glamour Dust in Glampire on top of the glue. L’Oreal Voluminous Carbon Black on my lashes.

Rest of the Face

  • Foundation: Covergirl CC Cream in 110 Classic Ivory and Bourjois Healthy Mix Serum in Shade 51 Light Vanilla mixed together
  • Bronzer: Physicians Formula Bronze Booster in Light/Medium
  • Blush: Tarte Blissful
  • Lips: NYX Butter Gloss in Maple Blondie

20140307_look1.1

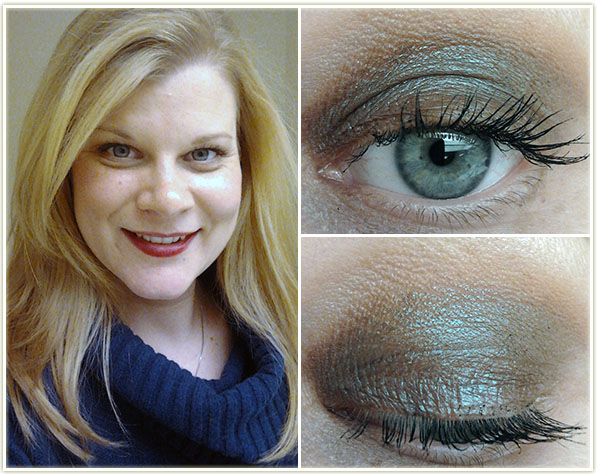
I’m amazed and pleased with just how well this one turned out. Usually I would reverse the colours (gold on the inside, colour on the outside), but I decided I need to actually learn to play with my makeup a little bit more. And I’m happy I did because I think this is really beautiful.

20140307_look1.2

Eyes:

  1. MUA Shade 26 Pearl all over the lid.
  2. Urban Decay Half Baked in the outer corner and into the crease.
  3. Makeup Geek Creme Brulee through the crease.
  4. Makeup Geek Cocoa Bear barely tapped into the very outer corner to make it a touch bit deeper.

MAC Shroom on the browbone and L’Oreal Voluminous Carbon Black mascara on my lashes.

20140307_look2.1

This is a bit more “typical” St. Patrick’s Day look for me (gold on the inner lid, green on the outside).

20140307_look2.2

Eyes:

  1. L’Oreal Infallible in Goldmine on the inner third of the lid.
  2. MAC Golden Olive pigment on the center of the lid.
  3. Makeup Geek Dirty Martini on the outer third of the lid and dragged lightly through the entire crease.
  4. Makeup Geek Creme Brulee at the top of the crease.

MAC Rice Paper to highlight the browbone. On the lower lid, Goldmine on the inner half and Dirty Martini on the outer half. L’Oreal Voluminous Carbon Black mascara on my lashes.

Rest of the Face

Foundation: Covergirl CC Cream in 110 Classic Ivory and Bourjois Healthy Mix Serum in Shade 51 Light Vanilla mixed together
Bronzer: Physicians Formula Bronze Booster in Light/Medium
Blush: MAC Petal Power
Lips: Sephora Color Reveal Balm in Unique Pink

20140307_look5.1

Even though this showed up pretty vibrantly on camera, I’d recommend using a white base (which I didn’t do) in order to brighten the colours up a bit more. I found the colours faded a bit throughout the day and the white base may help to keep the shadows intact.

20140307_look5.2

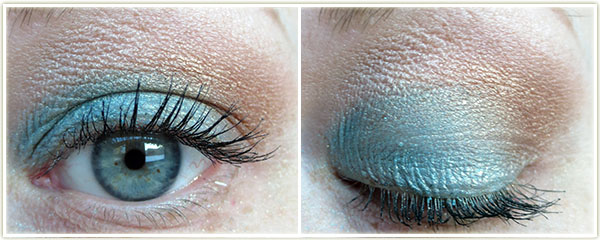
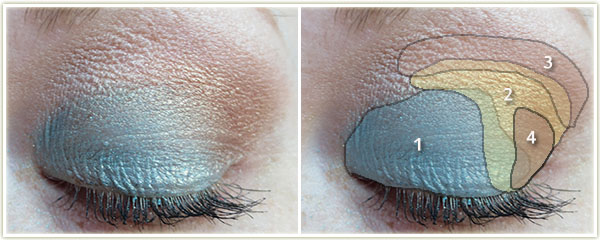
Eyes: (all Makeup Geek)

  1. Fuji all over the lid.
  2. Dirty Martini on the outer corner and through the crease.
  3. Creme Brulee to blend out the crease.

MAC Shroom on the browbone. Dirty Martini smudged very slightly on the outer corner of the lower lashline. Too Faced Better Than Sex mascara on my lashes.

Rest of the Face

Foundation: Covergirl CC Cream in 110 Classic Ivory and Bourjois Healthy Mix Serum in Shade 51 Light Vanilla mixed together
Bronzer: Physicians Formula Bronze Booster in Light/Medium
Highlighter: MAC Silver Dusk
Blush: Joe Fresh Apricot (cream)
Lips: NYX Butter Gloss in Vanilla Cream Pie

20140307_look3.1

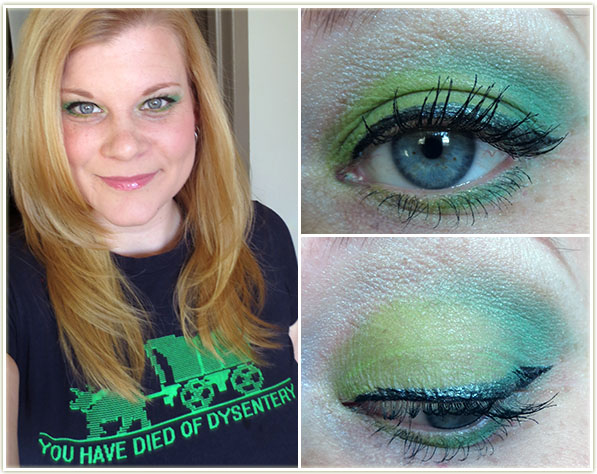
I love this look, but damn does it ever look not great in close ups. You’ll also notice that the liner is completely covered in the eyeshadow… this seemingly can’t be helped whenever I wear shiny liquid liners as it just picks up the shadow from my lid when my eyes are open.

Also… tell me how much you love my shirt. 😉

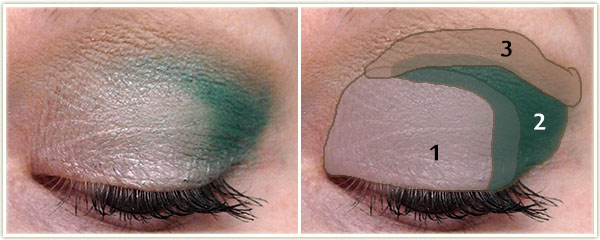
Eyes: Using the Wet n Wild I Dream of Greenie trio, follow the instructions!

  1. Eyelid shade all over the lid and the inner half of the lower lid.
  2. Crease shade in the outer corner and through the crease and on the outer half of the lower lid.

And, obviously, the Browbone shade to highlight the brow. Make Up For Ever Aqualiner in 13 Black to create the wing (although honestly, I’m so irritated with this liner that I’d recommend using a matte black one that won’t cause so much eyeshadow transfer to the liner). L’Oreal Voluminous Carbon Black mascara on my lashes.

Rest of the Face

Foundation: Covergirl CC Cream in 110 Classic Ivory and Bourjois Healthy Mix Serum in Shade 51 Light Vanilla mixed together
Blush: Illamasqua Hussy
Lips: NYX Butter Gloss in Tiramisu

What’s On My Face – Volume 11

20140224_look1.1

I hadn’t used MAC‘s Club in a really long time, and when I do, I tend to use it just in the crease which honestly doesn’t really show off just how awesome the shade is. So I decided to try something different and use it all over the lid.

20140224_look1.2

Eyes: Primed with Urban Decay Primer Potion in Original (this is the day when this primer suddenly stopped working on me and this entire eye look ended up a creased mess by the end of the day!), then:

  1. MAC Club all over the entire lid right up and over the crease.
  2. Makeup Geek Creme Brulee at the top of the crease to blend out the edges of Club.

MAC Brule was used to highlight the brow with L’Oreal Voluminous Carbon Black on my lashes.

Rest of the Face

  • Foundation: MUA Matte in Shade 1 Soft Sand
  • Concealer: MAC Select Cover-up in NW20
  • Bronzer: Physicians Formula Bronze Booster in Light/Medium
  • Blush: Cargo Medocino
  • Lips: Revlon Just Bitten Balm + Stain in Twilight

20140224_look3.1

My eye makeup matched my shirt. That’s pretty much the only logic I applied here!

20140224_look3.2

Eyes: NARS Pro Primer eye primer, then:

  1. MAC Crystal Avalanche all over the lid.
  2. MAC Print in the outer corner.
  3. Makeup Geek Creme Brulee to blend out the upper crease.

MAC Brule to highlight the brow and L’Oreal Voluminous Carbon Black on my upper and lower lashes. Make Up For Ever Aqualiner in 13 Black to create the wing.

Rest of the Face

  • Foundation: Revlon Colorstay (Combination/Oily) in Buff
  • Bronzer: Revlon Photoready in Bronzed & Chic
  • Concealer: MAC Select Cover-up in NW20
  • Blush: MAC Warm Soul
  • Lips: Revlon Fire and Ice

20140224_look4.1

Although I tend to think of the Laura Mercier Artist 2 palette as predominantly purple, there are a lot of neutral shades in there that need recognition too!

20140224_look4.2

Eyes: Urban Decay Primer Potion in Eden all over the lid, then:

  1.  (all Laura MercierSparkling Dew all over the lid.
  2. Bamboo through the crease.
  3. Truffle to darker up the outer corner.

MAC Brule on the browbone, Make Up For Ever Aqualiner in 13 Black for the winged linger and L’Oreal Voluminous Carbon Black mascara on my upper lashes.

Rest of the Face

  • Foundation: Bourjois Healthy Mix Serum in Shade 51 Light Vanilla
  • Bronzer: Physicians Formula Bronze Booster in Light/Medium
  • Blush: Illamasqua Hussy
  • Lips: MAC Russian Red lipstick with Brick lip pencil

20140224_look2.1

This one showed up decently in pictures, but I can’t say I really liked the end result. The blue shade (Illamasqua‘s Imagine) was sheer, powdery, patchy and just flat out miserable to apply. It needed a insane amount of layers AND it faded throughout the day.

20140224_look2.2

Eyes: NARS Pro Prime all over the lids, then:

  1. Urban Decay Virgin on the inner two-thirds of the lid.
  2. Urban Decay Gunmetal in sort of an angular stripe at the outer corner.
  3. Illamasqua Imagine at the outer corner and blended into the crease.

Urban Decay Virgin to highlight the brow, Make Up Forever Aqua Liner in 13 Black for the wing and Too Faced Better Than Sex mascara on my upper lashes.

Rest of the Face

  • Foundation: none
  • Bronzer: Tarte Park Ave. Princess
  • Blush: Tarte Crave
  • Lips: nothing

20140224_look5.1

Super quick one while I was on vacation.

20140224_look5.2

 Eyes: NARS Pro Prime all over the lid, then:

  1. (all Urban DecaySin all over the lid.
  2. Creep in the outer corner.

Virgin to highlight the brow and Too Faced Better Than Sex mascara on my lashes.

Rest of the Face

  • Foundation: nothing
  • Bronzer: Tarte Park Ave. Princess
  • Blush: Tarte Crave
  • Lips: nothing

What’s On My Face – Volume 10

More makeup looks I’ve done over the past few weeks ranging from stuff I wore to work, out to a bar or was just headed over to a friend’s place! I was really happy with this set of looks and I hope you enjoy them.

As a note, I’ve switched to NARS‘ Pro Prime eyeshadow primer, so that’s what I use in all of my looks now unless otherwise stated.

20140205_look1.1

I loooove this one! It took me a lot more time to put this one together because I don’t normally get this creative and use so many shadows. (Seriously, if you haven’t noticed, I tend to stick to about two lid colours!) I don’t typically wear this much shadow/liner under my eyes on a regular basis because holy hell is that area ever sensitive on me and I usually end up with very watery eyes. This frustrates me because I realize just how much a makeup look comes together when you shade under your eyes!

Anyway, moving on.

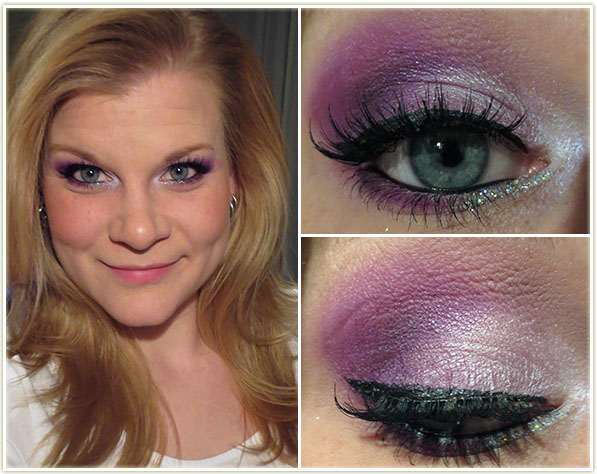
With this, I had one goal: I wanted to use the MUFE rainbow glitter that I had picked up last month. I also hadn’t done purple look in quite a while so I figured this was as good a time as any.

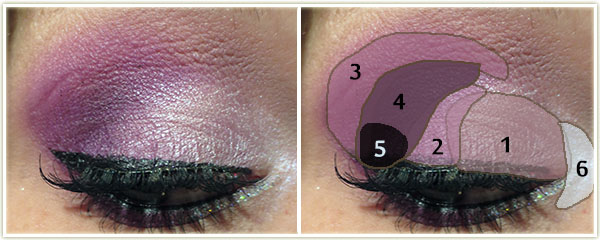
20140205_look1.2

Eyes: I first applied NYX‘s Jumbo Eye Shadow Pencil in Milk all over the lid as a base.

  1. The first colour from a ginormous Sephora eyeshadow palette I have that unfortunately does not have shade names, however, the colour is very similar to MAC‘s Crystal. Essentially, the colour is a very pale lilac shade with a bit of a sheen to it. This shade was placed on the inner half of the lid.
  2. I then used MAC Dame’s Desire right beside the previous shadow, but not all the way out to the corner.
  3. Sleek Sugarlite was blended heavily into the upper crease.
  4. Sleek Highness filled in the outer corner, with;
  5. Sleek Noir at the very edge of the outer lashline to darken up that area.
  6. I then used MAC Vellum to highlight the inner corner of the eye and blended it into the pale purple.

MAC Blanc Type  to highlight the browbone with MAC Omega on my brows. On the lower lashline, I used Sugarlite to line the outer half of the lid, then applied some Too Faced Glitter Glue to the inner half of the lid and tapped on Make Up For Ever‘s Glitters 13 (silver rainbow glitter) on top of the glue. I lined the upper lashline with MUFE‘s Aqua Liner in 13 Blackand used MAC‘s Feline Kohl Power pencil on the lower waterline. And finally, I finished up the eyes with some Ardell‘s 102 Demis and applied  L’Oreal Voluminous Carbon Black on my lashes.

Rest of the Face

  • Foundation: Bourjois Healthy Mix Serum in 51 Light Vanilla
  • Bronzer: Revlon Photoready Bronzer in Bronzed & Chic
  • Blush: Tarte Exposed with Illamasqua Hussy layered on top
  • Highlighter: MAC Silver Dusk
  • Lips: I’m not wearing it in the picture, but I wore Rimmel Apocalips in Celestial out that night.
  • Extra: I used MAC‘s Select Coverup in NW20 under my eyes and set it with Laura Mercier

20140205_look2.1

It was just one of those mornings when I had no idea what to wear and just happened to look into the tub that contains all of my mineralize eyeshadows. Although it’s beautiful, I rarely use this shadow. A word to the wise though, this can apply really patchy and can flake off at a moment’s notice. Beautiful end result, however.

20140205_look2.2

Eyes:

  1. With a dampened, flat, stiff makeup brush, I packed (and I do mean packed) on MAC Blue Flame all over my entire lid. You may will likely need to layer this.
  2. I then blended Makeup Geek Creme Brulee into the crease.

I also lined the outer third of my bottom lashline with the Blue Flame as well. Too Faced‘s Cream Colored Ponies on my browbone and L’Oreal Voluminous Carbon Black on my lashes.

Rest of the Face

  • No foundation, bronzer or highlighter.
  • Blush: Illamasqua – Hussy
  • Lips: MAC – Shy Girl

20140205_look5.1

Obligatory neutral eye look, using the Too Faced A Few of my Favorite Things palette.

20140205_look5.2

Eyes: (Urban Decay Primer Potion as a primer for this one!)

  1. Too Faced Snowflakes all over the lid.
  2. Too Faced Buche de Noel slightly into the outer corner.
  3. Too Faced Woolen Mittens on the outer corner and blended into the crease.

I did the winged liner with MAC‘s Dipdown fluidline. Too Faced Cream Colored Ponies to highlight the brow with  L’Oreal Voluminous Carbon Black on the lashes.

Rest of the Face

  • Foundation: MUA Matte foundation in Shade 1 Soft Sand
  • Bronzer: Physicians Formula Bronze Booster in Light/Medium
  • Blush: Errr no idea. Maybe nothing?
  • Lips: MAC Boldly Bare lipliner with MAC Viva Glam Cyndi on top

20140205_look4.1

This look features Jealousy Wakes, the eyeshadow created by Christine (Temptalia) for MAC. Unfortunately it was limited edition (boy, was it EVER) and it sold out almost instantly back when it was released. It’s a beautiful shade and this is my default look when I want to wear that shadow.

20140205_look4.2

Eyes: (Again with UDPP)

  1. MAC Vex, inner two thirds.
  2. MAC Jealousy Wakes, outer corner and into the crease.
  3. Makeup Geek Creme Brulee throughout the crease.

MAC Brule to highlight the brow and  L’Oreal Voluminous Carbon Black on my lashes.

Rest of the Face

  • Foundation: MUA Matte foundation in Shade 1 Soft Sand
  • Bronzer: Physicians Formula Bronze Booster in Light/Medium
  • Blush: Physicians Formula – Natural
  • Highlighter: Dior Amber Diamond
  • Lips: MAC Petting Pink Lip Conditioner

20140205_look3.1

A shame the sparkles don’t show up more – I was going for a wintry snowfall at night look.

20140205_look3.2

Eyes:

  1. MAC Crystal Avalanche on the inner two-thirds of the lid.
  2. MAC Print on the outer third.

Although it is incredibly difficult to see in the photograph (which is very frustrating to me), I did layer Illamasqua‘s Beguile pigment on top of Crystal Avalanche. Rest assured that it showed up much better in person.

I used KIKO‘s Twinkle Eye Pencil in 06 (I really need to use this more, it’s fantastic) on the lower lashline. The upper winged lined was created with MAC Blacktrack fluidline. I appliedToo Faced Better Than Sex mascara to both sets of lashes and ran some MAC Omega through my brows. (The brows really never change, I’ll probably stop repeating this…)

Rest of the Face

  • Foundation: MUA BB Cream in Light mixed with some moisturizer
  • Bronzer: Physicians Formula Bronze Booster in Light/Medium
  • Blush: MAC Warm Soul
  • Highlighter: MAC Silver Dusk
  • Lips: Nothing – was heading out to eat so I didn’t see the point!

I’m pretty pleased in the makeup department lately… most of my looks have been suitable enough to post on here and I had about 15 or so looks to choose from for this post! Pretty happy with that because sometimes I can get a nasty streak where I don’t like anything I applied at all for several days. (That’ll make for an interesting post some day.

How I Used To Wear Makeup

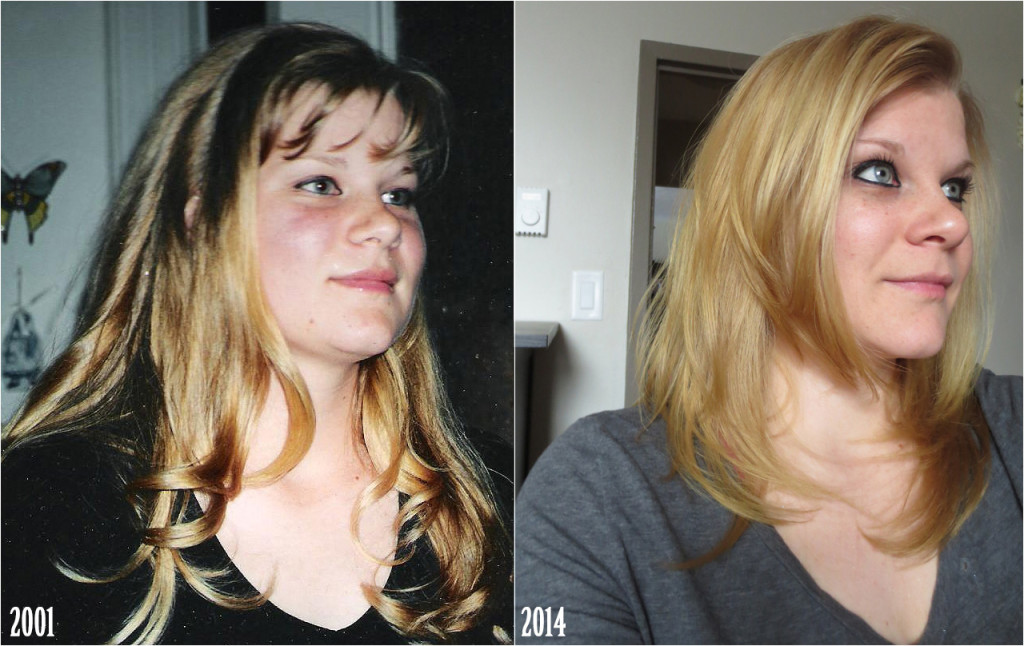
Ever wonder what you’d look like a decade or so later wearing the exact same makeup you used to wear in your teens? I’ve seen a few videos and blog posts on this and I wanted to give it a try. I dug into some old folders on my harddrive and found a few decent examples. With the old photos as reference points, it all started coming back to me and I decided to recreate my old makeup looks on my thirty-one year old self.

As I didn’t wear foundation, blush, bronzer or even fill in my eyebrows back in the day, I wanted to keep this as “true to the past” as I possibly could so I’m not wearing any of the usual suspects. Onwards with the flashback!

2001 vs 2014 – Click to enlarge

I was 18 years old in the shot on left and it was 2001. My grandmother took this shot before I was headed out to a bar or club, probably to see some live music at Barrymore’s in Ottawa. My mom still keeps this photo on her bedroom dresser, so I had her scan it for me so I could post it.

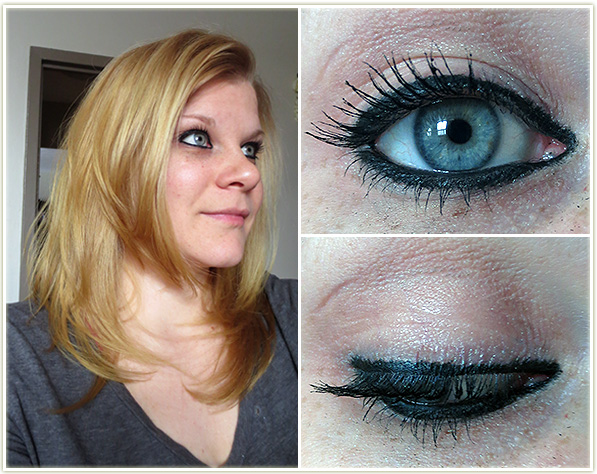
2014_hiutwm_blackliner2

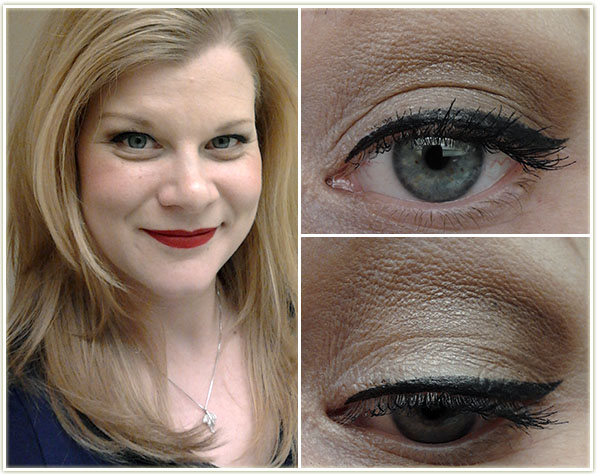
There is really nothing to this look but I remember liking it because I thought it looked pretty badass to be wearing black liner. I also had no idea what the heck blending was back in the day, so I assure that this was completely unblended. I also didn’t wear any primer or eyeshadow so by the end of the day, that black liner had completely transferred to my upper lid. Classy! In the shot above I used MAC‘s Feline Kohl Power pencil and Too Faced Better Than Sex mascara, but in 2001 I know I used MAC‘s Ebony pencil liner and some kind of CoverGirl mascara.

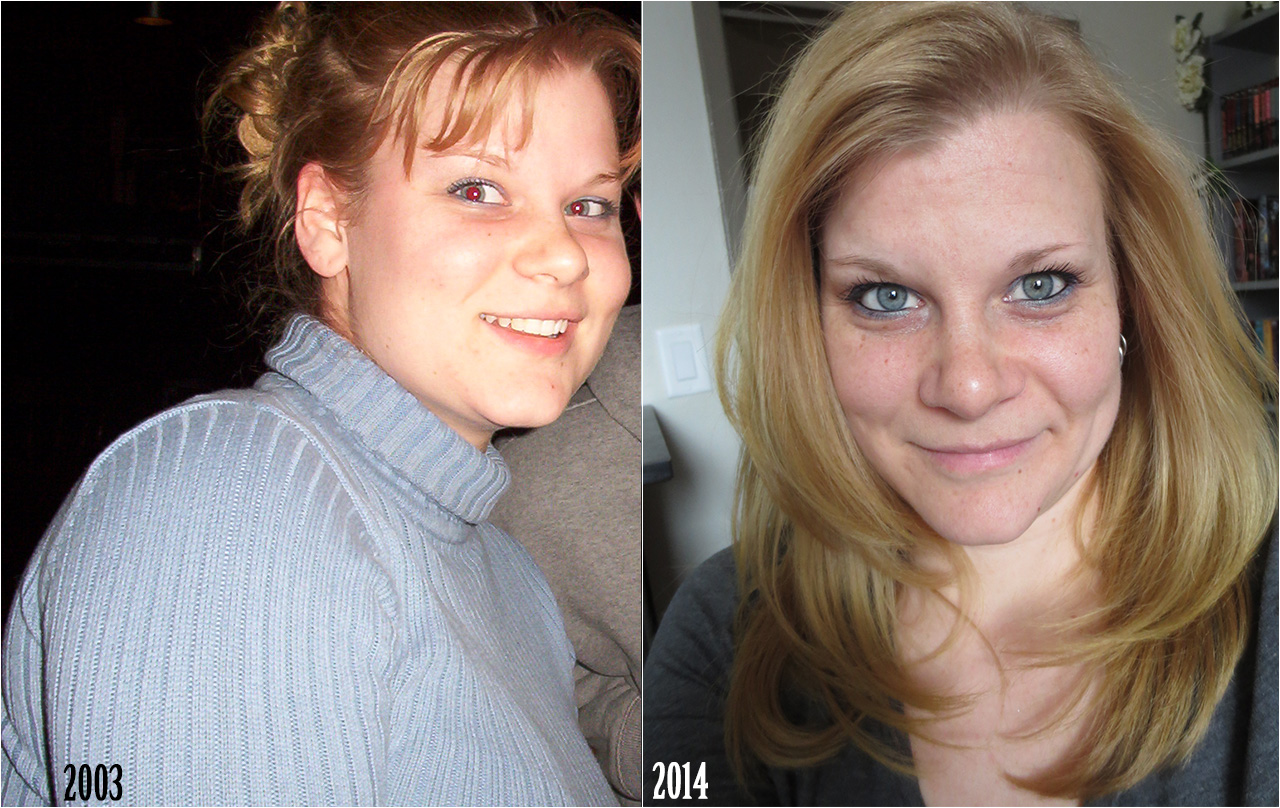
2003 vs 2014 – Click to enlarge

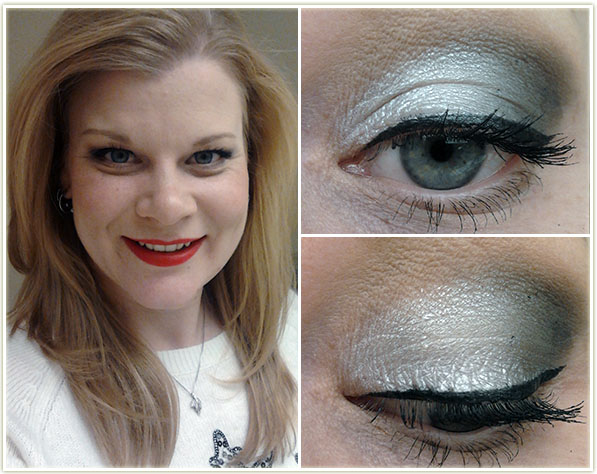
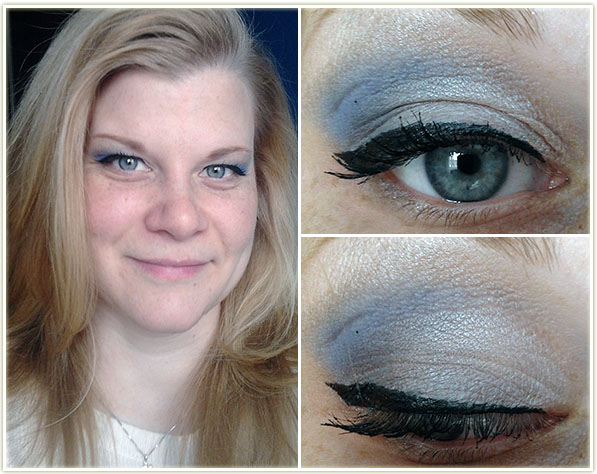
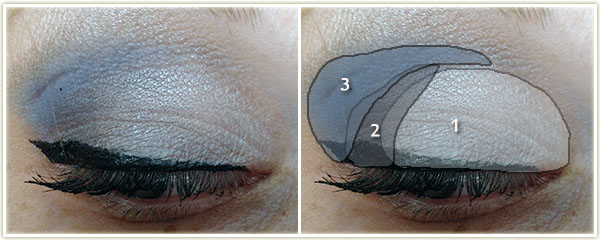
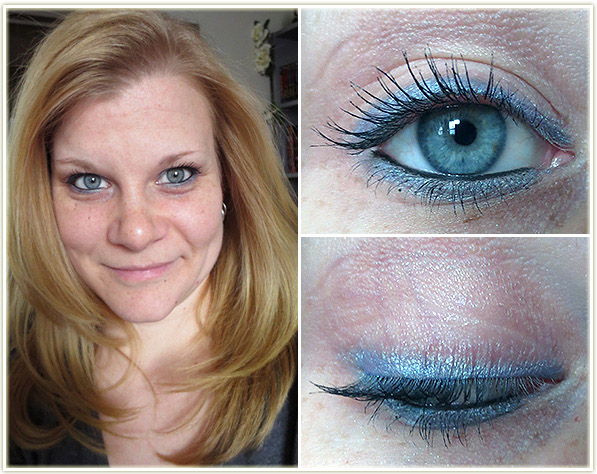
This was an absolute favourite look of mine. I used to wear a lot of light blue tops, and I usually matched my eyeshadow to my clothes (which is something I still do now). I remember getting the idea to do this look from a friend of mine in high school who did something very similar with a silver eyeshadow.

2014_hiutwm_tilitasliner2

This is one I’m surprised I still like. It’s completely unblended (I remember a friend pulling me aside, grabbing a cotton swab and vigorously blending out my liner because she was so incensed that I hadn’t done it) but I really like it. Maybe I’m just nostalgic for this look because I wore it so frequently. As you can see, there’s nothing on my lid. The only thing I used for the blue liner is MAC‘s Tilt eyeshadow and that’s exact same shade I used in my teens as well. I probably lined my lower waterline with Ebony pencil back then, but I used Feline for it today.

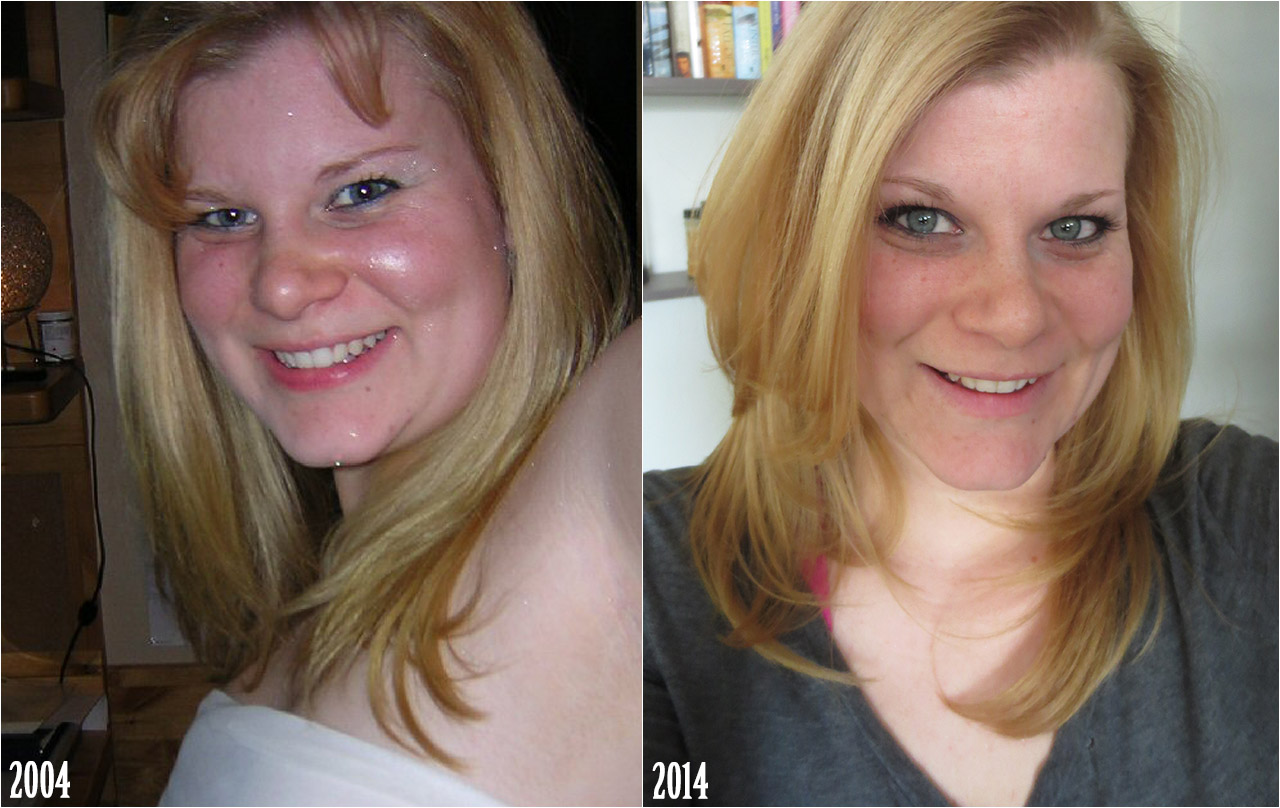
2004 vs 2014 – Click to enlarge

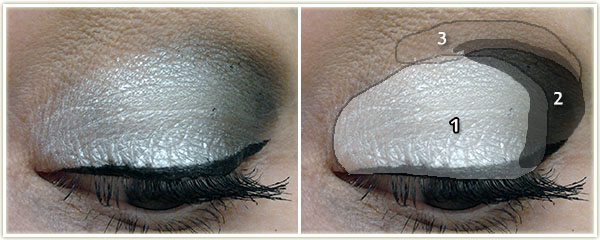
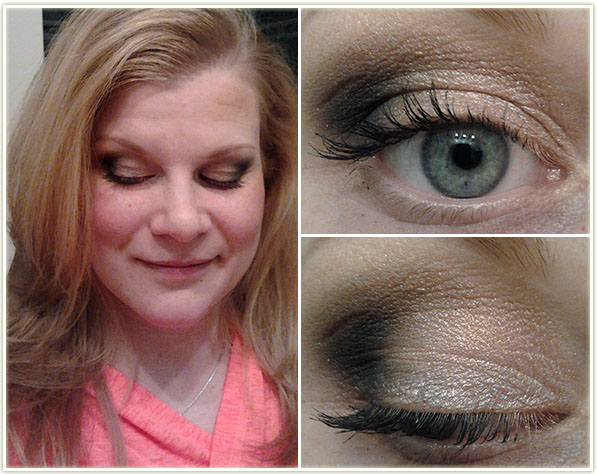
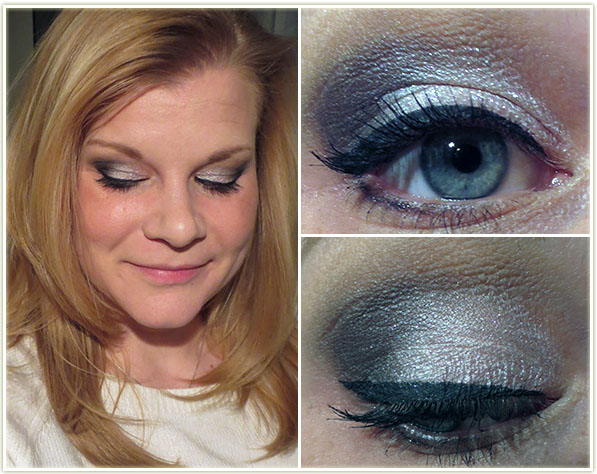
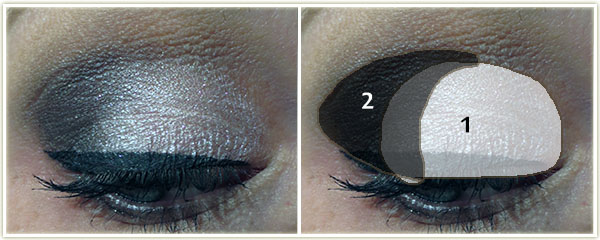
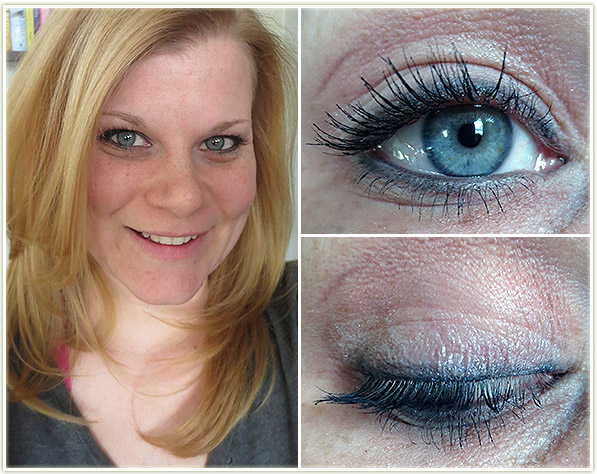
I remember this one so well. I went to a MAC counter and asked for help creating a smokey eye. Annnnnd this is what I got. Now, this isn’t how I’d do a smokey now (and heck, I don’t even know if this was considered a smoky eye back in the early 2000s) but I do like the overall effect. I’m also fairly certain I dumped half a container of MAC‘s Silver Dusk on my face in the shot on the left since there’s glitter particles everywhere… something I definitely didn’t recreate in the present! 😉

2014_hiutwm_phonenumber2

I had used MAC‘s liner in Phone Number and Krisp eyeshadow (no longer available) to blur out the harsh edges. I have since rebought Phone Number and have it still in my collection, but I used up Krisp a long time ago and it’s never become available at MAC again as far as I’m aware. I lined my upper and lower lashline with Phone Number, and then blurred out the edges slightly with an off-white, slightly grey eyeshadow from a Sephora palette I have (no shade name, sorry). I also lined my inner waterline with Phone Number as well and applied Too FacedBetter Than Sex mascara to my upper and lower lashes.

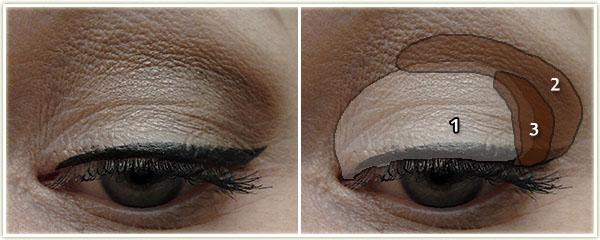
2014_hiutwm_shag

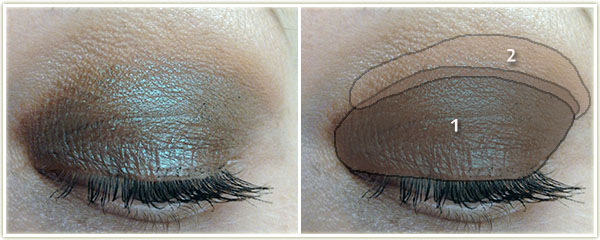
I look back on this one and smile! This was my “special event” makeup when I was in grades 9 or 10 (~1997). I considered it special event makeup because at the time it was darker and shinier than anything else I owned at the time. It’s fairly simple and I still have the same colours I did back then: MAC‘s Nylon on the lid with Shag (no longer available, although Haux is a very good dupe) on the outer third and through the crease.


I’m surprised at how much I actually still like these looks on me. They may be a bit dated, but they don’t look nearly as bad as I expected them to which is slightly relieving. Another thing I noticed is that I wore a lot of liner/shadow on my lower outer and inner lashline, something I don’t do nearly as often today as my lower lashline seems to get irritated very quickly.

So that’s all I have for now! I really enjoyed taking a trip down memory lane with this post. I’m curious to see if I can dig up more old photos in my parents photo albums for another post at a later date.