Category Archives: Tutorials

Halloween 2014 – Part 1 Sugar Skull

201411_sugarskull2

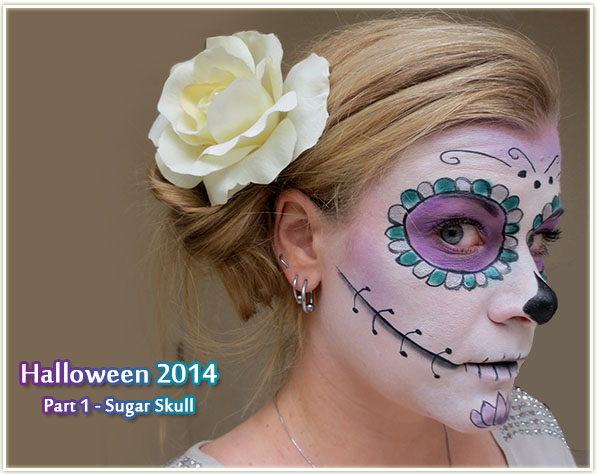
I am hugely proud of this look I created for work on Halloween day! I was little bit nervous to wear complete face paint since I do work in a corporate environment, but my Sugar Skull look was well received so I was pretty pleased with myself. /brushes off shoulder

Getting up long before dawn to try to get this look done before work!

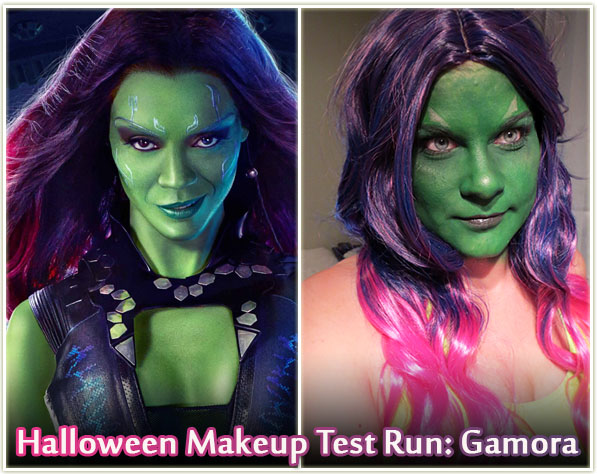
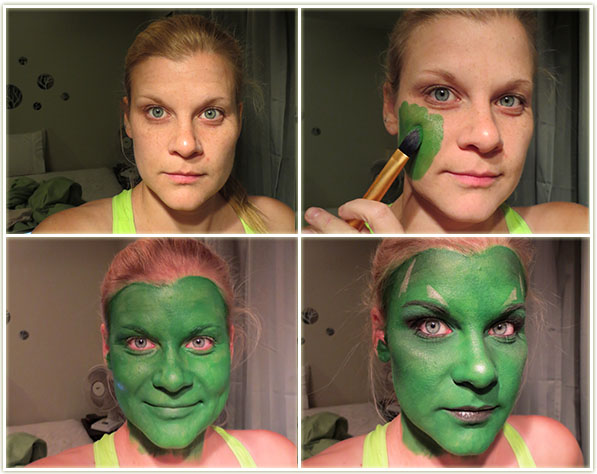
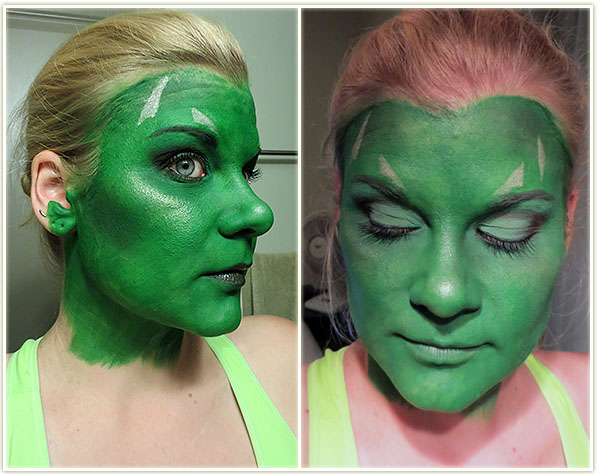
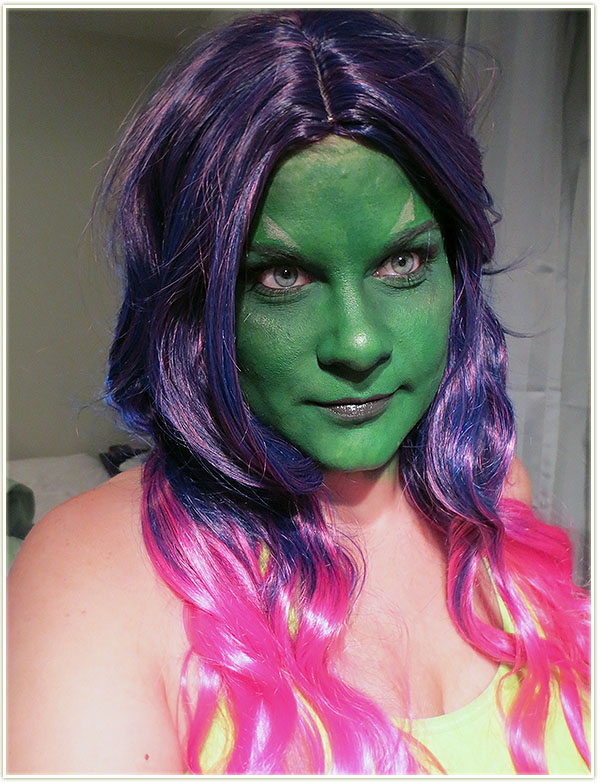
I had been inspired to do this look by Shaaanxo’s pink sugar skull tutorial on YouTube. I liked her concept and how it was “pretty” enough. Since I knew I was going to be wearing green face and body paint that evening (you’ll see that in next Wednesday’s post) for my Gamora costume, I wanted something that was on the “lovelier” side of things.  I opted for different colours than the tutorial, primarily because I didn’t have two matte pink shadows that would work well together.  I also incorporated other ideas from different sugar skull looks I had seen on the internet.

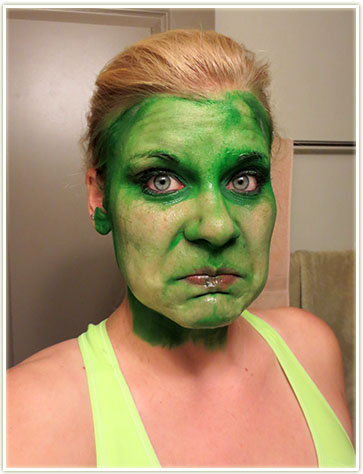
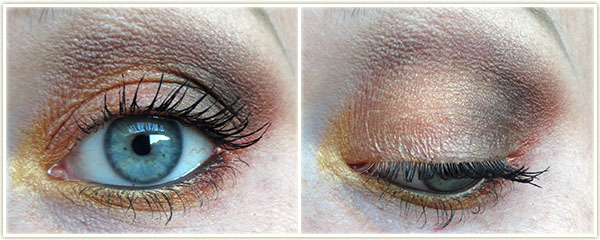
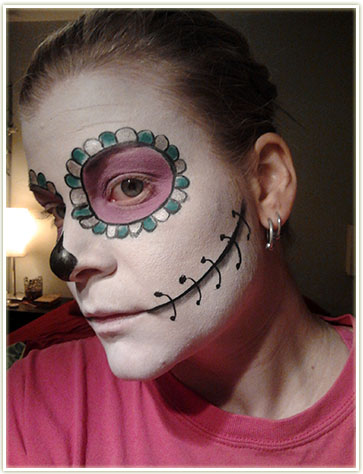
The look started off a bit weird. When I just had the colour blobs on and none of the shading, I looked really, REALLY bizarre. And I was starting to wonder if this was even going to come together. Luckily, adding on the black liner helped tie everything together.

Face details
Face details

I first layed down a base using the lightest foundation shade I had, which was Revlon Colorstay in Buff (very little of this) mixed with a *lot* of Inglot‘s Cream Concealer in 37 (white). I sponged this onto my face and managed to get a pretty smooth and even layer of product covering my whole face.

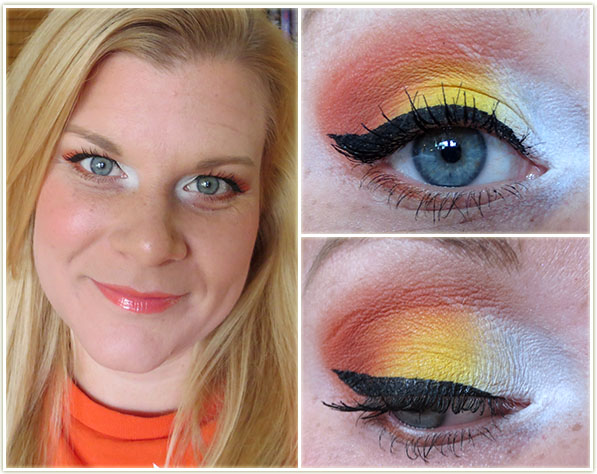
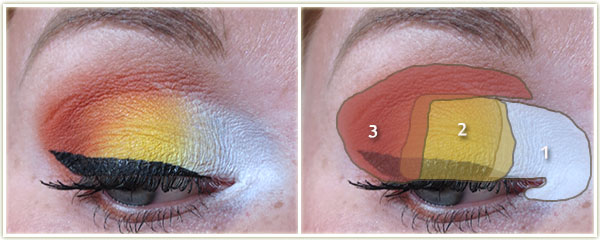
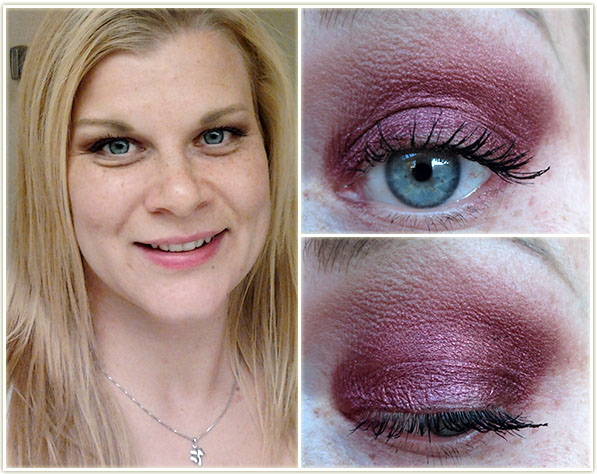
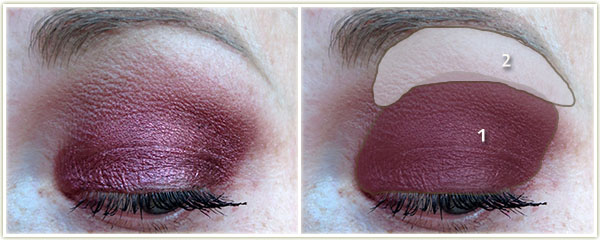
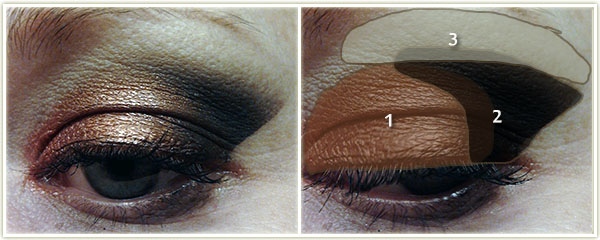
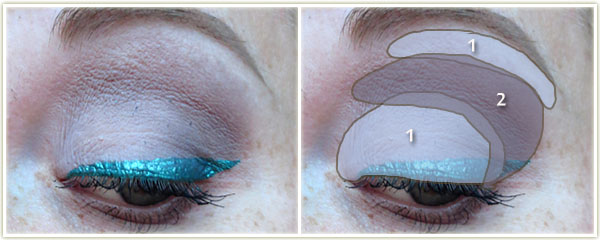
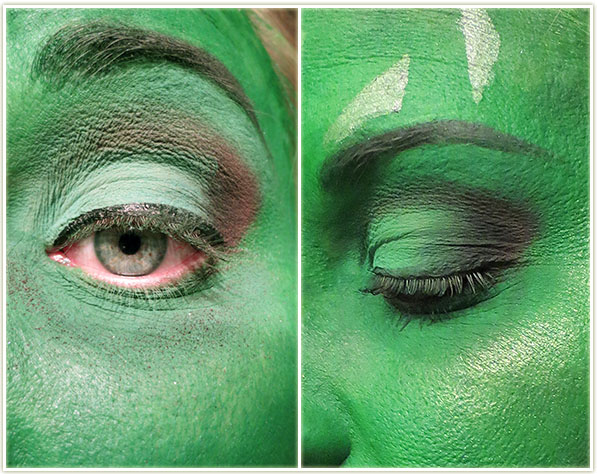
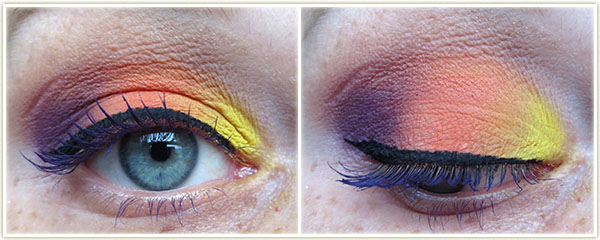
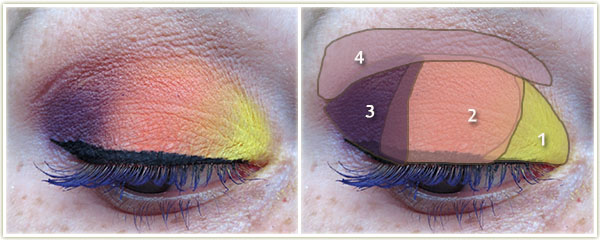
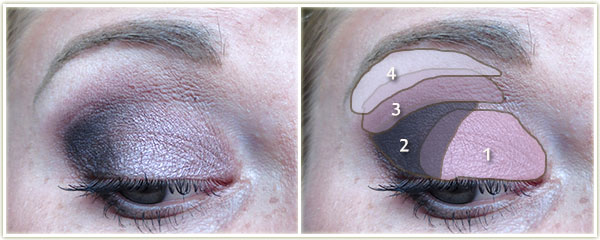
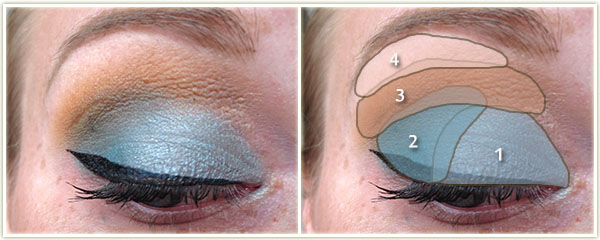
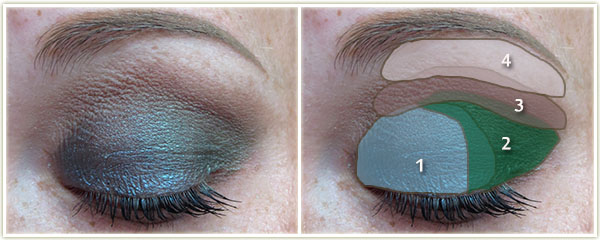
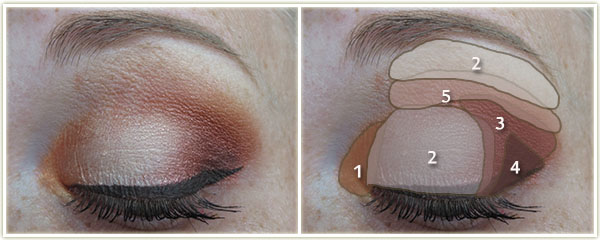
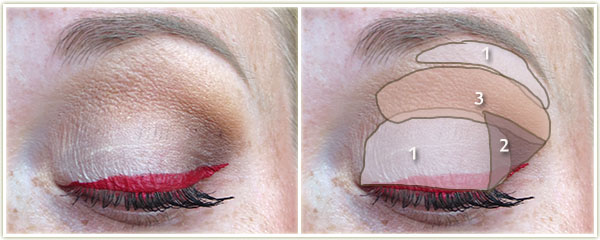
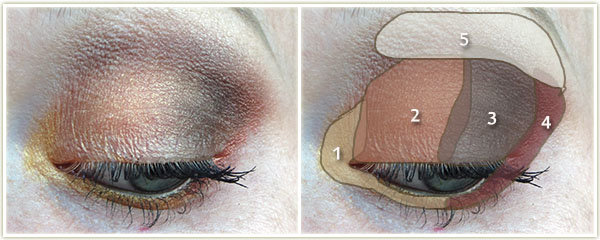
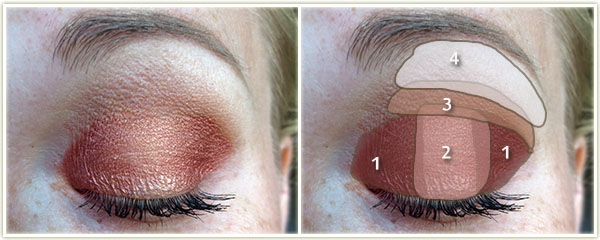
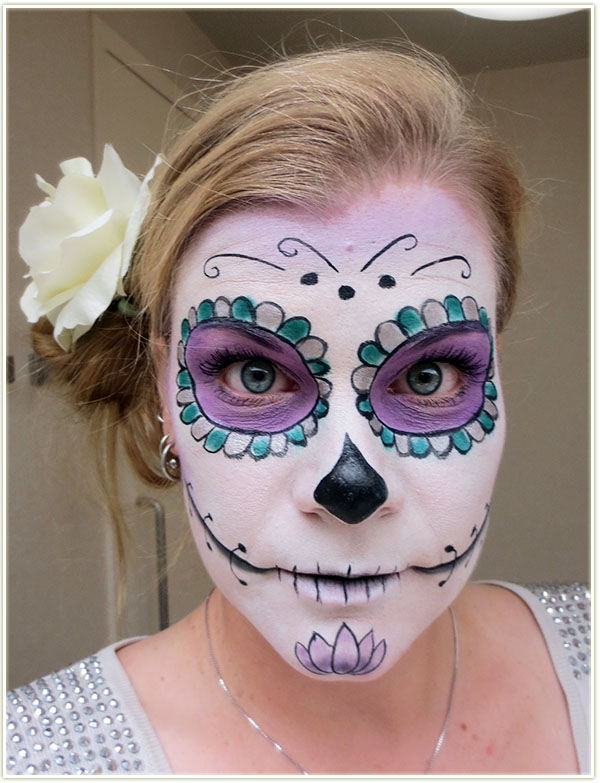
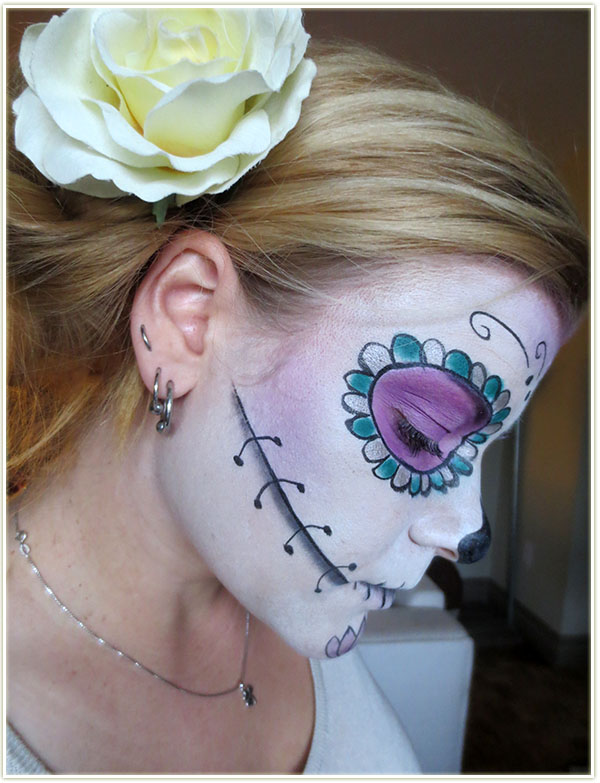
I then started to fill in the eye sockets with Inglot‘s Matte eyeshadow in 334 all over the lid. I filled in my brows with Matte 325. I then dotted on alternating colours around the purple usingInglot‘s AMC Shine 454 and Matte 317 shadows. When those were done, I used Kat Von D‘s Tattoo Liner in Trooper to create the black outline.

Full face
Full face

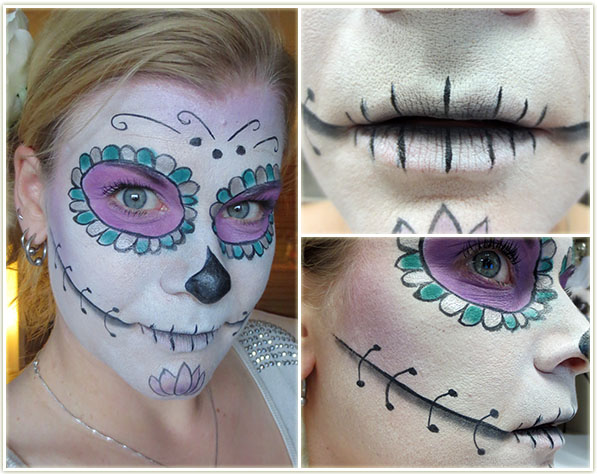
Using the same liner, I then drew lines coming straight out of my mouth, under my cheekbones. I used Urban Decay Blackout eyeshadow to create a fade down from the liner. And then drew on sewing lines to make it look (somewhat) like my face was sewn back together. I really could’ve done that better, but I was running out of time!

I filled in my nose with the same liner and then added some shading to the back of my cheeks and the top of my forehead with Inglot’s Matte 334 eyeshadow.

Yet another bathroom selfie

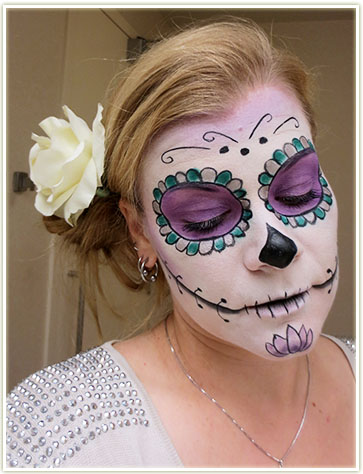
The last few steps were drawing on some random dots and swirls, as well as the lotus flower in the middle of my chin which was then shaded with the same purple Inglot eyeshadows.

My lips were easy to do with the liquid liner: I drew lines vertically to demonstrate teeth and then patted some black eyeshadow on the inner part of my lips to add some depth.

This shot was taken after I got home from work. You can see the makeup held up well for about eleven hours!

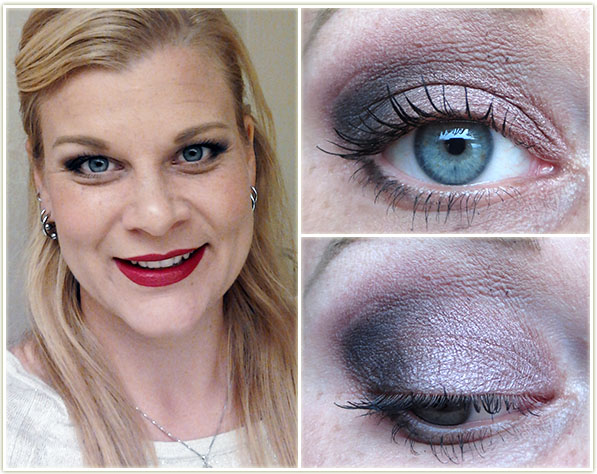
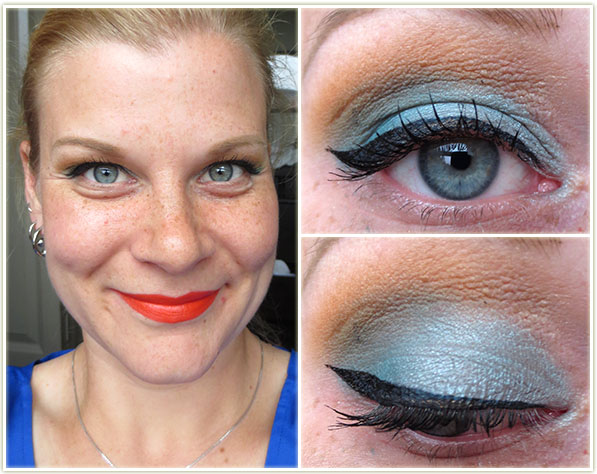
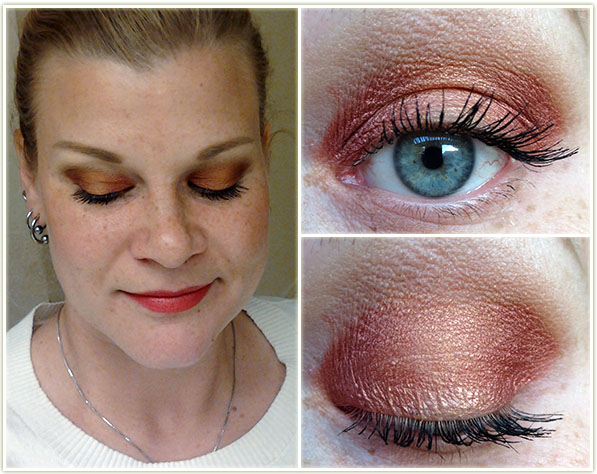
In the end, I was so pleased with how this turned out! I’ve never done any kind of makeup like this before and was really happy with the results. I didn’t need much touching up aside from my lips after I had eaten lunch and a little bit around my nose where the concealer got a bit cakey. All in all though… super successful!

What’s On My Face – Volume 26

I’ve been having “blah” kind of makeup days lately. A lot of neutrals, with brighter lip shades (tis the season?) but it’s actually starting to make me feel a bit depressed. With the darkness in the morning, I have far less desire to get out of bed. And because of that, I spend a lot less time on my makeup, which means not only boring looks (to me), but it also means sometimes I don’t even have enough time to take pictures of my makeup before I dart out the door to work. Sigh. Beauty blogger problems? I don’t know. I’m looking forward to DST ending so I can get an extra hour of that sun in the mornings (uhhh that is how that works right? I think I mess this up every year…), because right now, the only relatively suitable light I have to take pictures is at 7:55-8:05 a.m., which is when I’m supposed to be out the door!

So I tried to spice it up and do some interesting things every now and then. This is a mix of “meh” and “oooo”. I hope you find something you like!

20141027_look2-1

Let’s start out with my favourite! Themed after one of my favourite candies of the Halloween season: candy corn!

20141027_look2-2

Eyes

I first applied NYX‘s Jumbo Eyeshadow Pencil in Milk all over the lid, blended it out, then:

  1. Makeup Geek White Lies on the inner third of the lid and pulled around the tearduct.
  2. Inglot Matte 370 on the middle third of the lid.
  3. Inglot Matte 383 on the outer third of the lid and on the outer corner of the lower lash line.

Tarte‘s black gel liner to create the wing with Urban Decay Perversion mascara on my lashes.

Rest of the Face

  • Foundation: Boots No7 Instant Radiance in Cool Vanilla
  • Bronzer: NYC Fire Island Tan
  • Blush: Hard Candy Skinny Dipping
  • Lips: NYX Butter Gloss in Cherry Cheesecake

20141027_look5-1

While I love this shadow, this is what I mean when I say I’m too damn lazy to get out of bed in the morning. This is basically a one eyeshadow look with no liner. Not something I’m fond of, but this colour certainly gets the job done!

20141027_look5-2

Eyes

  1. L’Oreal Infallible in Golden Mahogany all over the lid and blended up through the crease.
  2. MAC Blanc Type to highlight the brow.

On my lashes is Estee Lauder‘s Sumptuous Infinite Daring Length + Volume Mascara.

Rest of the Face

  • Bronzer: NYC Fire Island Tan
  • Blush: MAC Gingerly
  • Highlighter: Too Faced Candlelight
  • Lips: Sephora Color Reveal Balm in Unique Pink

20141027_look1-1

I actually did this in 2012, but never got around to posting it. I believe I wore it to work on Halloween that year.

20141027_look1-2

  1.  MAC Coppering all over the lid.
  2. I then used a piece of tape to create the sharp outer edge, and then blended appliedUrban Decay Blackout to the outer corner.
  3. MAC Brule was used to highlight the brow.

L’Oreal Voluminous Carbon Black mascara is on my lashes.

20141027_look3-1

These are the kinds of looks I just don’t gravitate towards, but they’re a heck of a lot simpler to put together in the morning!

20141027_look3-2

Eyes

  1. L’Oreal Infallible in Tender Caramel all over the lid.
  2. MAC Copperplate on the outer corner and through the crease.
  3. MAC Shroom on my brow bone.

On my lashes is Urban Decay‘s Perversion mascara.

Rest of the Face

  • Bronzer: Hard Candy Hula Hula
  • Cheeks: Hourglass Mood Exposure
  • Lips: NYX  Soft Matte Lip Cream in Istanbul 

20141027_look4-1

Another easy one. Whack on boring eyeshadows, a super bright liner and tada!

20141027_look4-2

Eyes

  1. MAC Blanc Type on the lid and on the brow bone.
  2. MAC Copperplate in the outer corner and crease.

Nicka K Shimmer Eyeliner in Green to create the wing with Dermacol Party Time mascara on my lashes.

Rest of the Face

  • Bronzer: NYC Fire Island Tan
  • Blush: essence Pinky Flow
  • Lips: Revlon Pink Velvet

Halloween Makeup Test Run: Gamora

201410_gamora4

As I mentioned in my previous Halloween post of the year, I, along with several of my friends, are going out as the Guardians of the Galaxy. I’m one of the lucky ones out of the group and managed to buy my outfit on Ebay. The big issue with my outfit was going to be turning my skin colour green. I’ve never worked with full body makeup or anything of that ilk, so this was going to be super interesting for me!

Gamora Test Run
Gamora Test Run

So this was my first time trying out this kind of makeup. I picked up MAC‘s Landscape Green Chromacake a few weeks back after doing a little bit of research. It’s a water-based cake makeup that applies quite easily to the skin (as I quickly discovered). I did find I needed several layers (roughly three in the last photo on the bottom right) to get a somewhat even texture. I’ll probably do an extra layer on the night of Halloween just to make sure it’s extra smooth.

Highlighting and Contouring

The Chromacake pigment does feel a bit tight on the skin. It doesn’t feel as emollient as foundation does. In the hour that I wore the pigment, it didn’t crack on me, but it never really felt completely comfortable. (As a side note, foundation itself never really feels “comfortable” on me either, so ymmv.)

Since the green on its own would be too flat, I had to add in some shading. I used MACPrint eyeshadow to carve out a bit of my cheekbones. I found that blending was somewhat difficult: If I blended out too much, I ended up removing some of the green Chromacake. I also used Print to fill in my eyebrows. For highlighting, I used MAC‘s Whisper of Gilt Extra Dimension Skinfinish on the tops of my cheekbones and down my nose.

My lips turned out to be a bit of a disaster. Gamora has darker green lips but I didn’t have anything that would really work. I tried using a dark lip colour mixed with gloss but I don’t like how it came out, so I’m going to have to try something else.

Those silver lines were created with eyeshadow and didn’t turn out so hot either. Argh!

Eye Makeup
Eye Makeup

Lastly were the eyes. The promo shot seems to show Gamora having a dark purple outer corner of her eyes. I deepened it up with some black, but like the contouring, I had a heck of a time blending on top of the Chromacake. I also had a heck of a lot of fallout from the shadow – something to be aware of the next time I try this! I’ll definitely throw on a pair of huge false lashes for this when I wear it out on Halloween – that should help cover up some of the terrible blending!

With wig
With wig

So in the end, it was a decent first try. I primarily wanted to get a feel for the Chromacake and what I would have to do with it on Halloween. It seems very easy to apply to the skin, although blending is still my major problem. If you have any suggestions for me – either a great silver liquid liner, or a way to blend out the shadows better on top of the green paint, I’d love to hear them!

Frankenstein’s Monster

And no, this stuff was not fun to take off!

What’s On My Face – Volume 25

Mixed bag this week! Some colourful looks and some that are quite neutral.

20141013_look3-1

The colours you can get out of Inglot shadows is just unbelievable!

20141013_look3-2

  1. Inglot Matte 360 on the inner third.
  2. Inglot Matte 383 on the middle of the lid.
  3. Inglot Matte 325 on the outer third.
  4. Makeup Geek Creme Brulee through the crease.

Tarte gel liner in Black to create the wing. Sephora Full Action Extreme Effect mascara in Purple is on my lashes.

20141013_look5-1

A rare moment using the Urban Decay Naked 3 palette. I knew I wanted to wear that particular lip colour, so it was just about finding an eye look that would match the lips. I’m not sure it matches really, but I think it works.

20141013_look5-2

Eyes
(all Urban Decay Naked 3)

  1. Liar on the inner two-thirds of the lid.
  2. Blackheart on the outer third of the lid.
  3. Nooner through the top of the crease.
  4. Strange on the brow bone.

Urban Decay Perversion mascara is on my lashes and MAC Feline Kohl Power pencil was used to rim the outer half of the lower lash line then blended out.

Rest of the Face

  • Foundation: Boots No7 Stay Perfection in Deeply Ivory
  • Bronzer: NYC Fire Island Tan
  • Blush: MAC Gingerly
  • Highlighter: MAC Soft & Gentle
  • Lips: Too Faced Melted Berry

20141013_look4-1

This was something new for me. I like trying things, but sometimes you realize some colours just don’t work together. In this situation, I’m not pleased with the grey shade that was created by blending between the pale orange and the darker blue. And I finally got bold enough to wear that bright orange lipstick I picked up form Milani in March but never wore!

20141013_look4-2

Eyes
(all Makeup Geek)

  1. Glass Slipper on the inner half of the lid.
  2. Shark Bait on the outer half of the lid.
  3. Mandarin through the crease.
  4. Vanilla Bean on the brow bone.

Gabriella Salvete liquid eyeliner in Black to create the wing and Urban Decay Perversionmascara on my lashes.

Rest of the Face

  • Bronzer: Hard Candy Hula Hula
  • Blush: essence Pinky Flow
  • Highlighter: MAC Soft & Gentle
  • Lips: Milani Sweet Nectar

20141013_look2-1

Just a quick one using a palette I love.

20141013_look2-2

Eyes
(using the Too Faced A Few of my Favorite Things palette)

  1. Party Time on the inner half of the lid.
  2. Evergreen on the outer half of the lid.
  3. Chocolate Milk through the crease.
  4. Cream Colored Ponies on the brow bone.

Urban Decay Perversion mascara is on my lashes.

Rest of the Face

  • Bronzer: Too Faced Sun Bunny
  • Blush: Too Faced Raindrops on Roses

Challenge Week: Makeup Geek Vegas Lights

20141008_vegaslights_challengeweek

Good grief do I ever love this palette! I’ve gone on ad nauseum about my love for Makeup Geek eyeshadows, so I won’t bore you with the details other than to say that this brand is unbelievable quality for an incredibly low price point.

The week I used this palette I managed to get six looks out of it. Take a look:

20141008_vegaslights1-1

This was the most logical of choices for me in this palette. When I see colours, I naturally see a gradient, so I thought I’d make a gradient my first choice of looks.

20141008_vegaslights1-2

Eyes

  1. Casino on the inner corner.
  2. Sin City on the middle of the lid and one the lower lash line.
  3. Roulette on the outer corner and on the outer corner of the lower lash line.
  4. Desert Sands to blend out the crease.
  5. Mirage on the browbone.
  6. Bada Bing to line the upper lash line and to deepen up the outer corner.

CoverGirl Clump Crusher mascara is on my lashes.

Rest of the Face

  • Bronzer: Hard Candy Hula Hula
  • Blush: essence Autumn Peach
  • Highlighter: MAC Whisper of Gilt
  • Lips: MAC Hibiscus

20141008_vegaslights2-1

I stole this one completely from one of Marlena’s own tutorials. I would never think to use the colours this way so I always find it helpful to see other people’s instructions!

20141008_vegaslights2-2

Eyes

  1. Sin City on the inner corner of the lid.
  2. Mirage of the middle of the lid and to highlight the browbone.
  3. Roulette on the outer corner.
  4. Bada Bing in the outer V.
  5. Desert Sands through the crease.

MAC Dipdown fluidline to create the wing and CoverGirl Clump Crusher mascara is on my lashes.

Rest of the Face

  • Bronzer: e.l.f. Surf’s Up
  • Blush: Tarte Blissful
  • Highlighter: MAC Whisper of Gilt
  • Lips: Too Faced Bon Bon with Revlon Sunset Peach gloss on top

20141008_vegaslights3-1

Mmmm not as pleased with this one. Overall the look is nice, it’s just not as striking as I had thought it would be.

20141008_vegaslights3-2

Eyes

  1. Roulette all over the lid.
  2. Bada Bing in the outer corner and through the crease, also on the outer corner of the lower lash line.
  3. Desert Sands blended through the top of the crease.
  4. Mirage on the browbone.

Kat Von D tattoo liner in Trooper to create the wing with Urban Decay‘s Perversionmascara on my lashes.

Rest of the Face

  • Foundation: Boots No7 Instant Radiance in Cool Vanilla
  • Bronzer: e.l.f. Surf’s Up
  • Blush: Sleek Guipre and Chantilly mixed together
  • Highlighter: Too Faced Candelight
  • Lips: Revlon Sunset Peach gloss

20141008_vegaslights4-1

Red eyeliner is a look I reach for often enough, so while this look is not necessarily focused on the Vegas Lights palette, it’s a good way of showing that this palette is versatile enough to incorporate into many different looks.

20141008_vegaslights4-2

Eyes

  1. Mirage all over the lid and on the browbone.
  2. Bada Bing in the outer corner.
  3. Desert Sands through the crease.

Inglot gel liner in 79 to create the wing with CoverGirl Clump Crusher mascara on my lashes

Rest of the Face

  • Bronzer: NYC Fire Island Tan
  • Blush: essence Life’s a Cherry
  • Highlighter: MAC Soft & Gentle
  • Lips: Revlon Lip Butters in Red Velvet with Creamsicle on top

20141008_vegaslights5-1

This started out as a concept, and while I like the idea (lower lash line liner pulls up to outer edge of the upper lid) I think I chose the wrong colours for each location.

20141008_vegaslights5-2

Eyes

  1. Casino on the outer corner and on inner corner of the lower lash line.
  2. Sin City on the inner half of the lid.
  3. Bada Bing on the outer half of the lid.
  4. Roulette used as liner on the outer corner of the lower lash line and then brought up to the outer lid and frames Bada Bing (barely blended in).
  5. Mirage on the brow bone.

MAC Feline Kohl Poer pencil to tightline and on the lower water line. Urban Decay Perversion mascara is on my lashes.

20141008_vegaslights6-1

I think people tend to call this a “spotlight” look. Same colour on the inner and outer corner, lighter shade on the middle of the lid. Whatever it’s called, I like the result!

20141008_vegaslights6-2

Eyes

  1. Roulette on the inner and outer thirds of the eye.
  2. Sin City on the inner third of the lid.
  3. Desert Sands through the crease.
  4. Mirage on the browbone.

Urban Decay Peversion mascara is on my lashes.

Rest of the Face

  • Bronzer: Hard Candy Hula Hula
  • Blush: Sleek Crochet
  • Highlighter: Too Faced Candlelight
  • Lips: Boots No7 Sweet Copper