Category Archives: Tutorials

Challenge Week: Too Faced Everything Nice

20141210_toofaced_everythingnice

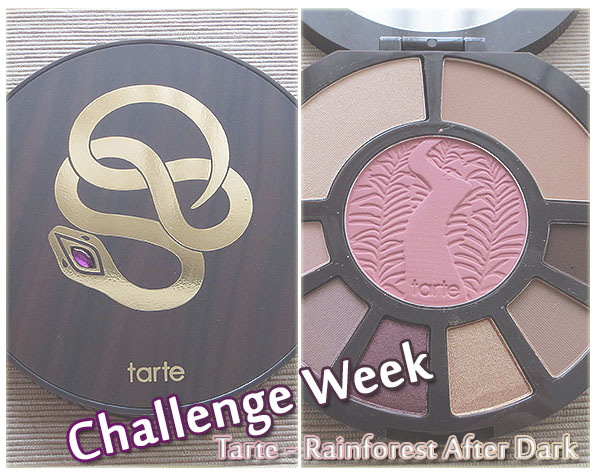
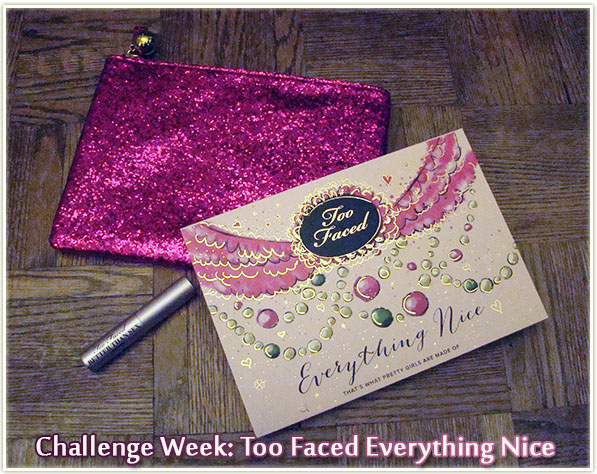
I wasn’t going to buy this palette (which is what I try to tell myself about every palette that comes out). I thought it was too similar to last year’s Too Faced palette (both only available at Sephora), but I caved during the VIB sale and snagged it for 20% off the asking price. For what you get,  20 eyeshadows, two blushes, a bronzer, a highlighter and a sample size mascara, $54 CAD (discounted price) is nothing short of amazing.

When I got the palette, I opened it up alongside my “A few of my Favorite Things” palette and started doing shade comparisons. I’d say there’s about three duplicates, and even then most of the duplicates are highlight/pale shades which are a must for any palette, but the rest are all completely different from last year’s rendition. Because of the difference in the shades, I was *really* glad to have picked this up.

Anyway, on to the looks I created!

20141210_toofaced_everythingnice_look5-1

While this palette does pack a lot of colour variety, it’ll also appease those who are lovers of neutrals and browns.
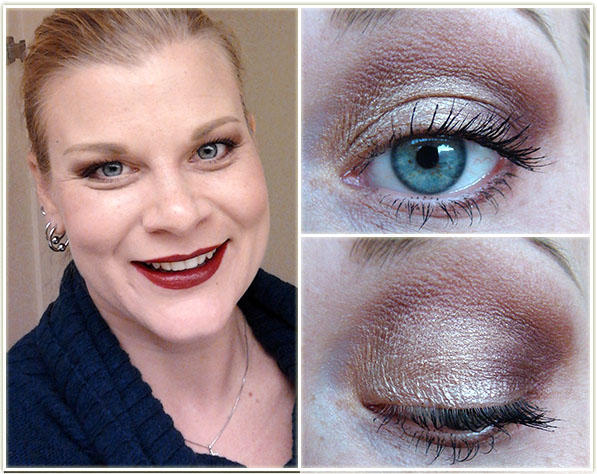
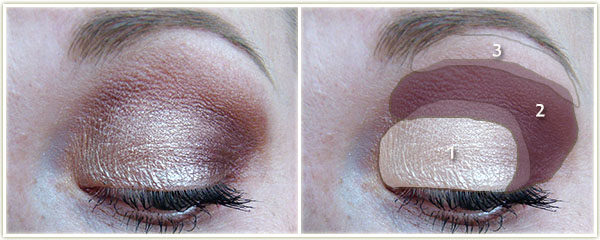
20141210_toofaced_everythingnice_look5-2

Eyes

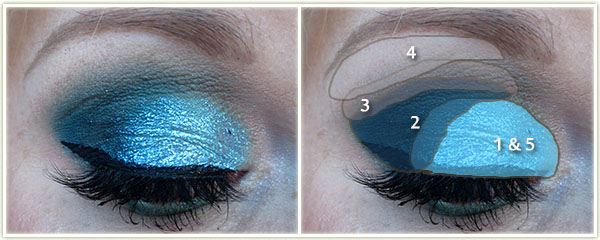
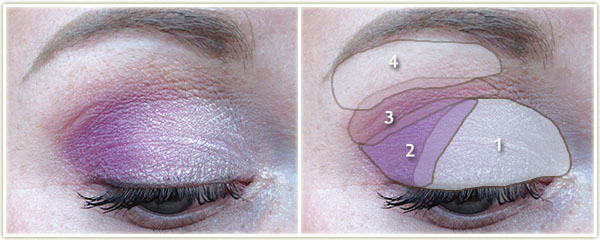
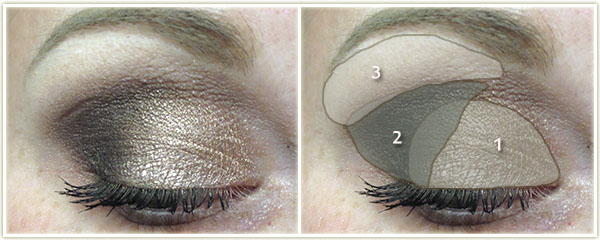
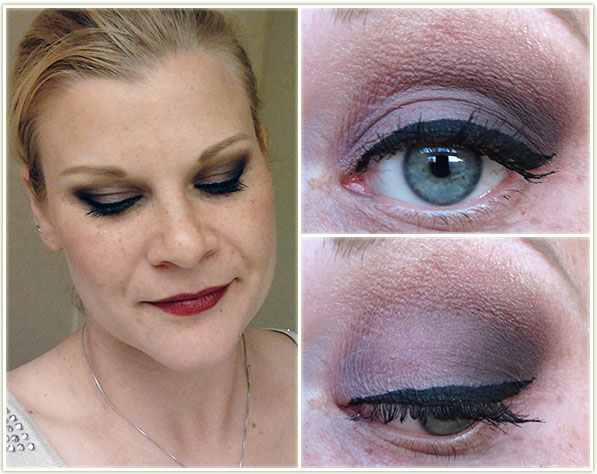
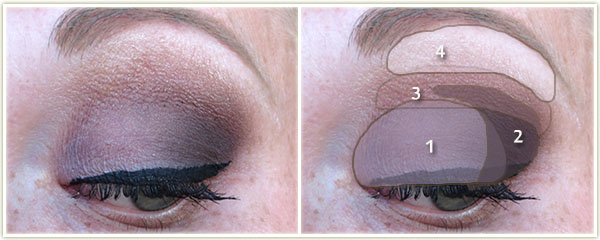
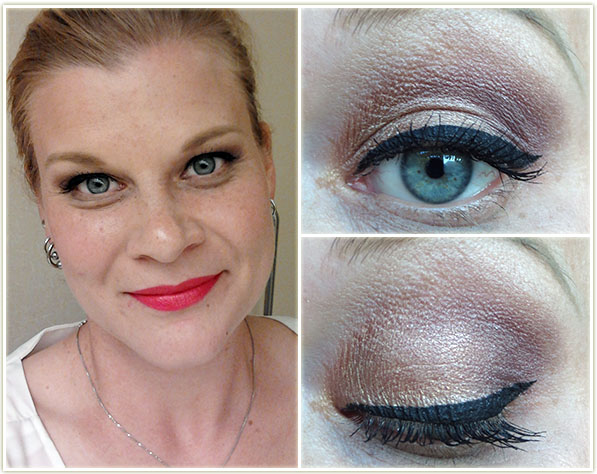
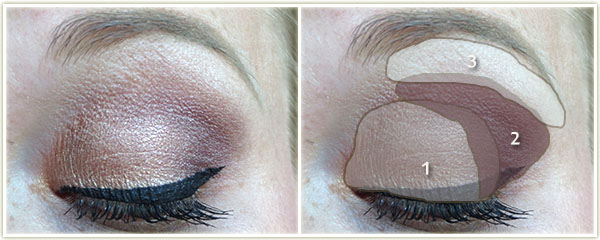
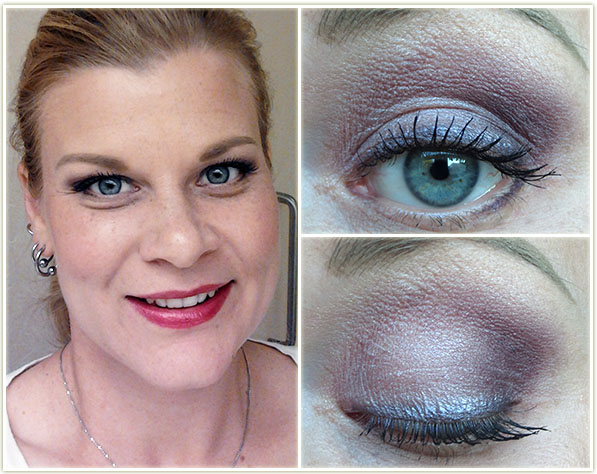
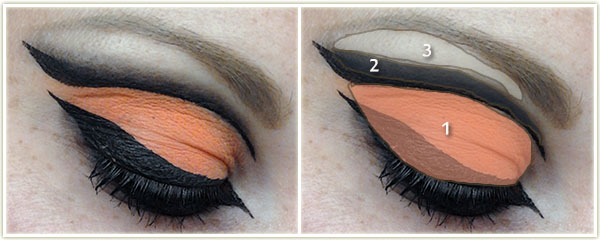
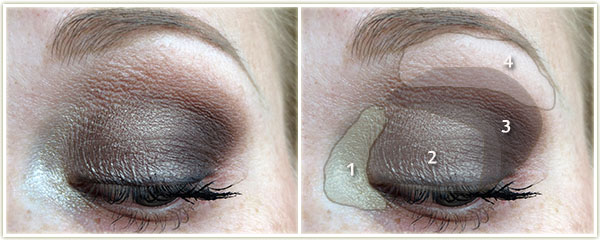
  1. Shiny Happy on the inner tearduct.
  2. Don’t Settle all over the lid.
  3. Knockout on the outer corner and through the crease.
  4. Dream On and Heaven on the brow.

On my lashes is Benefit‘s They’re Real mascara. I also used Chocolate Moon eyeshadow to line the upper lash line.

Rest of the Face

  • Bronzer: Chocolate Soleil
  • Blush: Sweet Pink
  • Highlighter: Inner Light
  • Lips: Wet n Wild 910D/Red Velvet

20141210_toofaced_everythingnice_look1-1

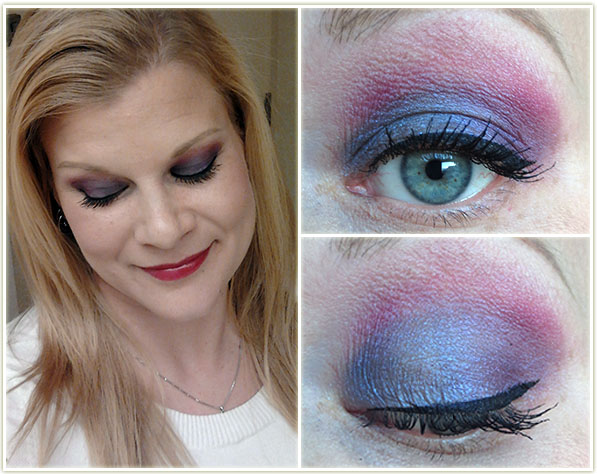
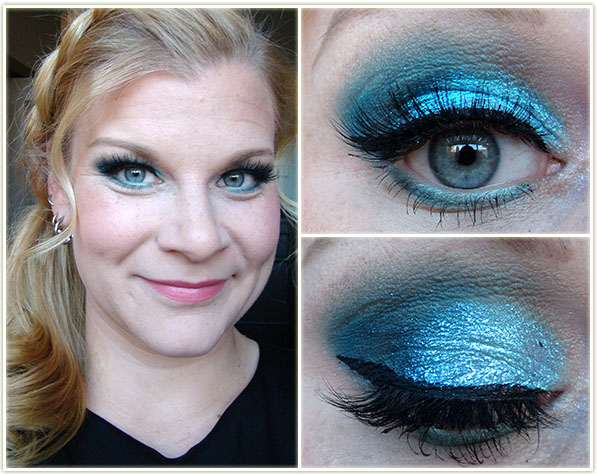
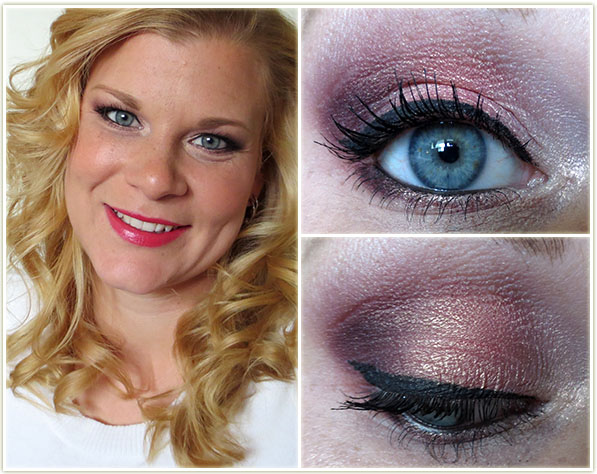
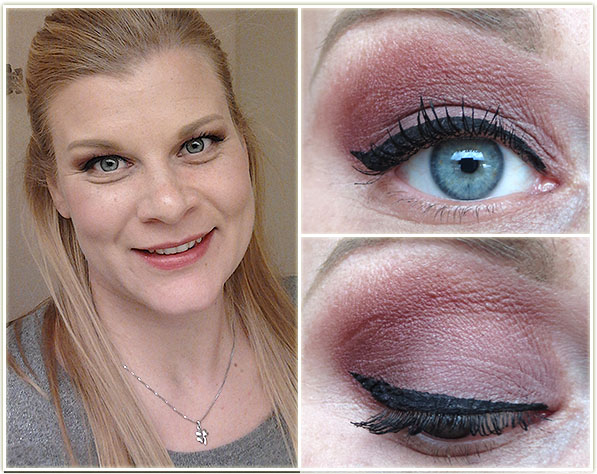
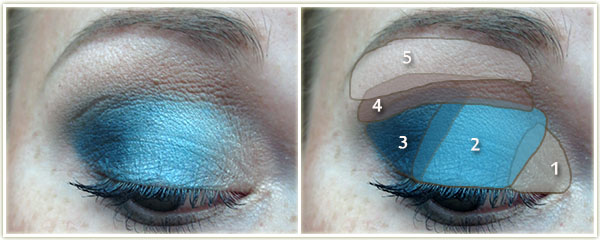
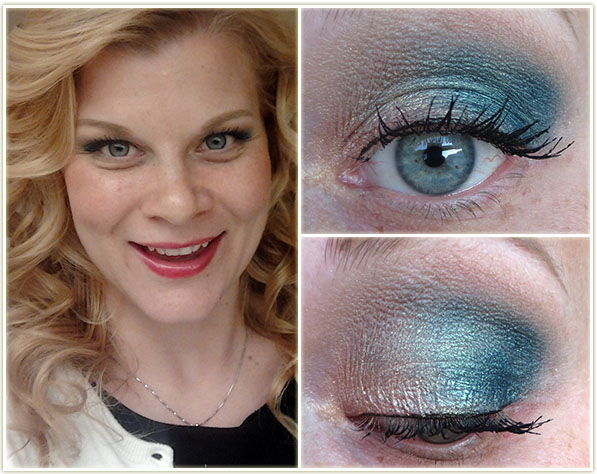
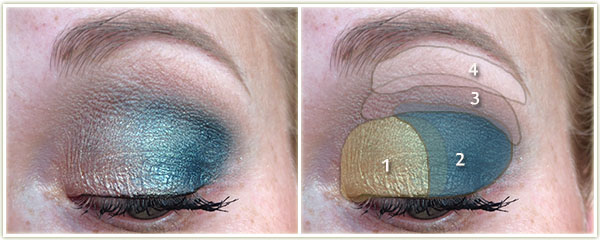
Fun with colours! The blue shade is one of the duplicates from last year’s palette – it’s fairly sheer so make sure you either use a similarly coloured base, or apply a LOT of layers of it.
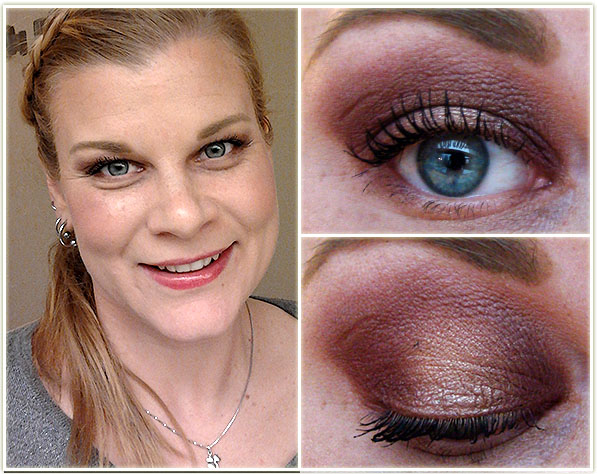
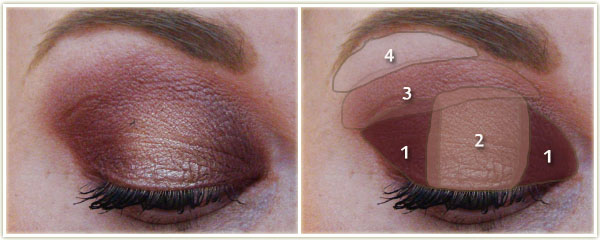
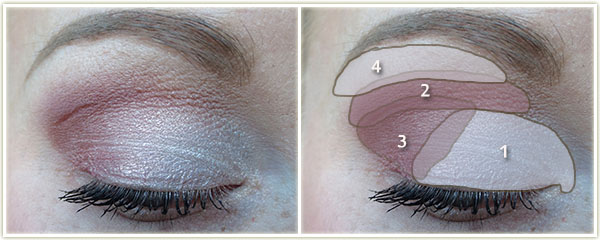
20141210_toofaced_everythingnice_look1-2

Eyes

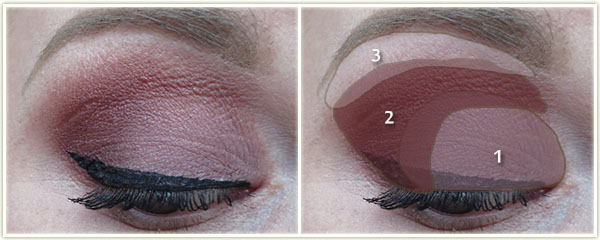
  1. Head Over Heels on the inner half.
  2. Live It Up on the outer half.
  3. Totally Fetch through the crease.
  4. Dream On on to highlight the brow.

I used Tarte‘s black gel liner to create the wing and applied Benefit They’re Real mascara to my lashes.

Rest of the Face

  • Foundation:  CoverGirl CC Cream in 110 Classic Ivory
  • Bronzer: Chocolate Soleil
  • Blush: Sweet Pink
  • Highlighter: Inner Light
  • Lips: Soap & Glory Sexy Motherpucker in Raplumzel


20141210_toofaced_everythingnice_look2-1

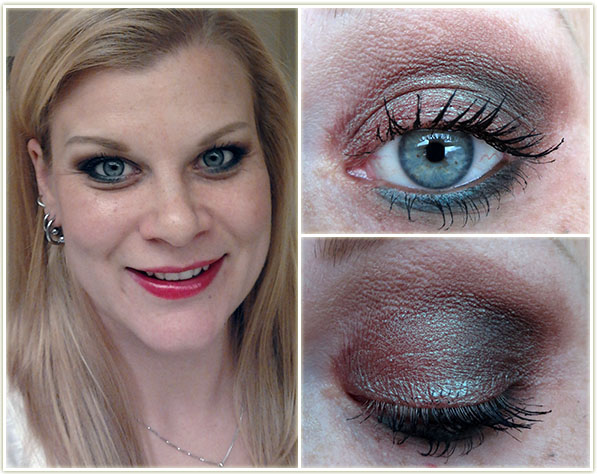
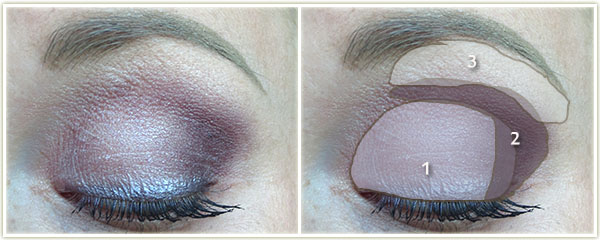
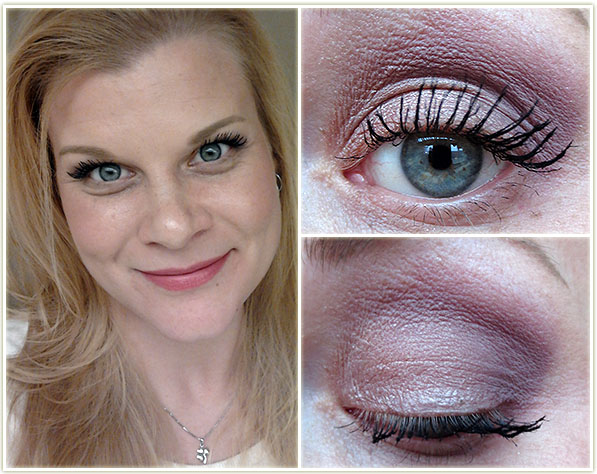
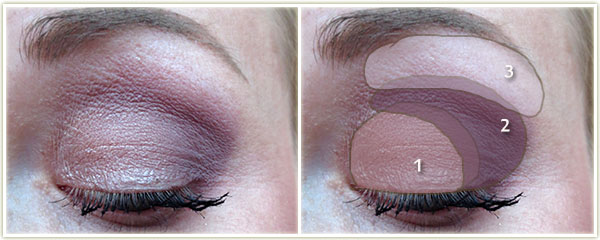
I actually think this look makes me look slightly cracked out, but that might just be my eyeshadow colour placement. The shadows themselves are lovely… I just… chose poorly.
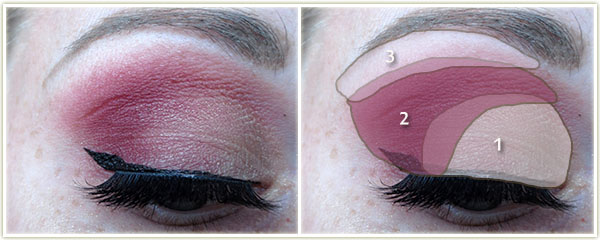
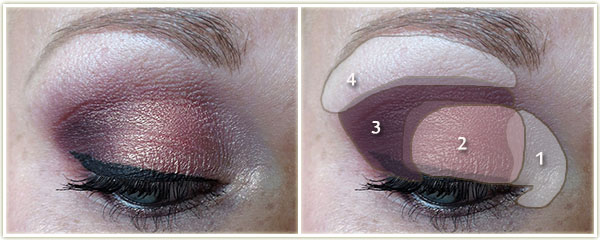
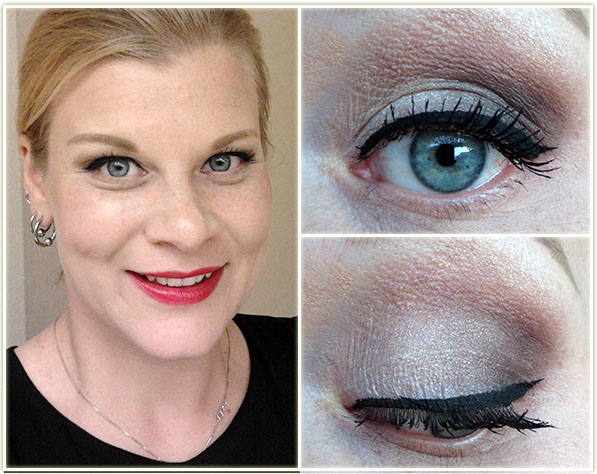
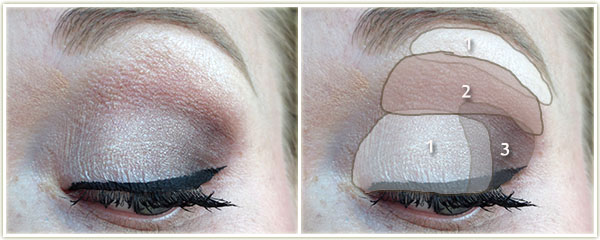
20141210_toofaced_everythingnice_look2-2

Eyes

  1. Girly all over the lid.
  2. Knockout in outer corner and crease.
  3. Heaven on the brow bone.
  4. (not actually numbered) Too Glam under the eye to line.

On my lashes is Benefit They’re Real mascara.

Rest of the Face

  • Bronzer: Chocolate Soleil
  • Blush: Papa Don’t Peach
  • Highlighter: Inner Light
  • Lips: Strawberry Malt

20141210_toofaced_everythingnice_look4-1

Christmas themed? Sorta? Gold for stars and green for evergreens? lol We were going to Toronto’s German Christmas Market that night and I wanted to look “festive”. And by festive, I mean I froze my butt off while trying to wear a jacket that was not warm enough.
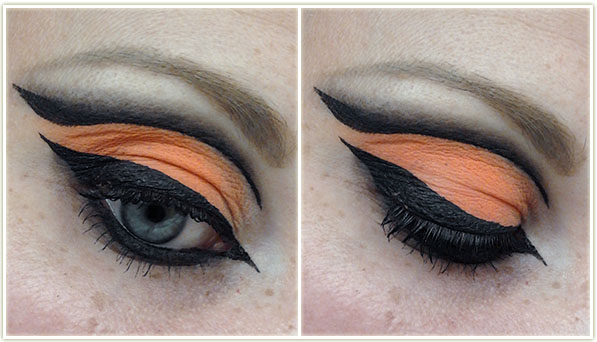
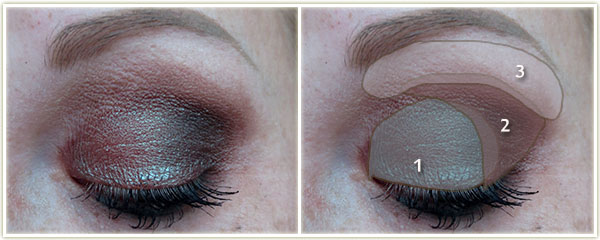
20141210_toofaced_everythingnice_look4-2

Eyes

  1. Honey Pot on the inner half of the lid.
  2. Too Glam on the outer half of the lid.
  3. Fawned of You through the crease.
  4. Heaven and Dream On on the brow bone.

I used Kat Von D‘s Tattoo Liner in Trooper to create a very, VERY thin line on my upper lash line and then applied Benefit They’re Real mascara to my lashes.

Rest of the Face

  • Bronzer: NYC Fire Island Tan
  • Blush: MAC Sea Me, Hear Me
  • Highlighter: MAC Soft & Gentle
  • Lips: MAC Strawberry Malt

20141210_toofaced_everythingnice_look3-1

This looks turned into being all about the lashes (Younique Fiber Lashes… review coming later this month), but I like the soft effect I got on my lids as a quick “get out the door NOW!” look.
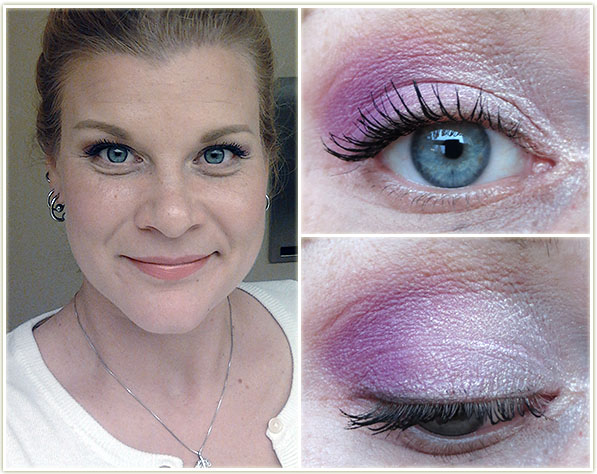
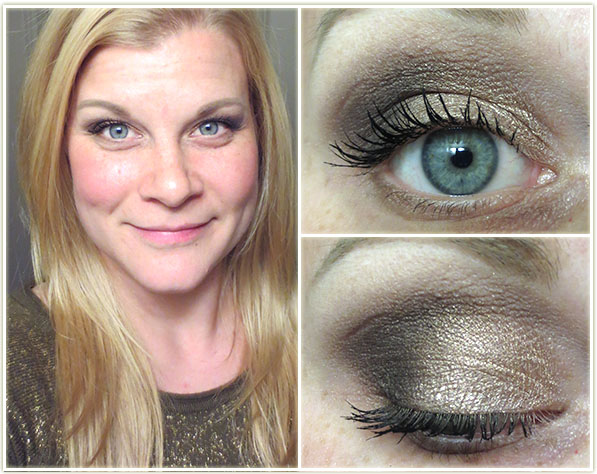
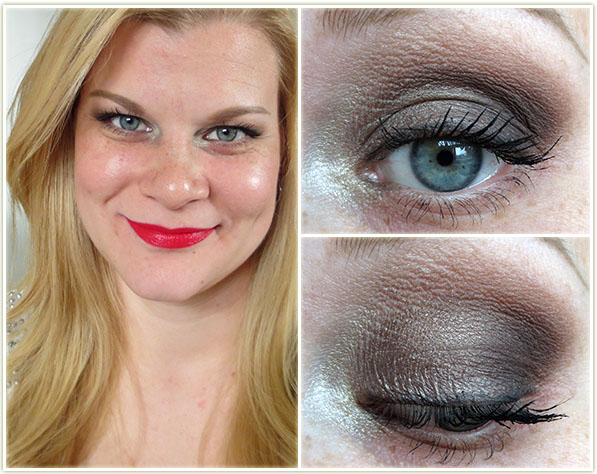
20141210_toofaced_everythingnice_look3-2

Eyes

  1. After Hours all over the lid.
  2. Be You on the outer half of the lid.
  3. Dream On on the brow bone.

On my lashes is Benefit They’re Real mascara with Younique‘s 3D Fiber Lash mascara coated on twice.

Rest of the Face

  • Bronzer: Chocolate Soleil
  • Blush: Sweet Pink
  • Highlighter: Inner Light
  • Lips: Rimmel Apocalips in Celestial

Did you pick up this palette? What do you think of it? I know that Sephora’s site no longer seems to be carrying it anymore (sold out, I imagine) but I have seen it in physical Sephora stores within the last week, so if you want it, jump on it now!

What’s On My Face – Volume 28

This week’s set of looks has a bunch of glitter, some “tis the season” lips and plenty of lashes!

20141124_look2-1

An excuse to wear glitter? I’ll take it! I did this look for a sports banquet one of my soccer leagues was putting on. Love how it turned out!

20141124_look2-2

Eyes

  1. Inglot AMC Shine 33 all over the lid.
  2. Inglot Matte 338 on the outer corner.
  3. Too Faced Milk Chocolate through the crease.
  4. Too Faced Cream Colored Ponies on the brow bone.
  5. MAC Reflects Transparent Teal glitter tapped onto the lid.

Catrice liquid liner in Dating Joe Black to create the wing with Pur Minerals Big Look Waterproof mascara on my lashes. I’ve also applied some Femme Fatale lashes in She-Devil.

Rest of the Face

  • Foundation:  CoverGirl CC Cream in 110 Classic Ivory
  • Bronzer: Revlon Bronzed & Chic
  • Blush: Hourglass Diffused Heat
  • Highlighter: MAC Silver Dusk
  • Lips: Bite Beauty Fig

20141124_look3-1

I’ve been loving the pinky-red berry lips lately and this eye look just worked out perfectly with this lip colour.

20141124_look3-2

Eyes

  1. Makeup Geek Bleached Blonde all over the lid.
  2. Makeup Geek Bitten on the outer corner and through the crease.
  3. Makeup Geek Vanilla Bean on the brow bone.

Kat Von D Tattoo Liner in Trooper to create the wing and applied Estee Lauder Sumptuous Infinite mascara to my lashes. I also have Femme Fatale Catwalk lashes on.

Rest of the Face

  • Bronzed: NYC Fire Island Tan
  • Blush: Hourglass Mood Exposure
  • Lips: Too Faced Melted Berry

20141124_look4-1

I love the lid colour on this one because it’s not just pale and shimmery, it’s also got hints of pinky, purple and some gold. Makes it easy to match it with different colours.

20141124_look4-2

Eyes

  1. Too Faced Coquet all over the lid.
  2. Too Faced Ooh La Orchid on the outer corner.
  3. Too Faced Chocolate Milk through the crease.
  4. Too Faced Cream Colored Ponies on my brow bone.

Too Faced Dark Chocolate was used to line the lid and Estee Lauder Sumptuous Infinite mascara is on my lashes.

Rest of the Face

  • Foundation:  CoverGirl CC Cream in 110 Classic Ivory
  • Bronze: Too Faced Chocolate Soleil
  • Blush: Too Faced Raindrops on Roses
  • Highlighter: Benefit Watts Up
  • Lips: Cailyn Basic Instinct gloss

20141124_look1-1

I did this look for a guest posting over on Julie’s Swatch and Review blog for a MAC Monday. I’m reposting it for my own posterity!

201410_sr_chellemac5

Eyes
(all MAC)

  1. Vanilla pigment on the inner corner.
  2. Expensive Pink all over the lid.
  3. Sketch in the outer corner and blended through the crease.
  4. Shroom on the brow bone.

I used Blacktrack fluidline to create the wing, then tightlined both my upper and lower lash lines with Feline Kohl Power Pencil. On my lashes is Urban Decay‘s Perversion mascara.

Rest of the Face

  • Foundation: Boots No7 Stay Perfect in Deeply Ivory
  • Bronzer: NYC Fire Island Tan
  • Blush: MAC Warm Soul
  • Highlighter: MAC Vanilla pigment
  • Lips: MAC Viva Glam Cyndi

20141124_look5-1

Inspiration? My shirt. Yep, I’m “one of those” that matches their eyeshadow to their clothing!

20141124_look5-2

Eyes

  1. Too Faced Creme Brulee all over the lid.
  2. Too Faced Gilded Ganache on the outer corner.
  3. Too Faced White Chocolate on the brow bone.

Rest of the Face

  • Bronzer: Tarte Park Avenue Princess
  • Blush: Tarte Dazzled

Challenge Week: Tarte Rainforest After Dark

201411_tarte_rainforestafterdark

A lovely friend picked up the Tarte Rainforest After Dark palette in the US when it was on a super deal at… Ulta I want to say? (*edit* Nope wrong! It was on Tarte’s own web site for such an amazing price.) She got it at a rocking deal of $26 USD and I couldn’t say yes fast enough! I had missed out on the previous Tarte disks (I’ve been mourning never getting my hands on Aqualilies for a while now) and since this was Tarte‘s latest release, I was excited to try it out.

There’s no denying the benefits of this palette. There’s a lot to be said for a palette that can give you so much product in one compact shape: It comes with six eyeshadows, a full-sized blush, a highlighter and a bronzer! I barely own any full face palettes like this, and if I do, they’re in absolutely enormous packaging which makes travelling cumbersome.

While I do love Tarte‘s blushes quite a bit, I’ve never had the opportunity to test out the rest of their products. I’ll admit that I found the eyeshadows in this palette to feel quite dry. They don’t lack for pigmentation, but they do feel a bit stiff. There is also no matte brow bone shade in this palette, so I found myself mixing the palest eyeshadow shade with the highlighter to use as on my brow.

For each look I used the blush (Unleashed), bronzer (Park Avenue Princess) and highlighter (Champagne) so I won’t re-iterate those for each look breakdown.201411_tarte_rainforestafterdark_look4-1

A look I always go to because it’s super easy – monochromatic shades going from light to dark.

201411_tarte_rainforestafterdark_look4-2

 Eyes

  1. Make a mauve all over the lid.
  2. Plum away with me on the outer corner and through the crease.
  3. Champagne and Bare to explore mixed together and blended onto the brow bone.

I used Tarte‘s black gel liner to create the wing and applied Estee Lauder Sumptuous Infinite mascara to my lashes.

Rest of the Face

  • Foundation: CoverGirl CC Cream in 110 Classic Ivory
  • Lips: MAC Mystical

201411_tarte_rainforestafterdark_look3-1

When I look at this palette, this is the look my eyes gravitate towards first – gold all over the lid with the purple/plum in the crease.

201411_tarte_rainforestafterdark_look3-2

 Eyes

  1. Up to no gold all over the lid.
  2. Plum away with me in the outer corner and through the crease.
  3. Champagne and Bare to explore mixed together and blended onto the brow bone.

Estee Lauder Sumptuous Infinite mascara is on my lashes.

Rest of the Face

  • Foundation: CoverGirl CC Cream in 110 Classic Ivory
  • Lips: MAC Brick lip liner with MAC Dark Side on top

201411_tarte_rainforestafterdark_look5-1

Unfortunately the lighting is not so good on the close up shots (I have no lighting source other than natural light and with the short days this become problematic!).

201411_tarte_rainforestafterdark_look5-2

Eyes

  1. Plum away with me on the inner and outer thirds of the lid.
  2. Up to no gold on the middle of the lid.
  3. Tan-gled up in you through the crease.
  4. Champagne and Bare to explore mixed together and blended onto the brow bone.

Estee Lauder Sumptuous Infinite mascara is on my lashes.

Rest of the Face

  • Foundation: CoverGirl CC Cream in 110 Classic Ivory
  • Lips: Laura Mercier Lip Glace in Rose


201411_tarte_rainforestafterdark_look1-1

I think this is my favourite look out of the bunch. It’s smokey and dramatic and I looove the outer corner shade (Don’t turn a-brown).

201411_tarte_rainforestafterdark_look1-2

 Eyes

  1. Make a mauve all over the lid.
  2. Don’t turn a-brown on the outer corner.
  3. Tan-gled up in you through the crease.
  4. Champagne on the brow bone.

I used Tarte‘s black gel liner to create the wing and applied Urban Decay Perversion mascara to my lashes.

Rest of the Face

  • Foundation: CoverGirl CC Cream in 110 Classic Ivory
  • Lips: Revlon Lipstain + Balm in Twilight

201411_tarte_rainforestafterdark_look2-1

The “typical” look. Light on the lid, brown through the crease. Oddly, the brown shades seemed to make the champagne shade seem rather grey. It didn’t bother me, but it’s worth noting.

201411_tarte_rainforestafterdark_look2-2

Eyes

  1. Champagne all over the lid and on the brow bone.
  2. Tan-gled up in you through the crease.
  3. Don’t turn a-brown in the outer corner.

Estee Lauder Sumptuous Infinite mascara is on my lashes.

Rest of the Face

  • Foundation: CoverGirl CC Cream in 110 Classic Ivory
  • Lips: Too Faced Jelly Bean

Halloween 2014 – Part 2 Guardians of the Galaxy

20141112_halloween_guardiansofthegalaxy2

Halloween was QUITE the event this year! A group of friends and I saw the movie the Guardians of the Galaxy in August and walked out of the theatre with the realization that we had the exact perfect combination of people to go as the Guardians for Halloween. We knew it was going to be a lot of work, but holy cow did I ever not realize just how much! We got started at the beginning of October and it feels like it consumed the entire month!

Our group as the Guardians of the Galaxy!

The bulk of the work was spent working on the Groot costume since that was not only massive, but super involved. I think it came out especially well – and we have our costume designer mastermind behind it all – Steve did an amazing job pre-planning and executing the Groot outfit, his own Drax costume (amazing muscle suit!) and then did Rocket Raccoon’s entire costume by himself! It’s worth pointing out that all of those costumes were made from scratch! I got off pretty easy – all of my parts (wig, costume) were all purchased online.

I have a few details on some of our makeup below, if you’re only interested in photos, be sure to scroll down to see some amazing shots of our group in action!


Going green
Going green

My makeup took longer than I expected – about two hours to get me completely done. I used MAC‘s Chromacake in Landscape Green to change the colour of my skin. It took about two layers but I’m still not pleased with how it turned out as I feel it’s too patchy. The texture seemed to be more even on my face, but the body was especially bad. I think using an airbrush system would’ve been a better idea.

Close up of face detail

My face was pretty straightforward once I had the green base on. I kept it simpler than the trial I had done before and stuck with a single colour on my eye for shadow (MAC Print). I used the same shade through my eyebrows and to contour my face. The contour helped a lot to give me some depth and bring out my cheekbones since I looked especially flat before doing so. I popped on a pair of Femme Fatale lashes in their Catwalk style since I felt my eyes were getting lose amongst all the green. Any liner touchups were done with Urban Decay‘s Black Velvet pencil. On my lips is Revlon‘s Black Cherry because I couldn’t find a decent darker green and I was running out of time to mix shades. Gamora has a few silver lines on her face so I sketched out some rough shapes with a silver liquid liner from NYX.

Finished Gamora makeup with outfit and wig

I think the end result is decent. Not movie quality, certainly, but definitely good enough for Halloween! The wig was a $20  I got from Ebay and it worked out far better than I ever expected from a relatively cheap wig (plus I’d never even worn a wig before). I had to pin some of the pieces into the wig cap because they kept dangling in my face, but I think the overall look is relatively realistic. Let me know what you think!

Steve as Drax
Steve as Drax

My friend Steve did his own makeup for Drax and he was kind enough to share how his turned out. Here’s his summary of what he did on his face:

Creating the Drax make-up required a fair amount of thought, and I wasn’t altogether sure about what supplies to use, or if I would be able to create it properly. For the movie, the tattoos were created using foam latex pieces that were made by taking a cast of Dave Bautista’s face, sculpting the tattoos on the cast, then taking a mould of the sculpt, and then creating the foam latex out of that. I do not have the kind of skills to do that, nor the materials, so I needed a work around that would allow me to have a base coat of greyish green, with raised red tattoos over top. I was comfortable working with latex, but could not get latex that was the greyish green I needed, nor could I make the latex thick enough to hold the shape of the tattoos.

I chose to use acrylic paint mixed with latex. What I found was that acrylic alone would flake off of the latex once it dried, as the latex did not give enough to adhere to. When I mixed the paint with liquid latex, I found that the paint now stuck and kept its thickness. I started by putting on the bald cap (which was an ordeal unto itself) trimming to size first, and then applying to my head using spirit gum. I then sponged “ruddy flesh tone” liquid latex to blend it into my skin so there was no seam.

I would need a base on which to apply the acrylic, so I used the ruddy coloured latex above my eyes and below them (I applied olive oil to my eyebrows so that I would hopefully not lose them all when I pulled off the latex). I then applied a green acrylic/liquid latex blend (I used a 3:2 ratio of liquid latex to acrylic paint) and then some grey to lighten the green, blow-drying between applications to set the latex.

I then applied the red acrylic and liquid latex mix (for this I needed it thicker so chose to use a 1:1 ratio of acrylic to latex). I lacked dexterity when applying to my face, so just used the side of the brush to make lines that criss-crossed and carefully applied tails and sharp ends using a toothpick. I added a coat of grey-green over top to lighten the tattoos.

Unfortunately, as I attempted to blend everything together using Ben Nye‘s Creme Make-up in Army Green mixed with some grey made from white and black Ben NyeCreme make-up, the latex sopped-up all of the colour, and a few minor mishaps ruined the red of the tattoos. As a result, I completely blended using the make-up and then used some leftover red creme make-up to bring the tattoos out.

You’ll notice in the close-up that there is a lot of wrinkling happening with the latex. I realized after the fact that this was probably because of the acrylic. It wasn’t sticking to my face as well because the acrylic didn’t want to stretch as much as the latex. In the end the make-up worked fine, but I wish I had done things slightly differently. I wish that I had just used acrylic and latex for the tattoos to make them raised, but then just used make-up to create colour and blend everything in. In the end the latex took the make-up so well that I would have been fine to paint the raised tattoos using red make-up after the fact.

In the end, I was satisfied with the look, and of course the best news is that my eyebrows escaped intact.

And now for some amazing shots we got before heading out onto the street!

Groot
Groot
Rocket Raccoon
Rocket Raccoon
Drax
Drax
Starlord
Starlord
Gamora
Gamora

After our brief “photoshoot”, we hit up Church Street which is shut down to traffic on Halloween for the entire evening for a street party. It was seriously cold (about 2 degrees), but it stopped raining for the hour we were out there which was a HUGE blessing since most of the paint would’ve melted off us!

The first group to stop us for pictures
Posing with some characters from Game of Thrones!
This was cute… a lot of kids came up to us and Rocket was always trying to get them involved!
We were stopped so often and so frequently for pictures that we ended up with crowds and crowds of people around us!
More posing
More posing

As always, Halloween was an amazing experience on Church Street in Toronto. If you live in the city and don’t know what to do on Halloween, it’s worth it to come down to the area and check out all the costumes. Even if you’re not dressed up yourself, it’s still worth it to see what others put together. And if you DO dress up, you’ll end up feeling like a celebrity for the evening.

Happy Halloween everyone. 🙂

What’s On My Face – Volume 27

There’s an insanely cool look (to me) in this set amongst the usual ones. Read on!

20141114_look1-1

Standard neutral lid with bright lip combo.

20141114_look1-2

Eyes

  1. e.l.f. Coral Reef gold shade all over the lid.
  2. e.l.f. Coral Reef purple shade on the outer corner and lightly through the crease.
  3. MAC Shroom on the browbone.

Tarte‘s black gel liner to create the wing with Urban Decay Perversion mascara on my lashes.

Rest of the Face

  • Foundation: Boots No7 Stay Perfect in Deeply Ivory
  • Bronzer: e.l.f. Surf’s Up
  • Blush: essence Pinky Flow
  • Lips: Too Faced Melted Candy

20141114_look2-1

I had a bunch of freebie items from No7 (well, FREE if I spent enough money on the brand… which I had) that I wanted to try out and this was the look I got out of them.

20141114_look2-2

Eyes

I first lined my upper lash line and outer corner of my lower lash line with Boots No7 Metallic Eyes Pencil in Purple, then I applied:

  1. Boots No7 eye shadow in Violet Shine all over the lid and over the liner.
  2. MAC Sketch on the outer corner and through the crease.
  3. MAC Shroom on the brow bone.

Urban Decay Perversion mascara is on my lashes.

Rest of the Face

  • Foundation: Boots No7 Stay Perfect in Deeply Ivory
  • Bronzer: Hard Candy Hula Hula
  • Blush: Can’t remember!
  • Highlighter: MAC Soft & Gentle
  • Lips: Soap & Glory Raplumzel

20141114_look3-1

Playing around with e.l.f.’s Little Mermaid collection.

20141114_look3-2

Eyes

  1. e.l.f. High Tide gold shade on the inner third of the eye.
  2. e.l.f. High Tide blue shade on the middle of the lid.
  3. Inglot Matte 338 on the outer corner.
  4. Too Faced Chocolate Milk through the crease.
  5. MAC Shroom on the brow bone.

To line the outer corner of the lower lash line, I used MAC Phone Number pencil and then layered Inglot Matte 338 on top lightly. Urban Decay Perversion mascara is on my lashes.

20141114_look4-1

I love how this look came out from a visual perspective. It’s in no way flattering on its own (even though I’ve given you somewhat decent photos above) but it was a lot of fun to create. I was looking for orange cut creases online for Halloween and I found this as a source of inspiration/outright copying.

20141114_look4-2

Taken at the right angle, this look is BEAUTIFUL in photographs. I love the sharp edges and the vivid colour. I wore this to work the day before Halloween (hey, any excuse right?) and it sure did net me some reactions alright! lol

20141114_look4-3

Eyes

I first applied NYX‘s Jumbo Eye Shadow Pencil in Milk all over the lid and blended it out with my finger. I then applied:

  1. Sleek‘s neon orange from the Acid palette all over the entire lid, right up and over my crease.I then used Kat Von D‘s Tattoo Liner in Trooper and carved out the top of the crease (keep your eye open for this), and;
  2. used Urban Decay‘s Blackout to blend out the edge of the liner upwards.
  3. Urban Decay Foxy is on my brow bone.

I used Kat Von D‘s Tattoo Liner to create the enormous wing and dragged it into a tiny point on the inner corner of my eye. I lined my lower lash line and water line with Urban Decay‘sBlack Velvet pencil. Estee Lauder Sumptuous Infinite Daring Length + Volume Mascara is on my lashes.

Rest of the Face

  • Bronzer: NYC Fire Island Tan
  • Blush: Hard Candy Skinny Dipping
  • Lips: Benefit Ultra Plush Lip Gloss in Coralista

20141114_look5-1

Totally falling in love with this lip colour! Too Faced Melted Berry is absolutely beautiful and goes with a whole variety of looks (+obvious observation that it’s fall and it’s a dark lip shade, yadda yadda).

20141114_look5-2

Eyes

  1. MAC Vanilla pigment all over the lid.
  2. MAC Shag through the crease.
  3. MAC Expensive Pink on the outer corner.
  4. Wet n Wild Brulee on the brow bone.

Estee Lauder Sumptuous Infinite Daring Length + Volume Mascara is on my lashes.

Rest of the Face

  • Foundation: CoverGirl CC Cream in 110 Classic Ivory
  • Bronzer: NYC Fire Island Tan
  • Blush: Hourglass Luminous Flush
  • Highlighter: MAC Vanilla pigment