Category Archives: Makeup

5 Blushes for Spring & Summer

201404_5blushesforspringandsummer1

Is it time for bright cheeks yet? Could it be that spring is finally going to happen at some point? (Sources say no based on the amount of snow that Toronto got this past Tuesday… yikes!) Maybe we’ll skip right into summer – either one is fine, let’s just feel some heat already!

Stack ’em up!
Stack ’em up!

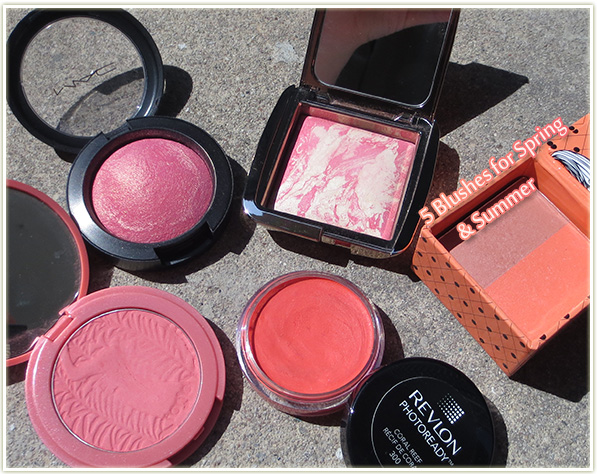
These are my top blush picks for the spring and summer. I’m a sucker for coral and orange shades, which, conveniently enough, is the theme of every spring and summer EVER!

Hard Candy - Skinny Dipping
Hard Candy – Skinny Dipping

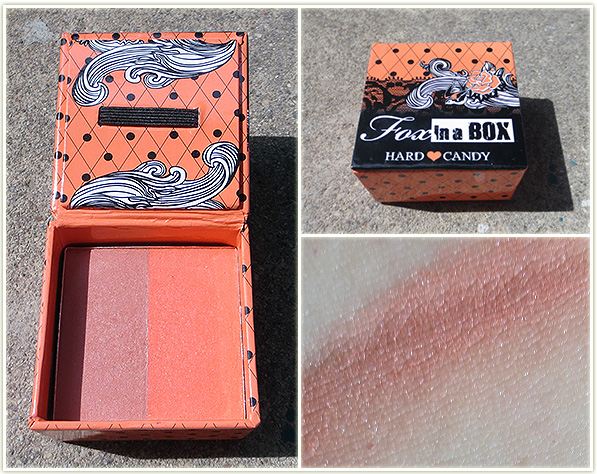
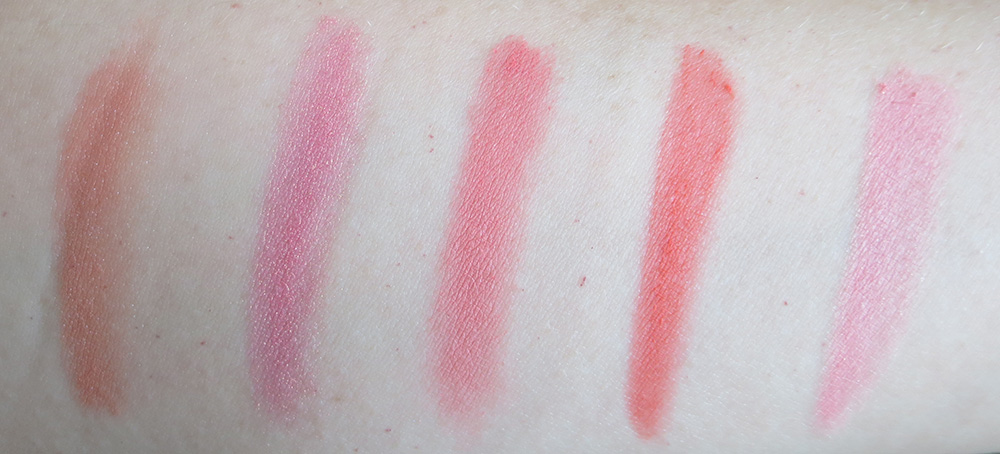
First up is Hard Candy‘s boxed powder blush (which they refer to as Fox in a Box) in the shade Skinny Dipping. The left side is more of a bronzer really and has a sheen to it. The right side is bright orange that seems rather matte. You could use them independently of each other, but I prefer to swirl my brush into the two shades and get the combined muted peach shade. It’s almost a boring shade – it really doesn’t look like much in my swatch does it? But this shade is really surprising on the cheeks. There’s an instant pick-me-up vibe to the shade that is really refreshing. This has been one of my most surprising blushes (in the sense that I wasn’t expecting to look as amazing as it actually did!

MAC – Petal Power
MAC – Petal Power

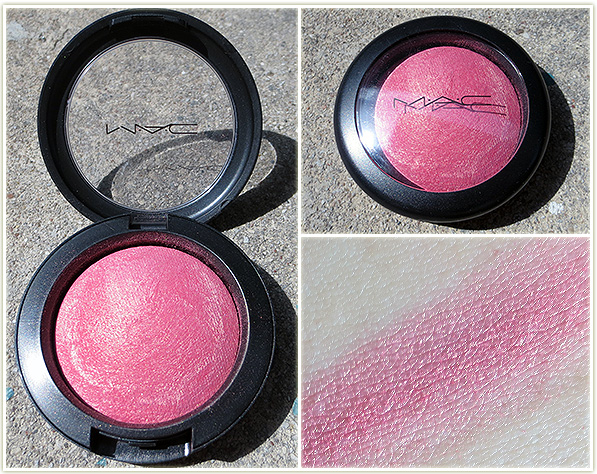
MAC recently came out with a collection for the spring called Fantasy of Flowers and this blush in Petal Power was part of that limited edition collection. Unfortunately it’s sold out online, but you may be able to still find them at free standing stores or counters (Edit: It’s part of the permanent collection now!). Petal Power is one of their mineralize blushes which usually means it has more dimension to it than a normal blush by MACPetal Power is no exception – this is a bright hot pink/coral shot through with gold shimmer (not glitter). Personally, I find mineralize blushes can be pretty hard to apply so I have to use a stiffer brush to apply them to my cheeks otherwise I don’t get enough product onto the brush. The nice thing about this shade, aside from the fact that it’s stunning, is that since there’s so much gold in the product, you don’t need to add highlighter to your cheekbones as the gold flecks in this product will set off your cheekbones anyway.

Tarte – Blissful
Tarte – Blissful

This is the first blush I ever owned and it’s my absolute favourite to this day. Tarte describes their Blissful blush as “warm peach”, but to me this is the very definition of the colour coral. The shade is completely matte and goes on the cheeks wonderfully. Tarte‘s Amazonian clay formula is pretty stiff in the pan, so I use a duo fiber brush to really stab at the product before buffing it onto my cheeks. This isn’t to say that the product doesn’t blend nicely, it does! It’s just something with the formula that seems to make it a harder blush. On me, this blush looks especially good in tandem with a shimmery bronzer.

Revlon - Coral Reef
Revlon – Coral Reef

Revlon‘s Photoready cream blush in Coral Reef is a strong orange coral. The texture of this product is pretty neat – it has a slightly waxy but slippery slicone-y feel. Fingers or a synthetic brush work really well to blend this into the cheeks. It goes on smooth and can be built up in light layers if you’re afraid of the vibrancy of the colour. Me though? Pack that on and blend out the edges and you’ll get a wonderfully flushed look.

Hourglass - Diffused Heat
Hourglass – Diffused Heat

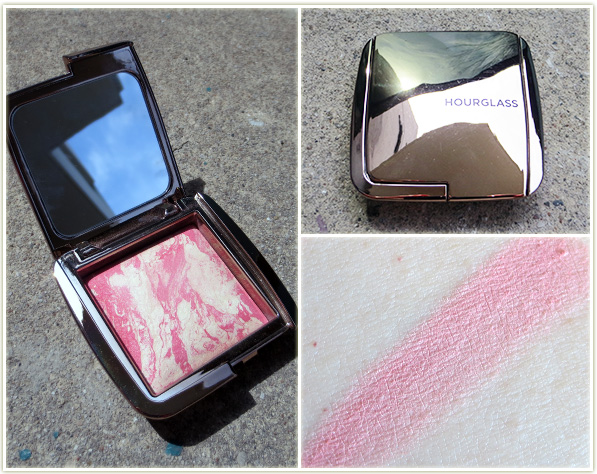
Hourglass‘ Ambient Lighting blush in Diffused Heat was such a huge shocker to me. In the pan it looks like a bright vibrant pinky-coral mixed with the Diffused Light powder. As a result, I  was expecting coral *something*. Instead, this swatches out, and applies like, a pale pink. This is almost a bit of a relief to me as I tend to focus too much on coral blushes and as a result don’t end up with much variety.

I said it the last time I mentioned this blush, but I’ll say it again: This blush is idiot-proof. The swatch above is heavy, but it doesn’t apply like that. It goes on softly and can be built up in intensity. The powder swirled into the mix ensures that the blush isn’t as stark or as bright as you would expect it to be by looking at it in the pan. This is an incredibly easy colour to wear and on my fair skin it’ll match pretty much any eye look I come up with.

My blishes pics - click to enlarge
My blishes pics – click to enlarge
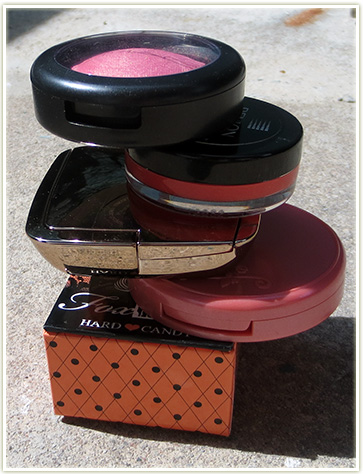
  1. Hard Candy’s Fox in a Box in Skinny Dipping
  2. MAC – Petal Power
  3. Tarte – Blissful
  4. Revlon – Coral Reef
  5. Hourglass – Diffused Heat

That’s my roundup! Any blushes you’re loving for the warmer months?

What’s On My Face – Volume 14

MOAR LOOKS

20140414_look2.1

I really like how this one turned out. Inglot‘s AMC Shine 24 is ridiculously amazing – one of my favourite eyeshadow colours ever. I love seeing how it pairs up with other colours and this one turned out to be a good match!

20140414_look2.2

Eyes

  1. Inglot AMC Shine 24 all over the lid.
  2. MAC Sushi Flower at the top of the crease.
  3. Makeup Geek Simply Marlena in the outer corner.
  4. Makeup Geek Burlesque to darken up the outer corner on top of Simply Marlena.

MAC Shroom to highlight the brow and L’Oreal Voluminous Carbon Black on my lashes.

Rest of the Face

  • Foundation: NARS Pure Radiant Tinted Moisturizer in Alaska (Light 2)
  • Bronzer: Physicians Formula Bronze Booster in Light/Medium
  • Blush: Hourglass Ambient Lighting Blush in Diffused Heat
  • Highlighter: MAC Mineralize Skinfinish in Soft & Gentle
  • Lips: NYX Butter Gloss in Strawberry Parfait

20140414_look4.1

I wish I knew how to photograph MAC‘s Vanilla Pigment – it has a beautiful pinky, orange sheen to it that just never seems to come across in photos I take. It’s a seriously stunning pigment, even though it looks rather white-ish here!

20140414_look4.2

Eyes (all MAC)

  1. Vanilla Pigment all over the lid.
  2. Charcoal Brown in the outer corner.
  3. Gorgeous Gold blended between the pigment and Charcoal Brown (that being said, I really don’t think it showed up all that much).
  4. Cork through the crease.

Too Faced Better Than Sex mascara on my lashes.

Rest of the Face

  • Foundation: Revlon Colorstay (Combination/Oily) in Buff
  • Bronzer: Physicians Formula Bronze Booster in Light/Medium
  • Blush: Tarte Exposed
  • Highlighter: Dior Amber Diamond
  • Lips: Revlon Cherries in the Snow

20140414_look5.1

This eye look turned out better than I expected, but I’m not showing you the full face shot because holy crap did I ever choose a bad lip colour to match with this (do NOT use MAC‘sDarkside, I looked ridiculous). Despite the bad lip choice, this is a really beautiful combination.

20140414_look5.2

  1. Makeup Geek Dirty Martini all over the lid.
  2. Makeup Geek Bitten in the outer third, through the crease and brought slightly down to the outer lower lashline.

MAC Shroom to highlight the brow bone and L’Oreal Voluminous Carbon Black mascara on my lashes.

20140414_look3.1

A play around with some of the goodies from Ipsy’s March 2014 bag.

20140414_look3.2

Eyes (NYX‘s Love in Rio – Segredos De Giselle)

  1. The cream coloured shade from the trio all over the lid.
  2. The brown shade in the outer corner and crease.

Too Faced Cream Colored Ponies to highlight the brow, Chella Indigo liquid liner to create the wing (this colour is amazing) and Too Faced Better Than Sex mascara on my lashes.

Rest of the Face

  • Primer: Pixi Flawless Beauty Primer
  • Foundation: MUA Matte foundation in Shade 1 Soft Sand
  • Bronzer: Physicians Formula Bronze Booster in Light/Medium
  • Blush: Sleek Chantilly
  • Highlighter: MAC Whisper of Gilt
  • Lips: Nothing

20140414_look1.1

This lip combination is seriously having me rethink my idea to no longer buying any lipglosses, especially when layered over a lipstick.

20140414_look1.2

Eyes (Too Faced Chocolate Bar palette)

  1. Cherry Cordial on the inner and outer third of the lid.
  2. Creme Brulee in the middle of the lid.
  3. Haute Chocolate through the crease.

Too Faced Champagne Truffle to highlight the brow bone and L’Oreal Voluminous Carbon Black on my lashes.

Rest of the Face

  • Foundation: CoverGirl CC Cream in 110 Classic Ivory mixed with Bourjois Healthy Mix Serum in 51 Light Vanilla
  • Bronzer: Physicians Formula Bronze Booster in Light/Medium
  • Blush: Wet n Wild Pearlescent Pink
  • Lips: Wet n Wild Red Velvet (901D) with MAC Strawberry Malt lipglass on top

The Unmentionables

201404_theunmentionables

I absolutely adore these products. I use them every  single time I do my makeup. But it gets incredibly repetitive saying that I use them every time I do a makeup look because really… these products aren’t changing in my routine any time soon and it’s not like you need to hear what primer I used unless I actually change it up, right?

So here are my unmentionables… and they’re only unmentionables because they’re too well loved!

The Tools – Tweezerman eyelash curler and an old mascara wand

Nothing glamorous about these two but they’ve ingrained themselves into my daily makeup routine.

The eyelash curlers are self explanatory – They’re a pair of Tweezerman ones I picked up at Shoppers Drug Mart several years ago. I’ve run out of the rubbery things to replace on the band, but they’re still working just fine as far as I can tell. (Although… side note, where the heck do you actually get replacement rubber thingies?!)

The old mascara wand is from a tube of L’Oreal Voluminous that I cleaned up and use as a spoolie for running through my brows when I’ve applied too much powder through them. Works like a charm, so why bother paying for an actual spoolie?

The Eye Primers – Urban Decay Primer Potion and NARS Pro Prime

Double primers because, for whatever reason, using only one of them no longer seems to work on me. I use the NARS one first, allow it to dry, then apply the Urban Decay one on top. These two together ensure that my eyeshadows don’t budge all day.

The Lip Primer – MAC Prep + Prime for lips

MAC‘s Prep + Prime for lips has been an absolute lipstick saviour for me. I was a really timid lipstick wearer until about three years ago. My major problem was that my lipstick, no matter what brand I used, would slide all over the place and bleed outside my lip lines. Lip liner never worked for me. Nor concealer. Someone at a MAC counter eventually suggested this primer and I was incredibly skeptical… how much better was this REALLY going to be? Well… it is. It just flat out is. My lipstick stays on my lips and doesn’t bleed outside my line. I won’t wear lipstick without this now!

The Brow Filler-Iner – MAC eyeshadow in Omega

I’ve been using MAC‘s eyeshadow in Omega to fill in my brows for the last two years and I’m only just now getting to the bottom of the pan. The colour is a perfect match for my barely there blonde eyebrow hairs. I’ve been surprised at the longevity of this product too – it doesn’t wear off during the day and that’s a necessity for me since my brows are so blonde it looks like I’ve overplucked them to hell and back. (I haven’t, the hairs just don’t seem to grow where the tail of my brows are supposed to be.)

All of these products are part of my daily routine and won’t be changing any time soon. They’ve all attained holy grail status in my collection. Is there anything you use in your daily routine that you can’t be without? I’m at the point where I don’t even want to test out replacement products or tools because these are already so good as is!

What’s On My Face – Volume 13

Another week, another set of looks. I even tried out some of the new spring trends that everyone keeps mentioning (white eyeshadow, orange lips). Keep on reading if you’re looking for some kind of inspiration!

20140407_look5.1

This is my absolute favourite look that I’ve come up with from the Laura Mercier Artist (2013) palette. I don’t usually apply dark(er) colours on the lid because I think it’ll interfere with the crease/outer corner colour, but when I do, I usually like the result!

20140407_look5.2

Eyes (all Laura Mercier)

  1. Bamboo all over the lid.
  2. Espresso Bean in the outer corner.
  3. Fresco through the crease.

Vanilla Nuts to highlight the brow bone. MAC Blacktrack fluidline to create the wing, Too Faced Better Than Sex mascara on my lashes and MAC Omega eyeshadow through my brows.

Rest of the Face

  • Foundation: nothing
  • Blush: Physicians Formula Happy Booster Blush in Natural
  • Lips: Maybelline Vivids in Neon Red

20140407_look2.1

I’ve said it before and I’ll say it again… this is the kind of bright, vibrant look that just makes me outright happy. I got back from trip to the US and just had to dive straight into the vividInglot shades I’d picked up.

20140407_look2.2

Eyes

  1. Inglot 343 all over the lid.
  2. Inglot 317 in the outer corner.
  3. Makeup Geek Creme Brulee very lightly at the top of the crease.

MAC Shroom on the brow bone. Tarte Amazonian clay waterproof gel liner in Black to create the wing, Too Faced Better Than Sex mascara on my lashes and MAC Omega through my brows.

Rest of the Face

  • Foundation: CoverGirl CC Cream in 110 Classic Ivory mixed with Bourjois Healthy Mix Serum in 51 Light Vanilla
  • Blush: Milani Luminoso
  • Bronzer: Physicians Formula Bronze Booster in Light/Medium
  • Lips: NYX Butter Gloss in Creme Brulee

20140407_look1.1

I first saw this look on Sharon Farrell’s YouTube channel (direct tutorial link here). I think it looked really simple and stunning on her (and apparently it’s trendy right now), but I think it looks a little stark on me. That being said, zoomed in on the eye, I really love it. No eye guide for this one because it’s ridiculously simple!

Eyes

  • NYX Jumbo Eyeshadow pencil in Milk all over the lid, smooth it out for your finger or a brush.
  • Using the white from the Sleek Acid palette, apply it right on top of Milk. I had to really, REALLY pack this on so I can’t say I recommend this white shade. Use another white with more pigment if you have it. Blend it up to the brow, but don’t actually cover the brow with it – make sure it fades out before it hits your browbone.
  • I then applied a lot of coats of Too Faced‘s Better Than Sex mascara on my upper and lower lashes.

Rest of the Face

  • Foundation: CoverGirl CC Cream in 110 Classic Ivory
  • Bronzer: Revlon Photoready in Bronzed & Chic
  • Blush: Illamasqua Hussy
  • Highlighter: MAC Silver Dusk


20140407_look3.1

Another trend for spring (as I keep hearing, I’m really not trendy at all) is orange lips. This is the most wearable orange lip I have so I decided I’d start with this one before trying out another one I’ve got that’s a lot more vibrant.

20140407_look3.2

Eyes (all Too Faced Chocolate Bar palette)

  1. White Chocolate all over the lid and to highlight the brow.
  2. Salted Caramel in the outer corner.

Tarte Amazonian clay waterproof gel liner in Black to create the winged liner and L’Oreal Voluminous Carbon Black mascara on my lashes.

Rest of the Face

  • Foundation: none
  • Blush: MAC Gingerly
  • Highlighter: Too Faced Absolutely Invisible Candlight powder
  • Lips: Maybelline Vivid in Vibrant Mandarin

20140407_look4.1

There’s a MAC shade in my collection that I’m desperate to get rid of (Fade) so I tried to construct a look around that shadow.

20140407_look4.2

Eyes

  1. Maybelline Color Tattoo in Waves of White on the inner half of the lid.
  2. MAC Fade on the middle of the lid.
  3. MAC Freshwater on the outer third of the lid.

MAC Blanc Type to highlight the browbone, L’Oreal Voluminous Carbon Black mascara on my lashes and Chella Indigo liquid liner to create a very thin line.

Rest of the Face

  • Foundation: none
  • Blush: Physicians Formula Happy Booster in Natural
  • Lips: Sephora Color Reveal Balm in Unique Pink

Challenge Week: Naked 3

I had this idea that is neither unique, nor ingenious, but I liked the idea of it. Every now and again I get the idea to use a single eyeshadow palette for a week. It gets me out of a rut of always using that palette in the exact same way every time I pull it out.

Since Urban Decay‘s Naked 3 palette is relatively new, I thought I’d start with that one. Not going to lie, I looked up a few tutorials to give myself some extra inspiration (and/or flat out copied some of them!). It was a fun week of getting to know the Naked 3 palette a little bit better. I’m far more in love with this palette now, especially the darker, taupier shades in the palette that I hadn’t been so sure about (I mean, at one point, they were all starting to look like Mushroom to me).

So anyway, on with the looks. I used Naked 3 exclusively on my eyes for a week. There are only six looks because I didn’t wear any makeup on the Sunday of the week I was doing this.

20140324_look4.1

This look is courtesy of Cora‘s Naked Cranberry tutorial. I would never have thought to put the colours together like this so I’m glad she did! Although this is not my own original look, this is definitely my favourite look out of all of them.

20140324_look4.2

Eyes: 

  1. Limit through the entire socket, all the way to the nose.
  2. Darkside on the outer third of the eye, fade it out towards the center of the lid.
  3. Mugshot on the middle of the lid.
  4. Liar on the inner third of the lid.

Strange on the browbone and apply Blackheart as a very thin liner right along the lashline. L’Oreal Voluminous Carbon Black on my lashes.

Rest of the Face

  • Foundation: Revlon Colorstay (Combination/Oily) in Buff
  • Bronzer: Physicians Formula Bronze Booster in Light/Medium
  • Blush: Tarte Exposed
  • Lips: Rimmel Apocalips in Celestial

20140324_look2.1

I looove how the winged liner turned out on this one. Slight side effect of it though; it transfers to your upper lid pretty quickly.

20140324_look2.2

Eyes:

  1. Dust all over the lid.
  2. Buzz in the outer corner.
  3. Limit to blend out the crease.
  4. Blackheart applied as a winged out liner with MAC Blacktrack on top (but not to the point where it overwrites the soft edge of Blackheart).

Strange to highlight the brow bone. L’Oreal Voluminous Carbon Black on my lashes.

Rest of the Face

  • Foundation: Bourjois Healthy Mix Serum in 51 Light Vanilla
  • Bronzer: Physicians Formula Bronze Booster in Light/Medium
  • Highlighter: MAC Silver Dusk
  • Blush: Wet n Wild Heather Silk
  • Lips: MAC Boldy Bare lip pencil with MAC Cyndi on top

20140324_look3.1

This look uses my favourite colour out of the entire palette: Trick – the one true rose-gold shade out of all 12 of them.  I’ve heard that you can apply it wet to punch up the colour a little bit and I’ll have to try that the next time as I used it dry here.

20140324_look3.2

Eyes:

  1. Trick all over the lid.
  2. Nooner in a “C” shape on the outer corner.
  3. Limit to blend out the crease.

Strange on the browbone, L’Oreal Voluminous Carbon Black on my lashes.

Rest of the Face

  • Foundation: None
  • Bronzer: Joe Fresh Sand Bronzer
  • Blush: MAC Warm Soul
  • Lips: Revlon ColorBurst Lipgloss in Sunset Peach

20140324_look1.1

Not gonna lie, the looks seriously start to meld together after a while. This one’s okay… not especially breathtaking in my eyes.

20140324_look1.2

Eyes:

  1. Mugshot all over the lid.
  2. Blackheart in the outer corner.
  3. Strange to blend out the crease.

Strange on the browbone, L’Oreal Voluminous Carbon Black on my lashes.

Rest of the Face

  • Foundation: MUA matte foundation in Shade 1 Soft Sand
  • Bronzer: Physicians Formula Bronze Booster in Light/Medium
  • Concealer: Collection Lasting Perfection in Shade 2 Light
  • Blush: Physicians Formula Happy Booster Bronzer in Natural
  • Lips: NYX Tiramisu

20140324_look6.1

Quick, easy one for Saturday brunch!

20140324_look6.2

Eyes:

  1. Strange on the inner half.
  2. Liar on the outer half.
  3. Limit in the outer corner and through the crease.

Strange on the browbone, L’Oreal Voluminous Carbon Black on my lashes.

Rest of the Face

  • Foundation: Bourjois Healthy Mix Serum in Shade 51 Light Vanilla
  • Bronzer: Physicians Formula Happy Booster 2 in 1 Bronze/Rose (Bronzer side used)
  • Blush: Physicians Formula Happy Booster 2 in 1 Bronze/Rose (Rose side used)
  • Lips: NYX Peaches and Cream

20140324_look5.1

Bit of a darker one!

20140324_look5.2

Eyes:

  1. Blackheart in the outer and inner third of the eye.
  2. Buzz on the middle of the lid, blend it into Blackheart on both sides.
  3. Limit through the crease to blend out all the edges.

Strange on the browbone, L’Oreal Voluminous Carbon Black on my lashes.

Rest of the Face

Foundation: MUA Matte Foundation in Shade 1 Soft Sand
Bronzer: Physicians Formula Bronze Booster in Light/Medium
Blush: Illamasqua Hussy
Lips: MAC Tinted Lip Conditioner in Petting Pink


And that’s it for the week! I hope you found some inspiration or ideas for your own Naked 3 eyeshadow combinations. Now to dig through my collection and see what palette I’ll use next for another challenge week…