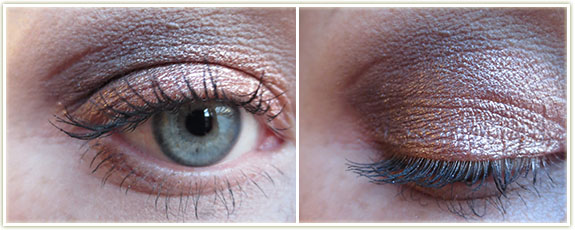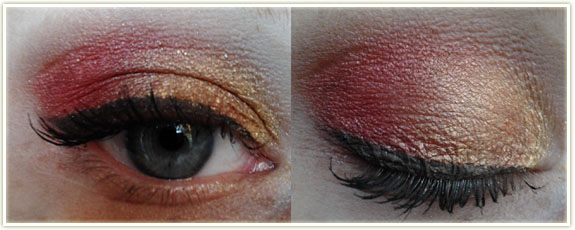
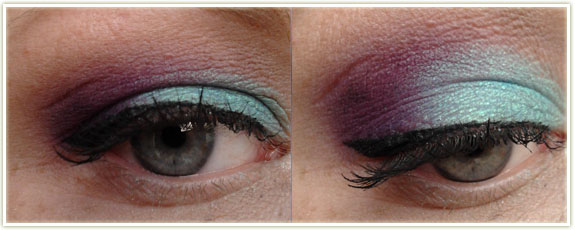
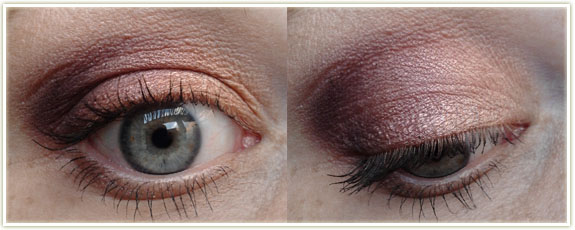
This turned out near identical to another look I normally do using MAC’s Mineralize eyeshadow duo in Heat: Element that I got a few years back.
Base: Urban Decay Primer Potion (Original) with Maybelline’s Color Tattoo in Bold Gold layered over the inner two-thirds of the eye.
Eyeshadows: Sleek’s Sunset palette – the gold shade was used on the inner half of the eye, with the vivid cranberry shade on the outer half of the eye. Urban Decay’s Buck was blended at the top of the crease. MAC’s Brule was used as a brow highlight.
Liner: MAC’s fluidline in Dipdown
Mascara: CoverGirl Clump Crusher in Very Black (in the water resistant variety, but I need to point out that is very NOT water resistant despite it being a fantastic mascara)
Looking at this now, I can see some creasing on the lid and these shots were taken right after application I believe. Regardless, I love that Color Tattoo (Waves of White) so in general I was pretty pleased with the outcome.
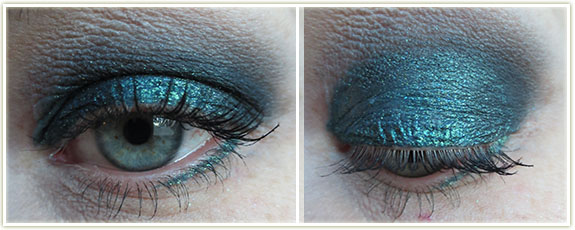
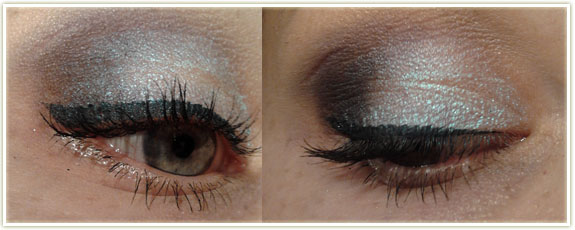
Base: Urban Decay Primer Potion (Original)
Eyeshadows: Maybelline’s Color Tattoo in Waves of White on the inner two-thirds of the lid. MAC’s Contrast blended into the outer half of the lid, with Parfait Amour in the upper crease (very lightly since colour payoff with this shadow is not amazing). MAC’s Brule was used as a brow highlight. I then sprayed an angled liner brush with MAC’s Fix+ and dipped it in MAC’s Iridescent Powder in Silver Dusk and used it as a liner across the outer half of the lower lid.
Liner: MAC’s Midnight Blues was used to create the upper winged liner.
Mascara: CoverGirl’s Clump Crusher in Very Black (water resistant)
Someone at work called this a full on peacock look – I’ll take that compliment!
Base: Urban Decay Primer Potion (Original)
Eyeshadows: Inglot’s AMC Shine 33 on the inner two-thirds of the lid. Sleek’s Sugarlite (Matte Brights palette) on the outer third. Urban Decay’s Buck blended into the crease, with MAC’s Brule as a brow highlight.
Liner: Maybelline’s Eyestudio Lasting Drama Gel Eyeliner in Blackest Black (not a fan of this product), I’m just trying to use it up)
Mascara: CoverGirl’s Clump Crusher in Very Black (water resistant)
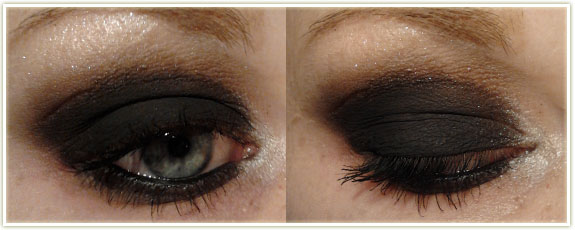
I was mucking around at home trying to do a “wearable to the office” type black eye. I quite like how this turned out and will probably end up wearing it to work one day. Also slightly Tron-esque which just makes it even more awesome.
Base: Urban Decay Primer Potion (Original)
Eyeshadows: Urban Decay’s Blackout all over the lid, into the crease and the smudged along the lower lashline. Buck was blended into upper crease. MAC’s Silver Dusk was used as a brow highlight and on the inner tearduct.
Liner: MAC’s Kohl Power in Feline on the inner waterline.
Mascara: CoverGirl’s Clump Crusher in Very Black (water resistant)
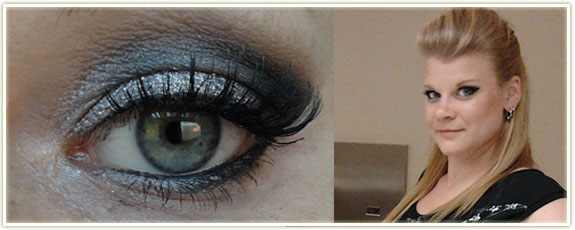
This was a fun one. We had a Rock N Roll-themed event at work and I took full advantage of being able to wear false lashes and glitter to work without thinking twice about it! While the end result ended up looking less rocker on my face than I’d intended, I still loved it.
Base: Urban Decay Primer Potion (Original)
Eyeshadows: I used a piece of sticky tape to create a sharp outer edge and then removed it once my makeup was completed. MAC’s Electra all over the lid. Urban Decay’s Blackout in the outer corner and then blended slightly into the crease. Urban Decay’s Buck was use to blend out the harsh line of the black in the upper crease and MAC’s Blanc Type was used to highlight the brow bone. Electra was also used to line the inner half of the lower eyelid and Blackout on the outer half.
After all the blending was done, I used Too Faced’s Glitter Glue and applied that all over Electra on the lid. I then stuck my finger into Tony & Tina’s Cosmic Lights Glitter in Gateway (this product is probably about ten years old and unfortunately the company has since gone under. Any silver glitter will do.) and applied that over the glitter glue.
Liner: MAC’s Kohl Power in Feline on the lower waterline and Physicians Formula Eye Booster on the upper lashline (mostly to hide the false lashes).
Lashes: Ardell 102 Demis
Mascara: CoverGirl’s Clump Crusher in Very Black (water resistant)
Face: Revlon Colorstay (Combination/Oily) in 220 Natural Beige. Physicans Formula Happy Booster Bronzer in Light was used for contouring and as a blush. MAC’s Silver Dusk was used as a cheek highlight as well. MAC Omega through the brows.
This one is a “go to” for me when I want something I know that is easy and tends to go with most things I wear. I find that Sketch is quite flattering on me and I never seem to go wrong when I use that shade.
Base: Urban Decay Primer Potion (Original)
Eyeshadows: MAC’s All That Glitters on the inner third of the lid, Star Violet on the middle third and Sketch on the outer third of the eye. Naked Lunch used to highlight the brow bone and blend out Sketch. For the lower lid, I used All That Glitters on the inner half and Star Violet on the outer half.
Liner: None (although I will often use some kind of black liner for an extra punch)
Mascara: CoverGirl’s Clump Crusher in Very Black (water resistant)